Crochet Easter Bunny Pin Pattern
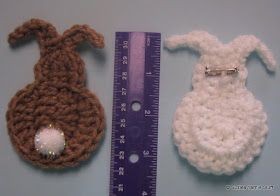
Create your very own adorable Crochet Easter Bunny Pin with this easy-to-follow pattern! This cute little accessory is perfect for adding a touch of Easter charm to your outfit or for gifting to a loved one. The pattern includes step-by-step instructions and helpful tips to guide you through the process, making it suitable for both beginners and experienced crocheters. With this pattern, you can customize your bunny pin by adding embellishments like a tiny bow, a flower, or even a mini Easter egg. Let your imagination run wild and make each bunny pin unique! Whether you're a crochet enthusiast or just looking for a fun Easter project, this Crochet Easter Bunny Pin pattern is sure to bring joy and smiles. So grab your crochet hook and get ready to create a delightful accessory that will make everyone hop with happiness!
Materials
Worsted weight yarn
G (4.25mm) crochet hook
1/2-3/4 inch pin back
½ inch pom pom for tail
4mm eyes
4mm pink pom pom
1/8 inch ribbon
Yarn needle
Glue gun and glue stick or needle and matching thread
Instructions
Body and Head
Leaving a 6 inch tail, ch 7
Round 1: 2 sc in 2nd from hook, sc next 2 st, dc in next 2 st, 7 dc in next st, dc in 2 st, sc in 3 st, slipstitch in top of first sc.
Round 2: Ch 1, 2 sc in 2 st, slipstitch in next st, sc in next 2 st, 2 dc in 9 st, sc in next st, slipstitch in next st, 2 sc in next 2 st. Join with slipstitch in top of first sc. DO NOT fasten off.
Bent Ears
Ch 5, slipstitch in 2nd and 3rd ch from hook, 2 sc in next st, hdc in last ch, slipstitch in next st of head. Slipstitch in next st of head, ch 7, slipstitch in 2nd and 3rd ch from hook, sc in next ch, sc dec over next 2 ch, hdc in last ch, slipstitch in next st of head.
Fasten off. Using beginning tail, working on back, weave in stitches of round one to close any gaps in center.
Straight Ears
*Ch 5, slipstitch in 2nd ch from hook, sc in next 2 ch, hdc in last ch, slipstitch in next st of head. Slipstitch in next head st and repeat from * for second ear. Fasten off.
Finishing
Using beginning tail, working on back, weave in stitches of round one to close any gaps in center.
Glue (or sew) pin back to wrong side of head. Glue pom pom to bottom on right side for tail.
For a front view bunny glue 2 4mm wiggly eyes and a 4mm pink pom pom for nose to face. Make a bow out of 1/8 inch ribbon and glue to neck.
For a fridgie, glue a magnet to the back instead of the pin back.


