Bunny Body, To start:
ch 34, join with a sl st, ch 1.
Tail and Foot Shaping
Rnd 1: Sc around, Work continuously without joining at the end of each round.
NOTE: Mark your work in two places: the beginning of the round and again at the halfway point. You may want to use different colors so you will know your starting point. The beginning of each round is the backside of the bunny; the halfway point is the front or belly of the bunny. All increases (inc) and decreases (dec) will be made at these two points (beginning/end, halfway point) to form the bunny shape, which is relatively flat. Periodically move the markers up as you progress up through the rounds.
You may want to use a counter to keep track of rows or, if you lose your place, simply count up the rows.
Rnd 2: Inc, sc up to the st just before the marked halfway point and inc in this st, sc in next (marked) st), inc, sc around to the 2nd to last st and inc, sc.
Rnd 3: Sc around.
NOTE: Your work will want to turn inward, so be sure to keep it turned correctly so that the right side of your work is out.
Rnds 4-6: These three rounds will be dec rounds. All decreases will be made by inserting hook into the next st, yo, hook into following st, yo, draw yarn through all 3 loops on hook (dec made).
Dec, sc to around to 2 st before the halfway point, dec, sc, dec, sc up to the last 2 st in the round, dec.
Back and Belly Shaping
Rnd 7: Inc in next 2 st, sc up to the 2 st before the halfway point, dec, sc, dec, sc around to the two st before the mark at end of the round, inc in these 2 st.
Rnd 8: Sc around.
Rnd 9: Sc to halfway pt, inc, sc around to the end.
Rnd 10: Dec, sc around to the final 2 st, dec.
Rnd 11: Dec, sc around to the halfway pt, inc, sc to the last 2 st, dec.
Rnd 12: Dec, sc around to the first st before the halfway pt, inc, sc, inc, sc to the last 2 st, dec.
Rnd 13: Dec, sc around to the last 2 st, dec.
Rnd 14: Dec, sc around to the 2 st before the halfway pt, dec, sc, dec, sc to the last 2 st, dec.
Neck and Head Shaping
Rnd 15-16: Dec, sc to the halfway pt, dec, sc to the last 3 st, dec, sc.
Rnd 17: Sc to the halfway pt, dec. sc to the end.
Rnd 18: Inc, sc around to the last 2 st, inc, sc.
Rnd 19: Inc (2), sc to the st before the halfway pt, inc, sc, inc, sc to last 2 st, inc (2).
Rnd 20: Inc, sc to the st before halfway, inc, sc, inc, sc to the last 2 sts, inc, sc.
Rnd 21: Inc, sc to 2 sts before halfway pt, inc (2), sc, inc (2), sc to the last 2 sts, inc, sc.
Rnd 22: Sc to the st before the halfway pt, inc, sc, inc, sc to the end.
Rnd 23: Dec, sc around to the last 3 st, dec. sc.
Rnd 24: Dec, sc to the 2 st before the halfway pt, dec (2), sc to last 3 sts, dec, sc.
Rnd 25: Dec, sc to 3 st before the halfway pt, dec (3), sc to the last 3 st, dec, sc.
Rnd 26: Sc to 3 st before the halfway pt, dec (2), sc to the end.
Ear shaping
Rnd 27: Inc, sc to 2 st before halfway, dec, sc to the last st, inc.
Rnds 28-30: Inc, sc to 1 st before halfway pt, dec, sc to the last st, inc.
Rnds 31-32: Inc, sc to halfway pt, inc, sc to last st, inc.
Rnd 33: Sc around.
Rnds 34-35: Sc to halfway pt, dec, sc to end.
Rnd 36: Sc around.
Rnd 37: Sc to halfway pt, dec, sc to end.
Rnd 38: Sc around.
Rnds 39-40: Sc to halfway pt, dec, sc to end.
Rnd 41: Dec around.
Rnd 42: (Sc, dec) around.
Cut yarn leaving a 5” (13 cm) tail. Close up tip of ear and secure yarn ends.
Stuff bunny with poly fiberfil.
Base: The base is two parts that are layered together to form a firm stand for the bunny.
Using a G (4 mm) hook and the same yarn as bunny body, ch 12.
Rnd 1: 2 sc in 2nd st from hook, sc in next 9 sts, 3 sc in last st, sc 10 sts, join with sl st.
Rnd 2:Ch 1, 2 sc in same st, sc in next 11 sts, 2 sc in next st, sc in next 12 st, join w sl st. Leave 15 in (30 cm) tail.
For second base part, repeat Rnds 1-2 plus add a third round as follows:
Rnd 3: Ch 1, 2 sc in same st, sc in next 13, 2 sc in next st, sc in next 13, join w sl st, Leave 18 in (46 cm) tail.
Center smaller base on larger base and, using the tapestry needle and the yarn tail from the smaller one, st tog. Using the remaining yarn tail, st base to the bunny filling in with more stuffing, if needed.
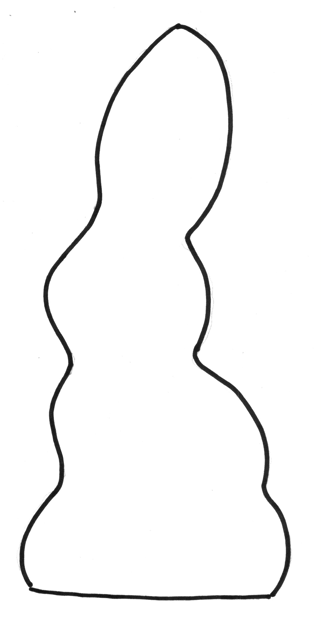
You can check the progress of your bunny’s shape by laying it on this provided outline. You will likely need to "capture" this template by right clicking on it and saving it so you can print it out. It should measure about 8 inches (20.5 cm) high.

