Crochet Easter Bunny
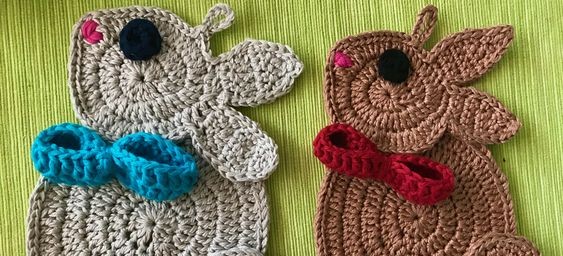
Create your very own handmade Easter Bunny with the art of crocheting! This adorable project is perfect for adding a personal touch to your Easter decorations or for gifting to loved ones. By using different colored yarns and various crochet stitches, you can customize your bunny to make it unique and special.
This Bunny is very easy and quick to make.
The pattern uses only basic crochet stitches - double crochets, single crochets and chains.
The pattern was made with YarnArt Begonia: 100% cotton, mercerized cotton, 50g/1.76oz = 169m/185yrds
Crochet hook: 3.00 mm.
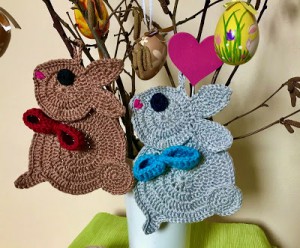
Difficulty Level: Level 1 – Easy, for beginners
US crochet term:
SlSt – slip stitch
CH/s – chain/s
DC - double crochet
HDC - half double crochet
SC - single crochet
SK - skip
T - turn
ST/s - stitch(es)
REP - repeat
Special stitches used:
Single Crochet Decrease (sc2tog)
A crochet decrease makes the current row or round that you are working on shorter than the one previous to it.
Insert hook into the first stitch.
Yarn over and draw through the loop.
Do not complete the stitch as normal.
Instead, insert the hook into the next stitch.
Yarn over and draw through the loop.
There should now be three loops on your hook
Yarn over and draw through all three loops on the hook
You should now have two single crochet stitches side-by-side, joined together into one stitch at the top.
PATTERN NOTES
1) A ch3 at beg of the first row counts as a stitch throughout.
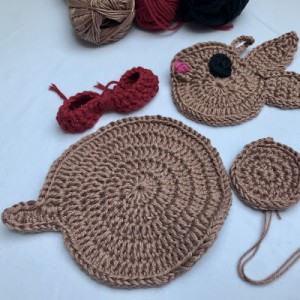
2) The project is crochet as 4 circles. One circle is for a head, one for a body and one for a tail, and a small circle for an eye. These parts are worked in spiral rounds, without joining rounds. Do not join rounds.
3) You can make Bunnies bigger or smaller with a thicker/thinner yarn or a larger/smaller hook size.
4) You need 4 colours:
colour A = for bunny = brown or shadow
colour B = for eye = black or dark shadow or navy blue etc.
colour C = for nose = pink
colour D = for bow = red, blue, green or any colour you like
There 5 parts:
1) BODY with PAW
2) HEAD with NOSE and 2 EARS
3) EYE
4) TAIL
5) BOW
6) I used 2 strands together to have a bunny thicker
THE WRITTEN PATTERN
1) BODY with PAW
colour A
Make a magic ring.
R1: ch3 (work as a dc), work 13 dc into the magic ring (14dc)
R2: 1hdc and 1dc in the 1st st from R1 (on the top of ch3), 2dc in each next st around (28 st)
R3: rep *2 dc in next 2 st, 1dc in next st* rep from * to * till end of row (45 dc)
R4: rep *2 dc in next st, 1dc in next st* rep from * to * till end of row (66 dc)
R5: rep *2 dc in next st, 1dc in next 2 st* rep from * to * till end of row (88 dc)
Make a paw: ch4, 1hdc in first ch from hook, 1hdc in next ch, 1dc in next 2 ch.
You reach the "body", around last dc in this row place 3 dc.
R6: sk 2st, sl st in each st around till end of row
Cut the yarn, fasten off and wave all ends
2) HEAD with NOSE and 2 EARS
colour A
Make a magic ring.
I would recommend you to leave a longer end (approx. 7.8 inch / 20 cm) and use this end to join the head with the body.
R1: ch3 (works as a dc), work 13 dc into the magic ring (14dc)
R2: 1hdc and 1dc in the 1st st from R1 (on the top of ch3), 2dc in each next st around (28 st)
R3: rep *2 dc in next 2 st, 1dc in next st* rep from * to * 3 time (you will have 20 dc), you are in the middle of R3
1tr in next 4 st
rep *2 dc in next 2 st, 1dc in next st* rep from * to * till end of row
(45 dc in total in R3)
Now make an ear:
R1: 1hdc in next st, 1 sc in next 4 st, turn your work (4sc)
R2: ch1, 1sc in fist st, 2 sc in next st, 1 sc in next 2 st, turn (5sc)
R3: ch1, 1sc in fist st, 2 sc in next st, 1 sc in next 3 st, turn (6sc)
R4: ch1, 1sc in each st, turn (6sc)
R5: ch1, 1sc in each st, turn (6sc)
R6: ch1, 1sc in fist st, sc2tog, 1 sc in next 3 st, turn (5sc)
R7: ch1, 1sc in fist st, sc2tog, 1 sc in next 2 st, turn (4sc)
R8: ch1, 1sc in fist st, sc2tog, 1 sc in next 1 st, turn (3sc)
R9: ch1, 1sc in fist st, sc2tog, turn (2sc)
R10: ch1, sc2tog (1sc)
10 slip stitches in last st of each row, work from top (R10) of ear down (R1)
when you reach circle, "the head", work a sl st and make the second ear, repeat the pattern for Ear:
R1: 1 sc in next 4 st, turn your work (4sc)
R2: ch1, 1sc in fist st, 2 sc in next st, 1 sc in next 2 st, turn (5sc)
R3: ch1, 1sc in fist st, 2 sc in next st, 1 sc in next 3 st, turn (6sc)
R4: ch1, 1sc in each st, turn (6sc)
R5: ch1, 1sc in each st, turn (6sc)
R6: ch1, 1sc in fist st, sc2tog, 1 sc in next 3 st, turn (5sc)
R7: ch1, 1sc in fist st, sc2tog, 1 sc in next 2 st, turn (4sc)
R8: ch1, 1sc in fist st, sc2tog, 1 sc in next 1 st, turn (3sc)
R9: ch1, 1sc in fist st, sc2tog, turn (2sc)
R10: ch1, sc2tog (1sc)
10 slip stitches in last st of each row, work from top (R10) of ear down (R1)
when you reach circle, "the head", work 1 sl st in next 3 st
now make a tag (it is optionally), you can skip this part and keep continue crocheting slip stitch in each st till end of row.
A tag: ch12, sl st in st you started chain
st sl in each st till end of row
NOSE
colour C
With a tapestry needle, embroider the nose on the head, embroider the nose as a triangle shape or heart shape around 4 triple crochet st. Start with the yarn on the top of 4th triple crochet for the bottom of the nose and worked across the 3 triple stitches in the rows above. Wrap yarn several times so the nose puffs out from the head.
3) EYE
Use colour B
Make a magic ring.
R1: ch1 (don't work as a dc), work 8 sc into the magic ring (8 sc)
R2: sl st into each st around (8 sl st)
Cut the yarn, leave a longer end (approx. 7.8 inch / 20 cm) and use this end to join the eye with the head.
Place Eye on Body approx on R2 between "nose" and tag.
Sew the eye on the head.
4) TAIL
Use colour A
Make a magic ring
I would recommend you to leave a longer end (approx. 7.8 inch / 20 cm) and use this end to join the tail with the body.
R1: ch1, 8 sc into the magic ring (8sc)
R2: 2 sc in each st around (16sc)
R3: rep *2sc in next st, 1 sc next st* rep from * to * till end (24sc)
R4: rep *2sc in next st, 1 sc next 2 st* rep from * to * till end (32sc)
R5: st st in each st around (32 sl st)
Cut the yarn, leave a longer end (approx. 7.8 inch / 20 cm) and use this end to join the tail with the body.
5) BOW PATTERN
Use colour D
Make a slip knot, leave a longer end - you will need it to make a bow
ch30, sl st into first ch and create a ring
Make sure the chain is NOT twisted.
R1: ch3, 1dc in each st around till end of row, st sl in 3rd ch from beg (30dc)
R2: ch3, 1dc in each st around till end of row, st sl in 3rd ch from beg (30dc)
Cut the yarn leave a longer end - you will need it to make a bow.
Fold a bow in the middle, right side facing up, the begging/ending is in the middle. Use both ends and wrap the middle part up several times. Tighten the ends as much as you can. Make 2 knots.
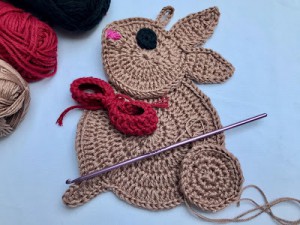
FINISHING with a tapestry needle
Sew the head to the top of the body, start with the yarn on the 4th row of the head, align the tag and the center of the body.
Sew the bow on the body, place a bow under the head, align the middle of the bow and the center of the head.
Sew the tail on the body, start approximately with the yarn on 20th dc of the 5th row of the body, the center of the tail is just on the edge of the body.
Weave in all ends.
MEASUREMENT
Body: 4.33 inch / 11 cm, Paw: 0.79 inch / 2 cm
Tail: 1.57 inch / 4 cm
Head: 2.76 inch / 7 cm, Ears: 2 inch / 5 cm
Bow: 3.15 inch / 8 cm

