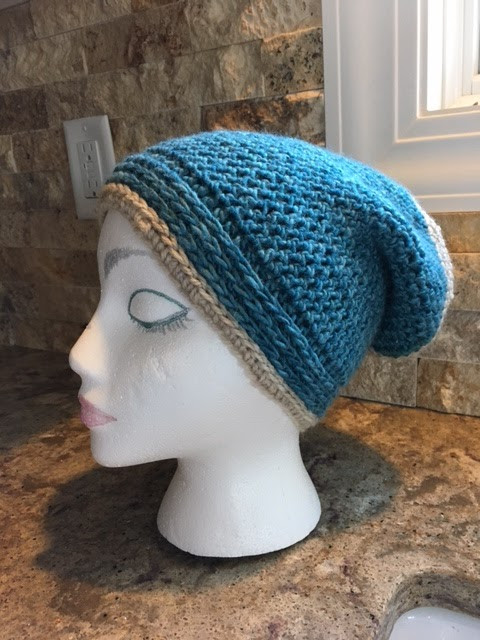
Crochet Oatmeal Hat

If you're looking to add a cozy touch to your winter wardrobe, the crochet oatmeal hat is a perfect choice! This stylish accessory not only keeps you warm on chilly days but also adds a cute and trendy flair to your outfit. The oatmeal color is versatile and goes well with many other colors, making it easy to mix and match with your favorite winter pieces.
Plus, the comfort of a handmade crochet hat is unbeatable! So why not treat yourself to this adorable and practical accessory that will surely become a staple in your winter collection?Materials:
DIRECTIONS:
Ch64, join in the round with a slip st in the first chain.
1. Ch1 then hdc in same ch, hdc in each ch across, join by slst into top of first hdc.[64 hdc]
2. Ch1, then hdc in the back (third) loop to perform "camel stitch" (see video above under references if you don't know how to do this.) Proceed to hdc camel stitch in each hdc around. Join with slst in top of first hdc.
3. Repeat round 2 until you have worked 1.75-2" (whatever width you like the look of).
4. Ch1 then turn the work so that you are working on the other (inside) of the round - I actually just turn the hat inside out at this point. Hdc (regular hdc, not camel stitch - for this row only) in same stitch as join then in the back loop of each st around, slip st into the top of the first hdc.
5. Work hdc camel stitches in each st on every round until pc measure 9" from beginning chain.
6. Ch1, then *work 6 hdc camel st, now work a hdc camel stitch decrease over the next 2 sts. (also worked in that back third loop as camel stitch), rep from * to end of round. Join with slst in top of first hdc.
7. Ch1, then *work 5 hdc camel st, now work a hdc camel stitch decrease over the next 2 sts. (also worked in that back third loop as camel stitch), rep from * to end of round. Join with slst in top of first hdc.
8. Ch1, then *work 4 hdc camel st, now work a hdc camel stitch decrease over the next 2 sts. (also worked in that back third loop as camel stitch), rep from * to end of round. Join with slst in top of first hdc.
9. Ch1, then *work 3 hdc camel st, now work a hdc camel stitch decrease over the next 2 sts. (also worked in that back third loop as camel stitch), rep from * to end of round. Join with slst in top of first hdc.
10. Ch1, then *work 2 hdc camel st, now work a hdc camel stitch decrease over the next 2 sts. (also worked in that back third loop as camel stitch), rep from * to end of round. Join with slst in top of first hdc.
Please note, It will get a bit tight working in this small amount of stitches but can be done.
11. Ch1, then *work 1 hdc camel st, now work a hdc camel decrease over the next 2 sts. (also worked in that back third loop as camel stitch), rep from * to end of round. Join with slst in top of first hdc.
12. Ch1, then *work a hdc camel stitch decrease over the next 2 sts. (also worked in that back third loop as camel stitch), rep from * to end of round. Join with slst in top of first hdc.
13. Cut yarn leaving 8" tail and thread thru the last stitch to close it, then with a darning needle and yarn tail, weave the yarn tail thru each of the tops of the hdc's, cinch tight and tie off. Cut yarn a bit shorter and weave in yarn tail.
