Crochet Square Hat: A Stylish Accessory for Every Season

A stylish and cozy accessory for any season! The Crochet Square Hat is a unique and fashionable project that combines the simplicity of a square shape with the warmth and comfort of a hat. This hat features a simple and modern design that can be dressed up or down to suit any occasion. The square shape provides a unique silhouette that adds a touch of sophistication to any outfit, while the crochet stitches create a warm and breathable fabric that will keep your head cozy on chilly days. Perfect for men or women, this hat is a great project for beginners and experienced crocheters alike.
Materials Needed
2.5 ozs of worsted weight yarn, G hook, sewing needles.
Note on Crochet Technique
I am finding that I don't make my granny squares like most of you do. The below pattern is the way I make mine. If you choose to put the ch 1 in between the 3 dcs space, I am sure the pattern will still come out correct.
Directions
Make 1 of the Following
Ch 5, join with a sl st to form a ring.
Round 1
ch 3 (counts as first dc throughout) in ring just formed work 2 dc, ch 2 *3 dcs, ch 2* 3 times, join with a sl st to top of beg ch 3.
Round 2
sl st in next 2 dcs, sl st in ch 2 sp, ch 3, 2 dcs in same ch 2 sp, ch 2, 3 dcs in same sp *in next ch 2 sp work 3 dcs, ch 2, 3 dcs* 3 times, join with a sl st to top of beg ch 3.
Round 3
sl st in next 2 dcs, sl st in ch 2 sp, ch 3, 2 dcs in same ch 2 sp, ch 2, 3 dcs in same sp, in the next space between the 2 sets of 3 dcs, work 3 dcs, *in next ch 2 sp work 3 dcs, ch 2, 3 dcs, in the next space between the 2 sets of 3 dcs, work 3 dcs,* 3 times, join with a sl st to top of beg ch 3.
Round 4-5
Repeat round 3 increasing the number of 3 dcs you put in the spaces between the 3 dc groups. Fasten off.
Make 4 of the Following
Ch 5, join with a sl st to form a ring.
Round 1
ch 3 (counts as first dc throughout) in ring just formed work 2 dc, ch 2 *3 dcs, ch 2* 3 times, join with a sl st to top of beg ch 3.
Round 2
sl st in next 2 dcs, sl st in ch 2 sp, ch 3, 2 dcs in same ch 2 sp, ch 2, 3 dcs in same sp *in next ch 2 sp work 3 dcs, ch 2, 3 dcs* 3 times, join with a sl st to top of beg ch 3.
Round 3
sl st in next 2 dcs, sl st in ch 2 sp, ch 3, 2 dcs in same ch 2 sp, ch 2, 3 dcs in same sp, in the next space between the 2 sets of 3 dcs, work 3 dcs, *in next ch 2 sp work 3 dcs, ch 2, 3 dcs, in the next space between the 2 sets of 3 dcs, work 3 dcs,* 3 times, join with a sl st to top of beg ch 3.
Round 4
Repeat round 3 increasing the number of 3 dcs you put in the spaces between the 3 dc groups.
Final Steps
At the end of round 4, sl st in next 2 dcs, sl st in ch 2 sp, ch 3, 2 dcs in same ch 2 sp, *work 3 dcs in next sp* 3 times in next ch 2 sp, work 3 dcs. Fasten off.
Attach yarn on the opposite side just worked in the ch 2 sp on the end, ch 3, work 2 dcs in same sp, *work 3 dcs in next sp* 3 times in next ch 2 sp, work 3 dcs. Fasten off.
Sewing the Hat
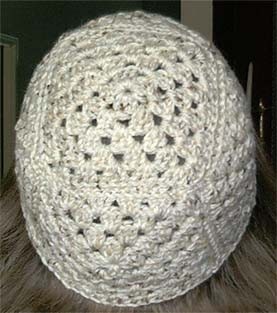
The 5 round granny square will be on the top of the hat. You will attach one of the 4 squares to each side of the granny square, making sure that the added rows are on the sides of the 5 round granny square. Sew each side piece to each other. I sewed all pieces with wrong sides together and in the back loops only.
For the bottom of the hat, attach yarn in any space and work hdc evenly around the bottom of the hat. Fasten off.