Crochet Tora the Tiger Amigurumi Pattern
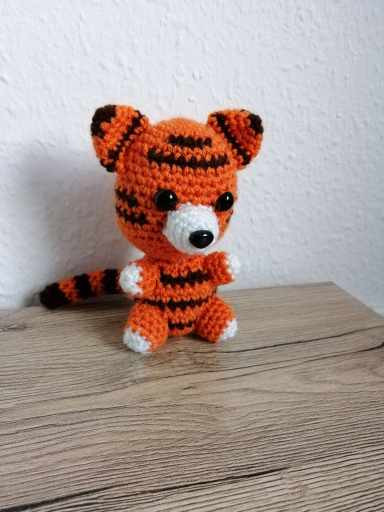
Crochet Tora the Tiger Amigurumi is a delightful and creative project that brings this adorable tiger to life with yarn and a hook! Whether you're an experienced crocheter or just starting out, this pattern is filled with fun and detailed instructions to help you create your very own cuddly Tora. From his vibrant orange stripes to his cute little ears, each stitch adds character and charm to this lovable amigurumi. It's a great way to unwind and express your creativity while making a new friend that will surely bring a smile to anyone's face. So grab your materials and get ready to embark on a crocheting adventure filled with warmth and joy!
Materials
To make Tora the Tiger you will need:
- A Crochet hook, 2.5mm
- Orange, brown and white DK yarn
- A tapestry needle and scissors
- Stuffing
- Safety eyes and nose (I used 9mm)
- A stitch marker to help you keep track of the start of the round
Please note that you can make Tora using any size crochet hook and yarn weight for a smaller or bigger result. I like using DK as it’s most commonly available. If you make amigurumi, it is usually recommended to go down a bit from the recommended hook size for the yarn to allow for a no-hole look (we don’t want to see the stuffing show through in between stitches)! Using DK yarn and a 2.5mm crochet hook, he should stand about 12cm tall.
Stitches & Abbreviations
The pattern is written using US crochet terms in continuous spirals. You will need to know the following kinds of stitches to make him:
- Magic Ring (MR)
- Single crochet (sc)
- Decrease (dec); preferably using the invisible decrease method
- Increase (inc)
- Changing colors
And now, let’s get started!
Head
Round 1: Starting with orange, 6 sc into a Magic Ring
Round 2: Inc around (12)
Round 3: (Sc, inc) around (18)
Round 4: (Sc 2, inc) around (24)
Round 5: Sc 3, inc, changing color to brown on the 2nd stitch of the increase, Sc 3, inc, changing color back to orange on the 2nd stitch of the increase, (sc, inc) 4 more times (30)
Round 6: Sc around (30)
Round 7: Sc 3, change to brown, sc 9, change to orange, sc 18 (30)
Round 8-10 (3 rounds): Sc around (30)
Round 11: Sc 28, change to brown, sc 2 (30)
Round 12: Sc 5, change to orange, sc 10, change to brown, sc 7, change to orange, sc 8 (30)
Round 13: Sc 28, change to brown, sc 2 (brown)
Round 14: Sc 7, change to orange, sc 8, change to brown, sc 9, change to orange, sc 6 (30)
Round 15: (Sc 4, inc) around (36), insert safety eyes between rounds 11 and 12, 3-4 stitches apart. Start stuffing
Round 16-17 (2 rounds): Sc around (36)
Round 18: (Sc 4, dec) around (30)
Round 19: (Sc 3, dec) around (24)
Round 20: (Sc 2, dec) around (18), finish stuffing
Round 21: (Sc, dec) around (12)
Round 22: Dec around (6), fasten off and close
Body
Round 1: Starting with orange, 6 sc into a Magic Ring
Round 2: Inc around (12)
Round 3: (Sc, inc) around (18)
Round 4: (Sc 2, inc) around (24), change to brown
Round 5-13 (9 rounds): Sc around, alternating between one round of brown and 2 rounds of orange (24)
Round 14: (Sc 2, dec) around (18)
Round 15: (Sc, dec) around (12), fasten off, leave a tail for sewing
Ears
(Make 2)
Round 1: Starting with brown, 6 sc into a Magic Ring
Round 2: (Sc, inc) around (9), change to orange
Round 3: (Sc 2, inc) around (12)
Round 4: (Sc 3, inc) around (15)
Round 5: Sc around (15), change to brown
Round 6: Sc around (15), change to orange
Round 7: Sc around (15), fasten off, leave a tail for sewing
Arms
(Make 2)
Round 1: Starting with white, 6 sc into a Magic Ring
Round 2: (Sc, inc) around (9), change to orange
Round 3-5: Sc around (9), fasten off, leave a tail for sewing
Legs
(Make 2)
Round 1: Starting with white, 6 sc into a Magic Ring
Round 2: Inc around (12), change to orange
Round 3-6: Sc around (12), fasten off, leave a tail for sewing
Snout
Round 1: Using white, 6 sc into a Magic Ring
Round 2: Inc around (12)
Round 3: (Sc 3, inc) around (15)
Round 4-5 (2 rounds total): Sc around (15), fasten off, leave a tail for sewing
Tail
You can either make the tail in the round using a Magic Ring, or, if you’re like me and you hate crocheting long tubes that are only 6 sc thick, you can also crochet this flat, changing and turning at the end of each row, and sew it together at the end. I started with 3 rows of brown, and then I did alternating sections of orange and brown each 2 rows long for a total of ~17 rows.
Assembly
Sew the body to the head. Add a safety nose (or embroider one) onto the snout, then sew the ears and snout (centered right below/between the eyes) onto the head. Sew on the arms, legs and tail to the body. Done!


