Crochet The Gentleman Bunny Amigurumi
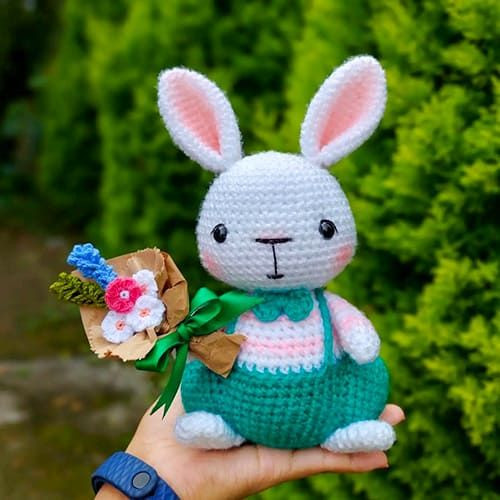
"Meet Crochet The Gentleman Bunny Amigurumi, the most dapper addition to your handmade collection! This charming bunny amigurumi is sure to steal hearts with his stylish bow tie and adorable demeanor. Perfect for gifting or decorating any space with a touch of handmade whimsy, Crochet The Gentleman Bunny Amigurumi is a delightful companion that will bring a smile to your face every time you see him.
Get ready to fall in love with this little crochet creation that exudes charm and elegance in every stitch!"
Materials
• 4 mm crochet hook
• Black thread for nose
• Blush
• 12 mm safety eyes
• Pet slicker brush
• Polyfil
Abbreviations
MR: Magic ring
Sc: Single crochet
Inc: Increase
Dec: Decrease
Slst: Slip stitch
BLO: Back loop only
FLO: Front loop only
Head
Rnd 1. 6 sc in MR (6)
Rnd 2. 6 inc (12)
Rnd 3. (1sc,inc)*6 (18)
Rnd 4. (2sc,inc)*6 (24)
Rnd 5. (3sc,inc)*6 (30)
Rnd 6. (4sc,inc)*6 (36)
Rnd 7. (5sc,inc)*6 (42)
Rnd 8-10. sc around (42) (3 rnds)
Rnd 11. (6sc,inc)*6 (48)
Rnd 12-18. sc around (48) (7 rnds)
Rnd 19. (6sc,dec)*6 (42)
Rnd 20. (5sc,dec)*6 (36)
Rnd 21. (4sc,dec)*6 (30)
Rnd 22. (3sc,dec)*6 (24)
Rnd 23. (2sc,dec)*6 (18)
Rnd 24. (1sc,dec)*6 (12)
Safety eyes in between rnd 13 and 14, 9 stitches apart.
Ears (Make 2)
In white.
Rnd 1. 6 sc in MR (6)
Rnd 2. (1sc,inc)*3 (9)
Rnd 3. (2sc,inc)*3 (12)
Rnd 4. (3sc,inc)*3 (15)
Rnd 5. sc around (15)
Rnd 6. (4sc,inc)*3 (18)
Rnd 7. sc around (18)
Rnd 8. (5sc,inc)*3 (24)
Rnd 9-16. sc around (24) (8 rnds)
Apply blush vertically to make the ears pink.
Fold it in half and sew across.
Sew in between row 5 and 6 of the head.
Body
Start with green.
Rnd 1. 6 sc in MR (6)
Rnd 2. 6 inc (12)
Rnd 3. (1sc,inc)*6 (18)
Rnd 4. (2sc,inc)*6 (24)
Rnd 5. (3sc,inc)*6 (30)
Rnd 6. (4sc,inc)*6 (36)
Rnd 7. (17sc,inc)*2 (38)
Rnd 8-14. sc around (38) (7 rnds)
Rnd 15. (17sc,dec)*2 (36)
Change to white.
Rnd 16. BLO sc around (36)
Rnd 17. sc around (36)
Change to pink.
Rnd 18. (4sc,dec)*6 (30)
Change to white.
Rnd 19-20. sc around (30)
Change to pink.
Rnd 21. (3sc,dec)*6 (24)
Change to white.
Rnd 22-23. sc around (24)
Change to pink.
Rnd 24. (2sc,dec)*6 (18)
Sew the body to the head, not the head to the body.
Hip (Make 2)
Make in green.
Rnd 1. 6 sc in MR (6)
Rnd 2. 6 inc (12)
Rnd 3. (1sc,inc)*6 (18)
Rnd 4. (2sc,inc)*6 (24)
Rnd 5. (4sc,inc)*4 (28)
Rnd 6-9. sc around (28)
Slst. Fasten off.
Arms (Make 2)
Rnd 1. 6 sc in MR (6)
Rnd 2. (1sc,inc)*3 (9)
Rnd 3. sc around (9), change to pink.
Rnd 4. sc around (9), change to white.
Rnd 5-6. sc around (9), change to pink.
Rnd 7. sc around (9), change to white.
Rnd 8-9. sc around (9), change to pink.
Rnd 10. sc around (9)
Slst. Fasten off.
Feet (Make 2)
In white.
Rnd 1. 6 sc in MR (6)
Rnd 2. 6 inc (12)
Rnd 3-4. sc around (12)
Rnd 5. (2sc,dec)*3 (9)
Rnd 6-7. sc around (9)
Rnd 8. (1sc,dec)*3 (6)
Rnd 9. sc around (6)
Straps
Mark 2 stitches in the front of the body 8 stitches apart in the FLO where we left off earlier in row 16.
Insert your hook into the stitch on the right and make 17 chains, put it around the rt shoulder and insert it into the left stitch on the back of the body.
Do the same on the left side, making an X on the backside.
Bow tie
In green.
Into the magic ring, make 3 chains, do 3 double crochet, chain 3, slst.
Chain 3 again, do 3 double crochet, chain 3 and slst.
Close the magic ring.
Leave a long tail. Wrap it around 5-6 times in the middle.
Sew it in the middle of the body, close to the neck.
Tail
In white.
Rnd 1. 6 sc in MR (6)
Rnd 2. 6 inc (12)
Rnd 3. (1sc,inc)*6 (18)
Rnd 4. (8sc,inc)*2 (20)
Rnd 5-7. sc around (20)
Rnd 8. (8sc,dec)*2 (18)
Assembly
1. Sew the ears to the head as instructed earlier.
2. Embroider on the side of the eyes to make it cute. Embroider the nose.
3. Apply blush.
4. Sew the body to the head.
5. Sew the arms to the body.
6. Sew the hips to the body.
7. Position and sew the feet to the hip.
8. Brush the tail with slicker brush to make it fluffy and sew to the bottom.

