Crochet Shika the Reindeer Amigurumi
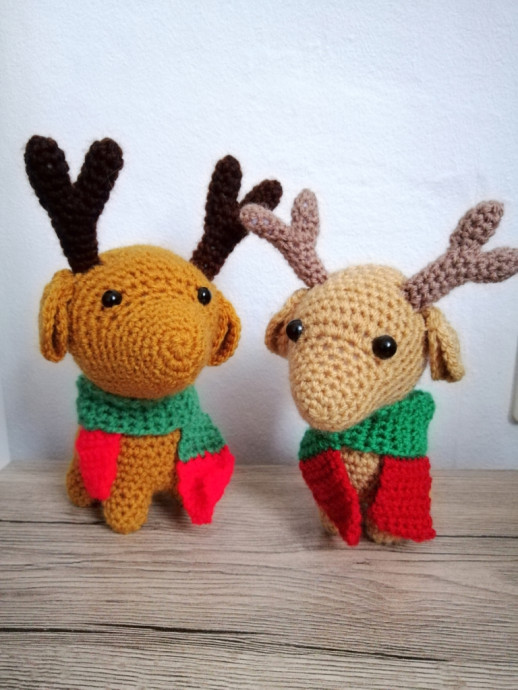
Crochet Shika the Reindeer Amigurumi is an adorable and festive project that will bring joy to any holiday season! This charming amigurumi design features intricate crocheted details that give Shika a whimsical and endearing personality. With its cozy scarf and twinkling eyes, this reindeer is perfect for adding a touch of warmth and charm to your home decor or as a special homemade gift for a friend.
Materials
To make Shika the reindeer you will need:
– A Crochet hook, 2.5mm
– A beige or brown yarn for the body (you could make a colorful one too, though!) as well as a different beige/brown color for the antlers; plus wool for a scarf (I used green and red)
– A tapestry needle and scissors
– Stuffing
– Safety eyes (I used 9mm)
– A stitch marker to help you keep track of the start of the round
Please note that you can make Shika using any size crochet hook and yarn weight for a smaller or bigger result. I like using DK as it’s most commonly available. If you make amigurumi, it is usually recommended to go down a bit from the recommended hook size for the yarn to allow for a no-hole look (we don’t want to see the stuffing show through in between stitches)! Using DK yarn and a 2.5mm crochet hook, Shika should be about 16cm tall.
Stitches & Abbreviations
The pattern is written using US crochet terms in continuous spirals. You will need to know the following kinds of stitches to make him:
– Magic Ring (MR)
– Chaning (Ch)
– Single crochet (sc)
– Decrease (dec); preferably using the invisible decrease method
– Increase (inc)
And now, let’s get started!
Head
Round 1: In a MR, sc 6
Round 2: Inc around (12)
Round 3: Sc around (12)
Round 4: (Sc 3, inc) around (15)
Round 5: Sc around (15)
Round 6: (Sc 4, inc) around (18)
Round 7: Sc around (18)
Round 8: (Sc 5, inc) around (21)
Round 9: (Sc 6, inc) around (24)
Round 10: Inc 6, sc 18 (30)
Round 11: (Sc, inc) x6, sc 18 (36)
Round 12-15 (4 rounds): Sc around (36)
Round 16: (Sc 10, dec) around (33)
Round 17-19 (3 rounds): Sc around (33)
Round 20: (Sc 9, dec) around (30), place eyes between rounds 10 and 11 (I placed the first eye right at the start of the inc section, and the 2nd on the 5th inc set so they are roughly 10 stitches apart) and start stuffing
Round 21: Sc around (30)
Round 22: (Sc 3, dec) around (24)
Round 23: (Sc 2, dec) around (18), finish stuffing
Round 24: (Sc, dec) around (12)
Round 25: Dec around (6)
Ears (make 2)
Round 1: In a MR, sc 6
Round 2: Inc around (12)
Round 3: (Sc, inc) around (18)
Round 4: (Sc 2, inc) around (24), fasten off
Tail
Ch 5, sc, hdc, dc, then 5dc into last chain, then on the other side of the chain, dc, hdc, sc. Fasten off
Feet (make 4)
Round 1: In a MR, sc 6
Round 2: (Sc, inc) around (9)
Round 3-5 (3 rounds): Sc around (9), fasten off
Make 4 like this BUT DO NOT FASTEN OFF THE FOURTH! We will now join them together to make the
Body
Round 6: On the last leg you made, sc 3, ch 2, sc 7 on the 2nd leg, ch 1, sc 7 on the 3rd leg, ch 2, sc 7 on the fourth leg, ch 1, sc 4 on the leg you started this round on (the one you didn’t fasten off) (34)
Round 7-11 (5 rounds): Sc around (34)
Round 12: Sc 12, dec 3, sc to end (31)
Round 13: Sc 10, dec 4, sc to end (27)
Round 14: Sc 9, dec 3, sc to end (24)
Round 15: (Sc 2, dec) around (18)
Round 16: (Sc, dec) around (12)
Round 17: Sc around (12), fasten off.
Now, stuff the legs. Do not stuff the body yet as we will now close the belly. To do this, I picked up a number of stitches on the belly hole (at least 14; for a smoother finish I recommend to also pick up stitches in the “corners” of the leg where there’s already a stitch from round 6/7.) to sc around for a round. Then, work 2 to 3 more rounds and implement some decreases. For example, if you picked up 16 stitches, I would do a round of (Sc 2, dec) to decrease to 12, then a round of (sc, dec) to decrease to 9, and then another round of (Sc, dec) to decrease to 6, then fasten off and sew closed. Exact numbers do not matter here!!! Just Make it up as you go along.
Scarf
Row 1: Ch 6, sc 5
Row 2-66: Sc across (5), fasten off. You can customize the scarf’s length or pattern however you like; I did 7 rows of red at the beginning and end and did the rest in greeen.
Antlers
Small piece
Round 1: In a MR, sc 6
Round 2-4 (3 rounds): Sc around (6), fasten off. Make another (2 total).
Main piece
Round 1: In a MR, sc 6
Round 2-5 (4 rounds): Sc around (6)
Round 6: Sc 2, join 2nd piece by doing sc 6 on it, then sc 4 on the main piece (12)
Round 7: (Sc 2, dec) around (9), start stuffing
Round 8: Sc around (9)
Round 9: (Sc, dec) around (6)
Round 10-13 (4 rounds): Sc around (6), finish stuffing and fasten off.
Assembly
The end is nigh! Time to assemble! First of all, take the ears. Fold them in half and sew them to the head (I sewed them on around rounds 14-16, roughly on the height of the eyes). Then, take the antlers and sew them on next to the ears. Next, sew on the body; the part where we worked the decreases is the back. Sew on the tail to the butt, and then all that’s left is to tie the scarf around the neck. Done!


