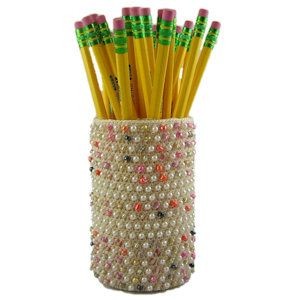
Crochet Beaded Pencil Cup

Creating a Crochet Beaded Pencil Cup is a fun and stylish way to keep your workspace organized and add a personal touch to your desk! This DIY project allows you to combine your love for crochet with a dash of creativity using colorful beads. By crocheting a sturdy base and then adding beads as you go along, you can customize your pencil cup to match your decor or showcase your favorite colors.
Not only is this project functional, but it's also a great conversation starter and a unique gift idea for friends and family. So grab your crochet hooks, beads, and let's get crafting!Materials Needed
Size 10 crochet cotton in ecru or color of choice.
Size 7 steel crochet hook
Fine tapestry needle, small enough to go through the beads.
418 4mm pearl beads
266 Multi color E Beads
Or a total of 684 4mm beads of choice.*
An empty short Crystal Light container. Or a similar type of container.
Hot glue gun and 1 small glue stick.
Yarn Thickness: 10thread
Gauge: 8sc = 1"
Finished Size: 3" x 5"
Skill Level: Intermediate to advanced.
Instructions
With tapestry needle, string all of the beads on the thread first in the following order if you are using the same type of beads I did.
228 beads, pearl, ebead in alternating order
76 pearl beads
76 beads, pearl, ebead in alternating order
76 pearl beads
228 beads, pearl, ebead in alternating order
Otherwise, just put all of the beads on the thread in what ever order you want
RND 1: Ch5. Join w/slst to first ch to form ring. Ch3. 13 dc in ring. Join w/slst to top of ch3. (14dc including ch3.)
RND 2: Ch3, dc in same st as slst. 2dc in each dc around. Join w/slst to top of ch3. (28dc)
RND 3: Ch3, dc in same st as slst. Dc in next dc. *2dc in next dc. Dc in next dc. Rep from * around. Join w/slst to top of ch3. (42dc)
RND 4: Ch3, dc in same st as slst. Dc in each of the next 2 dc. *2dc in next dc. Dc in each of the next 2 dc. Rep from * around. Join w/slst to top of ch3. (56dc)
RND 5: Ch3, dc in same st as slst. Dc in each of the next 3dc. *2dc in next dc. Dc in each of the next 2 dc. Rep from * around. Join w/slst to top of ch3. (70dc)
RND 6: Ch3, dc in same st as slst. Dc in each of the next 11 dc. *2dc in next dc. Dc in each of the next 11 dc. Rep from * 3 times more. 2dc in next dc. Dc in each of the last 9 dc. Join w/slst to top of ch3. (76dc)
Turn work so now you are working on the back side for the next 18 rounds. You are also now going to work the beads into every other stitch on each of the next 18 rounds. To work a beaded dc (bdc) Work as you would for a regular dc but before pulling through the last 2 lps on hook, bring up a bead and work that last part of the stitch over the bead.
RND 7: Ch3. Bdc in next st. *Dc in next st. Bdc in next st. Rep from * around. Join w/slst to top of ch3.
RND 8: Ch2, bring up a bead and ch1 over the bead. Dc in next st. *Bdc in next st. Dc in next st. Rep from * around. Join w/slst to top of beaded ch.
RND 9-24: Rep RNDs 7 & 8 consecutively. At the end of RND 24, turn work back around so you are working on the back side of the beads.
RND 25: Ch1. Sc in each st around. Join w/slst to ch1. Fasten off and weave ends into back of work.
Finishing
Place work on pencil cup, beads facing out, onto empty plastic container. Glue upper edge of work to rim of plastic container. Try not to burn yourself like I did!
*NOTE: You can use what ever beads you want in any order that you want. Just as long as they are all 4mm in diameter. The beads I used, I used because that is what I had on hand. Plus I didn't really want all one type of bead. I wanted to mix things up a bit.
