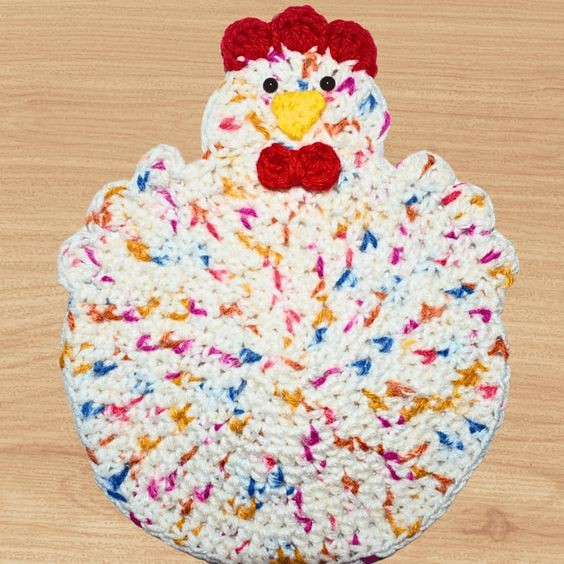
Crochet Chicken Potholder

If you're looking to add a touch of whimsy and charm to your kitchen, a crochet chicken potholder is a fun and practical addition! These adorable potholders not only protect your hands from hot surfaces but also bring a smile to your face every time you use them. The intricate detailing of the crochet work gives the potholder a unique and cozy feel, making it a delightful kitchen accessory.
Whether you're whipping up a delicious meal or simply adding a pop of color to your kitchen decor, a crochet chicken potholder is sure to become a favorite item in your culinary arsenal. So go ahead, add a touch of handmade warmth to your kitchen with these cute and functional potholders!Abbreviations:
- dc=double crochet
- ch=chain
- sc=single crochet
- sl st=slip stitch
- hdc=half double crochet
- 2sctog= 2 single crochet together decrease
- Medium Worsted Yarn
- Tapestry needle
Measures 8.5 inches tall and 6.5 inche wide
G, F, and E Hook
I used multi colored red heart yarn
G Hook for the body of the Chicken
Rnd 1: ch 2, work 8 hdc in the 2nd chain from the hook, sl st — 8 hdc
Rnd 2: 2 hdc in each st around, work in continual rounds — 16 hdc
Rnd 3: *1 hdc, 2 hdc in the next stitch, *Repeat around — 24 hdc
Rnd 4: *1 hdc in next 2 hdc, 2 hdc in the next stitch, *Repeat around — 32 hdc
Rnd 5: *1 hdc in next 3 hdc, 2 hdc in the next stitch, *Repeat around — 40 hdc
Rnd 6: *1 hdc in next 4 hdc, 2 hdc in the next stitch, *Repeat around — 48 hdc
Rnd 7: *1 hdc in next 5 hdc, 2 hdc in the next stitch, *Repeat around — 56 hdc
Rnd 8: *1 hdc in next 6 hdc, 2 hdc in the next stitch, *Repeat around — 64 hdc
Rnd 9: *1 hdc in next 7 hdc, 2 hdc in the next stitch, *Repeat around — 72 hdc
Rnd 10: *1 hdc in next 8 hdc, 2 hdc in the next stitch, *Repeat around — 80 hdc
Head
Continue on with the Head, sl st
Row 1: (All in the same stitch, sl st, ch 2, 5 dc) skip 2, sl st in the next stitch. Turn — 6 dc
Row 2: 2 dc in each stitch, skip 2 sts, sl st in next st, Turn ‑12 dc
Row 3: dc, 2 dc in the next stitch, skip 2 sts, sl st in next st. Fasten off. Weave in your ends. — 18 dc
Wings
Conintue on from the Head, sl st in next 3 sts, *ch 2, 3 dc, sl st next 2 sts, 4 dc, sl st in next 2 sts, 4 dc, sl st. Fasten Off and Weave in your ends.
Repeat on the opposite side to make another set of wings, skip 3 stitches from the head, *Repeat
Header Topper
G hook, Red yarn
On the Head in the 5th stitch, sl st, *4 dc, sl st, *Repeat for two more times
Beak
E hook, Yellow yarn, ch 4, sc in 2nd chain, next 2 chs, turn, sc in next 2 sts, turn, 2sctog, Fasten off, Weave in your ends.
Bow
E hook, Red yarn, ch 3, 3 dc in the 3rd chain from the hook, ch 2, sl st, ch 2, 3 dc, ch 2, sl st, Fasten off. Take about half foot long of yarn and wrap it around the center. Then cut and tie the yarn in the back.
Eyes: Make dash lines above beak or hot glue small eyes on above the beak.
Assembly: Sew or hot glue gun the beak under the eyes and the bow under the beak.
The main parts of the chicken include the breast area, top of the body, and the curved bottom. Begin by crocheting the breast of the chicken with brown yarn and then move on to the top of the body with yellow yarn for a vibrant look. Incorporate black yarn for the eyes and beak, and don’t forget to use a slip stitch to close any gaps.
Once the main parts are completed, join the chicken bodies together using a series of single crochet stitches and slip stitches. Pay attention to the scallops of the bottom to add a decorative touch and ensure a snug fit. The final steps involve finishing with a shell row and securing any yarn tails with a tapestry needle.
