How to Make a Crochet Dress Potholder

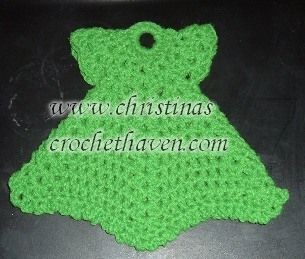
If you're looking to add a touch of charm to your kitchen, a crochet dress potholder is a fun and practical choice! These adorable potholders are not only functional but also add a quirky and whimsical flair to your cooking space. Whether you're protecting your hands from hot pans or simply looking to brighten up your kitchen decor, a crochet dress potholder is sure to do the trick. Plus, they make fantastic gifts for friends and family who appreciate handmade items. With various colors and patterns to choose from, you can personalize the potholders to suit your style and add a unique touch to your kitchen essentials. Get ready to cook in style with these delightful little accessories!
Materials
| Materials Used | Scrap worsted weight 4ply, 1" plastic ring |
| Hook Size | Size H |
| Measurements | |
| Notes | I did one with 2 colors and 1 with just one color. If you want to use 2 colors, change colors at the 4th row and do 4th and 5th row in a different color. Change back to main color after that. |
Pattern Instructions
Initial Rows
Row 1: Do 19 sc around the ring. Sl st tog, ch 2 (count this as first dc).
Row 2: In the front loop only, do 13 dc. Turn and go back behind the 13 dc and dc in the back loops (14 dc total). Sl st tog.
Continuing the Pattern
Row 3: Ch 3 and dc in same st. *Skip next st, then do dc ch 1 dc in next st. Repeat from * around. Join with sl st in the top of the first dc.
Row 4: Ch 3, *do 2 dc ch 1 2 dc in the middle of the do dc of the 3rd row. Repeat from * around. Join with sl st in the top of the first dc.
Row 5: Repeat row 4, fasten off. Fold the dress down, and do a sl st after the second shell through the back 2 shells.
Row 6: Ch 3, *do 2 dc ch 1 2 dc in middle of the do dc of the shell from the previous row. Repeat from * twice (so you have 3 shells in the front). (Only the top layer, not the back shells). Now, dc in the 2nd shell both the back and the front shells like you did on the other side. Flip over and *do 2 dc ch 1 2 dc in middle of the do dc of the shell from the previous row. Repeat from * twice (so you have 3 shells in the back). Sl st into the top of the first ch 3.
Final Rows
Row 7: Ch 3, 2 dc ch 1 2 dc in the middle of the first shell. Dc in the space between the next shells. 2 dc ch1 2dc in the next shell middle. Dc in the space between the next shells. 2dc ch 1 2dc in the middle of the next shell. Dc in the dc from row 6 on the side. 2 dc ch 1 2dc in the middle of the next shell. Dc in the space between the next shells. 2dc ch 1 2dc in the middle of the next shell. Sl st into the top of the first ch 3.
Row 8: Ch 3, 2 dc ch 1 2 dc in the middle of the first shell. Dc in the space in front of the dc and dc in the space after the dc. 2 dc ch1 2dc in the next shell middle. Dc in the space between the next shells. 2dc ch 1 2dc in the middle of the next shell. Dc in the dc from previous row on the side. 2 dc ch 1 2dc in the middle of the next shell. Dc in the space in front of the dc and dc in the space after the dc. 2dc ch 1 2dc in the middle of the next shell. Sl st into the top of the first ch 3.
Row 9: Repeat row 8 but this time have 3 dc on either sides of shells.
Row 10: Repeat row 8, but this time have 4 dc on either sides of shells.
Row 11: Repeat row 8, but this time have 5 dc on either sides of shells.
Row 12: Repeat row 8, but this time have 6 dc on either sides of shells.
Row 13: Repeat row 8, but this time have 7 dc on either sides of shells. You are just increasing dc in the middle to increase the skirt of the dress.
Row 14: Repeat row 8, but this time have 8 dc on either sides of shells.
Row 15: Repeat row 8, but this time have 9 dc on either sides of shells. After this row, ch 3 and sc in each st to create a ruffle. Go all the way around. Fasten off and weave in ends. Refer to the picture to help you do this.