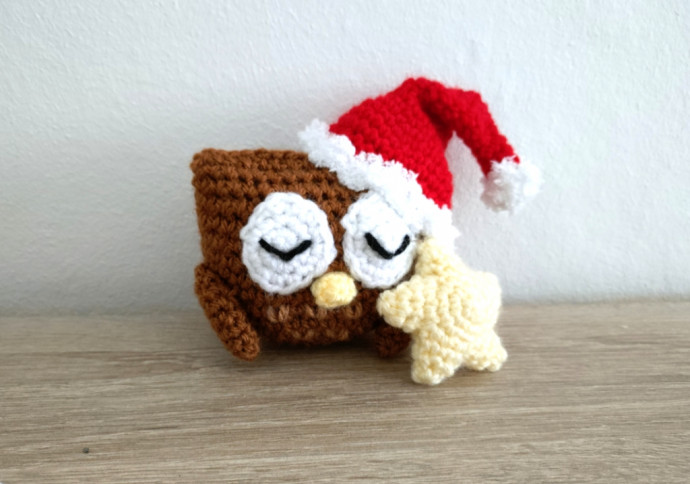
How to Make a Crochet Santa Owl

The Crochet Santa Owl is a delightful and creative take on the traditional holiday symbol. This adorable owl sporting a Santa hat brings a charming touch of whimsy to any festive decor. With its intricate crochet work and festive color palette, this little owl is sure to steal the hearts of both young and old alike. Whether perched on a shelf or hanging from the tree, the Crochet Santa Owl is bound to add a sprinkle of holiday cheer to your home. So why not bring a smile to your face this holiday season with this cute and cuddly crochet creation?
Materials
To make Santa Owl you will need:
- A Crochet hook, 2.5mm, and one in 3.5mm
- Dark brown, light brown, white, black, red, and light yellow regular yarn as well as white cuddly yarn
- A tapestry needle and scissors
- Stuffing
- A stitch marker to help you keep track of the start of the round
Please note that you can make Santa Owl using any size crochet hook and yarn weight for a smaller or bigger result. I like using DK as it’s most commonly available. If you make amigurumi, it is usually recommended to go down a bit from the recommended hook size for the yarn to allow for a no-hole look (we don’t want to see the stuffing show through in between stitches)! Using DK yarn and a 2.5mm crochet hook, Santa Owl should be about 10cm tall.
Stitches & Abbreviations
The pattern is written using US crochet terms in continuous spirals. You will need to know the following kinds of stitches to make him:
- Magic Ring (MR)
- Single crochet (sc)
- Decrease (dec); preferably using the invisible decrease method
- Increase (inc)
- Slip stitch (sl)
And now, let’s get started!
NOTE: It can be very hard to keep up with your stitch count if you’re using cuddly yarn as it’s basically impossible to see your actual stitches. Don’t worry too much about the exact stitch count as you won’t be able to see the stitches anyways. The fluffy parts are worked using the 3.5mm hook, everything else with the 2.5mm hook.
Body (in Dark Brown)
Round 1: In a MR, sc 6
Round 2: Inc around (12)
Round 3: (Sc, inc) around (18)
Round 4: (Sc 2, inc) around (24)
Round 5: (Sc 3, inc) around (30)
Round 6: (Sc 4, inc) around (36)
Round 7-18 (12 rounds): Sc around (36), stuff
Round 19: Flatten your work. Ch 1, then, inserting your hook through 2 stitches at a time (front and back), sc across for a total of 18 stitches. This will close your owl. Fasten off, weave in the end.
Eyes (in White; Make 2)
Round 1: In a MR, sc 6
Round 2: Inc around (12)
Round 3: (Sc 3, inc) around (15), then sc 1, sl2, fasten off
Hat
Round 1: In red, in a MR, sc 6
Round 2-3: Sc around (6)
Round 4: (Sc 2, inc) around (8)
Round 5: Sc around (8)
Round 6: (Sc 3, inc) around (10)
Round 7: Sc around (10)
Round 8: (Sc 4, inc) around (12)
Round 9: Sc around (12)
Round 10: (Sc 5, inc) around (14)
Round 11: Sc around (14)
Round 12: (Sc 6, inc) around (16)
Round 13: Sc around (16)
Round 14: (Sc 7, inc) around (18)
Round 15: (Sc 2, inc) around (24)
Round 16: (Sc 3, inc) around (30)
Round 17-19 (3 rounds): Sc around (30), change to 3.5mm hook and cuddly white yarn
Round 20: Sc around (30), fasten off
Pompom (in Cuddly White)
Round 1: In a MR, sc 6
Round 2: Sc around (6), fasten off and sew closed
Wings (in Dark Brown; Make 2)
Round 1: In a MR, sc 6
Round 2: Sc around (6)
Round 3: (Sc, inc) around (9)
Round 4-7 (4 rounds): Sc around (9)
Round 8: (Sc, dec) around (6), fasten off and sew closed
Beak (in Light Yellow)
Round 1: In a MR, sc 6
Round 2: Sc around (6), fasten off
Assembly
Assembly is quick and easy! First of all, add some black lines to your owl’s eyes (or insert safety eyes), then sew the eyes onto the body (I sewed them so that there are some 3 rounds between the top of the eyes and the top of the owl, with about 1 stitch in between the eyes). Next, I recommend sewing on the wings; the shoulders should be around the same height as the bottom of the eyes. Sew the pompom to the tip of the Santa hat, then insert some stuffing and sew the hat over one side of the owl’s head, slightly overlapping the eye and possibly the shoulder. Lastly, sew on the beak. To finish, embroider some light brown Vs over the chest. Done! If you want you can add some small gift or the likes for the owl to hold onto, but I opted not to as to not hide the feather pattern.
