CrochetMenScarvesHatsGlovesSweatersCardigansSocksOther clothingWomenScarvesHatsGlovesShawls and cover upSweatersCardigansSocksSlippersBagsOther clothingChildrenScarvesHatsGlovesSweatersCardigansSocksSlippersOther clothingHomeBlankets and plaidsRugsHome decorationsPetsSchemesKnittingOther hand-madeChat
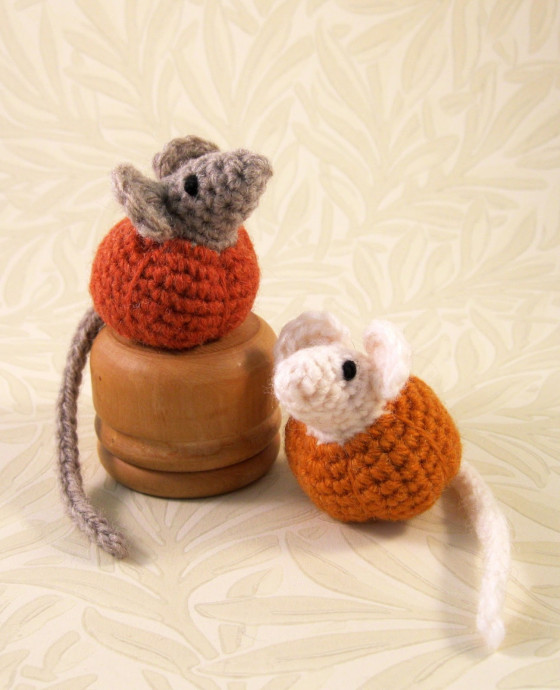
Crochet Little Pumpkin Mice Amigurumi

If you're looking to add a touch of whimsy to your fall decor or to delight someone with a unique gift, the Crochet Little Pumpkin Mice Amigurumi is just the charm you need! These adorable creations combine the cuteness of mice with the festive spirit of pumpkins, making them perfect for the autumn season. With their small size and intricate details, these amigurumi mice are a joy to create and will surely bring smiles to those who see them. Whether you're an experienced crocheter or a beginner looking for a fun project, these little pumpkin mice are sure to become a cherished piece in your collection.
Abbreviations:
ch = chain
st = stitch or stitches
ss = slipstitch
sc = single crochet (US), double crochet (UK)
dc = double crochet (US), treble crochet (UK)
tog = together
sc2tog = decrease by working two sc together
FLO = work in front loop only
FO = fasten off
Approximate size: 5cm/2" long without tail.
General instructions:
Work in rounds unless otherwise stated and do not join rounds unless told to. Use a stitch marker to mark the start of a round - a small piece of different coloured yarn placed under the stitch at the start of the round will do. To start a round, you can use the magic ring method, but I prefer to ch 2, and work the appropriate number of sc into 1st ch. If you work the sc over the tail of yarn as well you can use that to pull the hole tight.
When changing from one colour of yarn to another work the stitch before the change until there are two loops left on the hook. Then use the new colour for the final yarn over hook and pull through.
Stuff as you go along.
Work through both loops of stitches unless otherwise indicated.
You will need:
Small amounts of yarn in a natural colour for the head and tail, and orange for the pumpkin, double knitting or worsted weight.
Small amounts of black yarn to embroider eyes.
Small amount of stuffing.
3.5mm (E) hook.
Tapestry needle.
Start with natural colour yarn.
Round 1: Ch 2, work 4 sc into 1st ch - 4 st.
Round 2: [2 sc in next st, sc in next st] 2 times - 6 st.
Round 2: [2 sc in next st, sc in next st] 2 times - 6 st.
Round 3: [2 sc in next st, sc in next 2 st] 2 times - 8 st.
Round 4: [2 sc in next st, sc in next 3 st] 2 times - 10 st.
Round 5: Sc in each st around – 10 st.
Round 6: [2 sc in next st, sc in next 4 st] 2 times - 12 st.
Round 7: Sc in next 6 st, [ear, in FLO of next st: ss, ch 2, 5 dc, ch 2, ss], sc in next 3 st, [ear as before], sc in next st – 12 st (counting each ear as one st).
Round 8: Sc in next 2 st, 2 sc in next st, sc in next 3 st, sc in back loop behind ear, sc in next st, sc2tog, sc in back loop behind ear, sc in next st – 12 st.
Change to orange yarn.
Round 9: [2 sc in next st] 6 times, sc in next 6 st – 18 st.
Round 10: [2 sc in next st, sc in next 5 st] 3 times – 21 st.
Round 11 - 16: (6 rounds) Sc in each st around – 21 st.
Round 17: [Sc2tog, sc in next 5 st] 2 times, sc2tog, sc in next 3 st, change to natural colour yarn, [tail: ss in next st, ch 20, miss ch next to hook, ss 19, ss back into original st and change back to orange yarn], sc in next st – 18 st.
Round 18:Sc2tog 2 times, sc in next 6 st, sc2tog 4 times – 12 st.
Round 19:Sc2tog 6 times – 6 st.
FO, leaving a length of yarn about 15”/40 cm long. Finish stuffing and use black yarn to sew eyes. Using the length of yarn, sew up the bottom of the mouse neatly. Then sew six lines evenly spaced around the pumpkin, from the neck down to the bottom (the bottom point shouldn’t be the hole you sewed up, just a little in front of that will be better and will make the mouse sit up properly). Pull each line through tightly so your mouse has a flat base.
No comments
Write a comment
