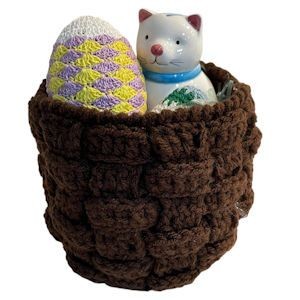
Crochet All Occasion Holiday Basket

The Crochet All Occasion Holiday Basket is a delightful and versatile handmade creation perfect for spreading joy during various celebrations. Crafted with care and creativity, this charming basket adds a touch of warmth and personal flair to any special occasion. From Easter to Christmas, birthdays to weddings, this basket is a truly versatile piece that is sure to bring a smile to anyone's face.
Its intricate design and vibrant colors make it not just a functional storage solution but a beautiful decorative accent for your home. Whether you're gifting it to a loved one or using it to enhance your own festive decor, the Crochet All Occasion Holiday Basket is a must-have for those who appreciate the charm of handmade treasures.Materials Needed
Worsted weight acrylic yarn in brown.
Size H/8 aluminum crochet hook
1 1lb whipped topping container to use as a form.
Piece of contrasting color yarn about 18" long.
Metal yarn needle.
Yarn Thickness: 4mm
Gauge: 4dc = 1"
Finished Size: 6" diam x 6" high
Skill Level: Intermediate
Instructions
RND 1: Ch4, join w/slst to first ch to form ring. Ch3. 15 dc in ring. Join w/slst to top of ch3.
RND 2: Ch3. Dc in same st as slst. 2dc in each dc around. Join w/slst to top of ch3.
RND 3: Ch3. 2dc in next dc. *Dc in next dc. 2dc in next dc. Rep from * around. Join w/slst to top of ch3
ROW 1 of Arms: Ch3. Dc in each of the next 3 dc. Ch3, turn
ROW 2-8: Sk first dc. Dc in each of the next 2 dc. Dc in top of ch3. Ch3, turn.
Arms: Join yarn to next unworked dc in round 3 of circle. Rep rows 1-8 of first arm. When you are done with all of the arms, weave all ends into back of work and set aside.
Horizontal Rings Make 6 the same: Ch60. Being careful not to twist chain, join w/slst to first ch to form ring. Ch3. Dc in each ch around. Join w/slst to top of ch3. Weave ends into back of work.
Assembly
STEP 1: Used whipped topping container as a jig or form. It will not be part of the finished basket. Place the container in front of you upside down.
Place the circle with the arms on the bottom side of the container so the arms hang down the side. Make sure the right side of the circle is facing up.
STEP 2: Place a ring over the arms so that the starting chain is facing toward the circles and the right side is facing out away from the container. Pull every other arm out and place it over the ring. Do the same with the other rings, making sure that every other arm has been pulled out over the ring to make a woven effect.
STEP 3: Put contrasting yarn onto needle and use a running stitch to baste the arms to the 6th ring near the rim of the container to keep everything together. You will remove this when you are done with the basket. Leave a ¼" space at the end of each arm. Tie a knot in the basting yarn to keep in place.
STEP 4: Remove work from container. Join brown to top of ch3 of one of the arms on row 8. Ch1. Sc in each of the next 3 dc. *Sc in next top of ch3 of next arm and in each of the next 3 dc. Rep from * all the way around. Join w/slst to ch1.
STEP 5: Work 1 reverse sc in each st around to form the basket's rim. Join w/slst to first st. Fasten off and weave ends into back of work. Remove basting yarn and adjust rings as needed to make the basket the way you want it to look.
