Make Your Adorable Crochet Elephant Amigurumi

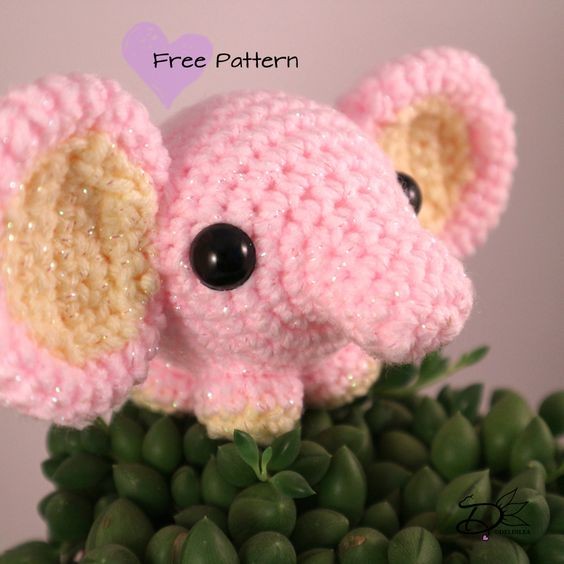
Crochet Elephant Amigurumi is an adorable and fun craft project that brings pure delight to both the maker and the recipient. The process of creating these cute little elephants involves intricate crochet stitches that magically transform a ball of yarn into a lovable plush toy. From the oversized floppy ears to the tiny trunk and tail, each detail is carefully crafted to capture the essence of these majestic animals in a miniature form. Whether you are gifting it to a friend or keeping it for yourself, this charming amigurumi will surely bring a smile to anyone's face with its whimsical charm and handmade touch. So grab your crochet hook and yarn, and let's embark on a delightful adventure of creating these lovable crochet elephant amigurumi together!
Materials Needed
For this DIY you will need:
- Yarn, in Pink and Yellow, but of course, you can use any color you like.
- Crochet hook.
- Stitch marker.
- Yarn needle.
- Sewing pins (optional).
- Fiber fill.
- Safety eyes.
- Scissors.
Stitches Used
CH = Chain.
SC = Single Crochet.
ST = Stitch.
Inc = Increase.
Dec = Decrease.
Slst = Slip Stitch.
(…) = Repeat the space in brackets the given number of times.
[…] = Total number of stitches.
* = Read note below.
Pattern
Body
In Pink.
- 1: 6SC in magic ring. [6]
- 2: 2SC in each st around. [12]
- 3: SC in each st around. [12]
- 5: SC in each st around. [12]
- 6: (3SC, inc) 3 times. [15]
- 7: (4SC, inc) 3 times. [18]
- 8: 5SC, (1SC, inc) 4 times, 5SC. [22]*
- 9: (1SC, inc) 10 times. [33]
- 10: SC in each st around. [33]*
- 18: SC in each st around. [33]
- 19: (9SC, dec) 3 times. [30]
- 20: (3SC, dec) 6 times. [24]
- 21: (2SC, dec) 6 times. [18] Stuff the body here.
- 22: (1SC, dec) 6 times. [12]
- 23: Dec all around. [6]
Fasten off and weave in tail.
*When you have finished about row 12, you want to sew around a cm together. Squeeze rows 8 and 10 together and sew it. This will be the mouth part—make sure it is around the place your rows start.
Add the safety eyes at this point as well, if you are using them.
Legs (4)
Start with Yellow.
- 1: 6SC in magic ring. [6]
- 2: 2SC in each st around. [12]
- Change to Pink.
- 3: SC in each st around. [12]
- 4: SC in each st around.
Fasten off and leave a long tail for sewing. Stuff them lightly.
Ears (2)
In Pink.
- 1: 6SC in magic ring. [6]
- 2: 2SC in each st around. [12]
- 3: (1SC, inc) 6 times. [18]
- 4: (2SC, inc) 6 times. [24]
- 5: (3SC, inc) 6 times. [30]
- 6: SC in each st around. [30]
- 9: SC in each st around. [30]
- 10: (3SC, dec) 6 times. [24]
- 11: (2SC, dec) 6 times. [18]
- 12: (1SC, dec) 6 times. [12]
Fasten off and leave a long tail for sewing. Don’t stuff the ears, just flatten them.
Inside of the Ears (2)
In Yellow.
- 1: CH5, insert in the second CH from hook, 4SC, turn. [4]
- 2: CH1, inc, 2SC, inc, turn. [6]
- 3: CH1, inc, 4SC, inc, turn. [8]
- 4: CH1, SC in each st, turn. [8]
- 5: CH1, dec, 4SC, dec, turn. [6]
- 6: CH1, dec, 2SC, dec. [4]
Fasten off and leave a long tail for sewing.
Assembling
First sew the inside of the ears to the outside of the ears. Then place both ears to the sides of her head, using sewing pins. This way you can easily move them around until you are happy. When you are sewing them on, position the legs as well, using the same method as the ears.
I put them all together on her belly, and then, just sew them on one by one. It can be a bit fiddly, but I am sure you can do it!
Last but not least, add 3 pieces of yarn on a yarn needle, and get those about halfway through at his butt (see picture). Make a braid with them and finish off with a knot, cut the remaining bits off, and you have finished your elephant!