Crochet Spring Birdie Basket

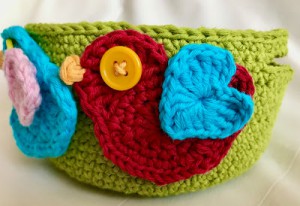
Introducing the Crochet Spring Birdie Basket, a delightful and charming creation that will add a touch of whimsy to your home decor. This unique basket is perfect for storing small items or displaying fresh flowers, bringing a burst of color and joy to any room. Handcrafted with love and attention to detail, this crochet masterpiece features intricate stitches that mimic the delicate feathers of a bird, creating a truly enchanting design. The Crochet Spring Birdie Basket is not just a practical storage solution, but also a work of art that showcases the beauty of crochet craftsmanship. Made with soft and durable yarn, this basket is not only visually appealing but also functional, providing a sturdy and reliable container for your belongings. The vibrant colors used in this design evoke the freshness and vibrancy of spring, making it a perfect addition to your seasonal decor. Whether you choose to use it as a catch-all for keys and trinkets or as a centerpiece filled with blooming flowers, the Crochet Spring Birdie Basket is sure to bring a smile to your face every time you see it.
This Birdie Basket is very easy and quick to make.
The pattern uses only basic crochet stitches - double crochets, single crochets and chains.
The pattern was made with Drops Paris and Drops Muskat.
Crochet hook: 3.50 mm.
Difficulty Level: Level 1 – Easy, for beginners

US crochet term:
SlSt – slip stitch
CH/s – chain/s
TR - tripple crochet / treble
DC - double crochet
HDC - half double crochet
SC - single crochet
SK - skip
T - turn
ST/s - stitch(es)
REP - repeat
Special stitches used:
Single Crochet Decrease (sc2tog)
A crochet decrease makes the current row or round that you are working on shorter than the one previous to it.
- Insert hook into the first stitch.
- Yarn over and draw through the loop.
- Do not complete the stitch as normal.
- Instead, insert the hook into the next stitch.
- Yarn over and draw through the loop.
- There should now be three loops on your hook
- Yarn over and draw through all three loops on the hook
- You should now have two single crochet stitches side-by-side, joined together into one stitch at the top.
PATTERN NOTES
1) A ch1, ch2, ch3 at beg of the first row don't count as a stitch throughout.
2) The project for a birdie is crochet as a circle.
3) The Cute Little Birdie measures 3 inches, 7.5 cm, Wind measures 2 inches / 5 cm.
You can make Birdie bigger or smaller with a thicker/thinner yarn or a larger/smaller hook size.
This Basket measures 4.7 inches / 12 cm (circle), 2.36 inch / 6 cm (high)
4) You need several colours:
colour A = for basket = spring green
colour B = for birdie = yellow or blue or red etc.
colour C = for wing = red, yellow, pink, red or any colour you like
colour D = for nose = orange or yellow
5) You need a button size about 1.2 inch / 0.5 cm
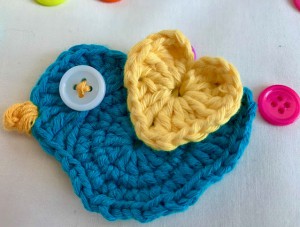
Birdie has 3 parts:
1) Birdie Body
2) Nose
3) Wing
THE WRITTEN PATTERN
BIRD
Use colour B
Make a magic ring
R1: Ch3 (doesn't work as a st), 12 dc into magie ring, sl st in 3rd ch from beg to join the row (12dc)
R2: Ch1 (doesn't work as a st), 2sc in each st around, sl st in 1st ch from beg (24sc)
R3: ch1 (doesn't work as a st), 1sc in first st, 2 sc in next, rep * 1 sc in next st, 2 sc in next st * repeat from * to * till you have 6 st left to last st,
1hdc in next st, 2 dc in next st, 1 dc in next st, 2tr in next st, 1 tr in next st, 2 dtr in next st, ch5, sl st in ch1 from beg to join the row
R4: 1st st in next 4 st, sk 3 st, 10 tr in one st, sk 3 st, sl st in each st till you reach the 1st ch of ch5 from R3, (which is the top of tail), cut the yarn and make a invisible ending
NOSE
Use color D
Work all stitches in 7th tr in R3 of Bird body
ch1, sc2tog, sl st
WING
Use colour C
make a magic ring
work in magic ring: ch3, 3tr, ch1, 3dc, ch1, 1tr, ch1, 3dc, ch1, 3tr, ch3
finish wish a slip stitch, cut the yarn - I would recommend you to leave a longer end (approx. 7.8 inch / 20 cm) and use this end to join the wing with the body.
Measurement
Bird: 3inch / 7.5 cm
Wind: 2inch / 5 cm
Basket
Use colour A
Make a magic ring
ch1 at the beginning doesn't work as a st
R1: ch1, 8 sc
R2, ch1, 2sc in each st (16 sc)
R3: ch1, rep * 2sc in one st, 1 sc in next st * repeat from * to * till end of round, sl st in ch1 from beg to join round (24 sc)
R4: ch1, rep * 2sc in one st, 1 sc in next 2 st * repeat from * to * till end of round, sl st in ch1 from beg to join round (32 sc)
R5: ch1, rep * 2 sc in one st, 1 sc in next 3 st * repeat from * to * till end of round, sl st in ch1 from beg to join round (40 sc)
R6: ch1, rep * 2sc in one st, 1 sc in next 4 st * repeat from * to * till end of round, sl st in ch1 from beg to join round (48 sc)
R7: ch1, rep * 2sc in one st, 1 sc in next 5 sc * repeat from * to * till end of round, sl st in ch1 from beg to join round (56 sc)
R8: ch1, rep * 2sc in one st, 1 sc in next 7 st * repeat from * to * till end of round, sl st in ch1 from beg to join round (64 sc)
R9: ch1, rep * 2 sc in one st, 1 sc in next 14 sc * repeat from * to * till end of round, sl st in ch1 from beg to join round (68 sc)
R10: ch1, rep * 2sc in one st, 1 sc in next 33 sc * repeat from * to * 2 time, sl st in ch1 from beg to join round (70 sc)
Circle Measurement: 4.7 inch / 12 cm
R11 - R20: 1 sc in each st around (70 sc in each round)
Measumerent: 2.36 inch / 6 cm high
Change a crochet hook: 4.00 mm. We will make 2 handles in next round.
R21: 1 sc in each st around (70 sc)
R22: ch10, make sure the chain is NOT twisted!
sk 10 st, 1 sc in each 25 st, ch10, sk 10 st, 1sc in next each 25 st till end of round, don't join the round and keep continue crocheting
R22: 10sc under ch10, 1sc in each next 25 st till you reach ch10, 10 sc under ch10, 1 sc in each next 25 st till end of round
R23: 1 sc in each st around (70 sl st)
R24: sl st in each st around (70 sl st)
Cut the yarn, fasten off and wave all ends in.

FINISHING with a tapestry needle
With a tapestry needle add a button as an eye on Birdie Body. Place the button on stitch where are placed 10 trc (R3 of Birdie Body).
Join Wing with Body, place Wing on the middle of magic circle of Birdie Body. Use a tapestry needle and sew both parts together.
Sew the eye on the head.
Weave in all ends.
