Crochet Classic Heritage Hat
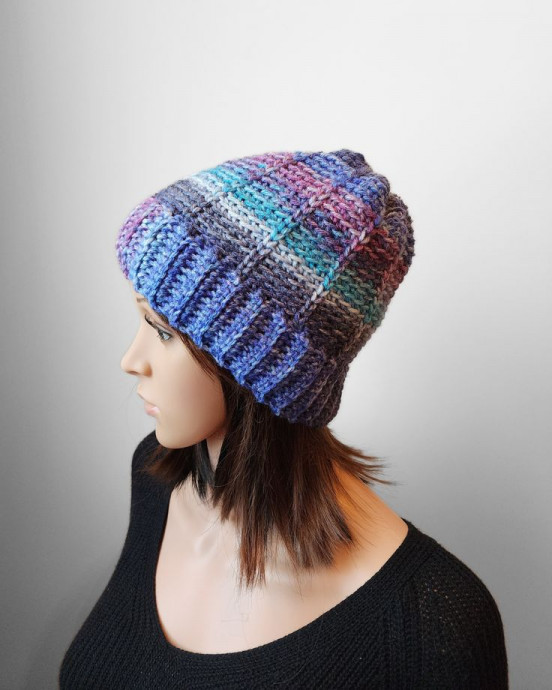
The Crochet Classic Heritage Hat is a delightful blend of timeless style and cozy comfort. Crafted with care and attention to detail, this hat is perfect for staying warm in style during chilly days. Whether you’re out for a walk in the crisp autumn air or sipping hot cocoa by the fireplace, this classic hat will add a touch of charm to any outfit. With its versatile design and soft texture, it’s sure to become a favorite piece in your winter wardrobe. So, why not treat yourself to this lovely hat and enjoy the warmth and style it brings to your day!
Supplies
Yarn: Red Heart Super Saver Bitty Stripes. 10 oz (283 g) and 515 yds (471 m). 100% Acrylic. Medium Weight Yarn [4]. Machine wash warm, gentle cycle.
Color: 1 skein Galaxy
Crochet Hooks: 5 mm (H) and 6 mm (J)
Finished Project: Child Hat: 2.4 oz (67 g) and 122 yds (111 m); Adult Hat: 3.42 oz (97 g) and 176.5 yds (161.4 m). Mannequin is wearing the Child Size Hat.
Scissors, Tapestry Needle (yarn needle)
Difficulty Level
Easy
Finished Sizes
Due to the nature of the waistcoat stitch these hats have very little stretch. The hat band can be rolled up for a more fitted beanie or left down for a slouchy hat.
6-12 months: 16.3 inches circumference X 7.1 inches height
12-24 months: 16.3 inches circumference X 7.6 inches height
3-5 years: 18 inches circumference X 8.2 inches height
Child: 18 inches circumference X 8.8 inches height
Teen: 19.6 inches circumference X 9.9 inches height
Adult Medium: 21.3 inches circumference X 11.1 inches height
Adult Large: 23 inches circumference X 12.2 inches height
Gauge
Hat Band: Approximately 8 sc per 2 inches and 8 rows per 2 inches (top of the hat).
Main Hat: Approximately 12 sts per 4 inches and 14 rounds per 4 inches worked in pattern stitch.
You can substitute any yarn and hook for this stitch pattern – just remember when you substitute if your gauge is different, the finished size, and amount of yarn used for your project will also be different.
Abbreviations
US Terminology used
bl – back loop
ch(s) – chain(s)
g – grams
m – meters
oz – ounces
R – row
RS – right side (outside of the hat)
rem – remaining
rep – repeat
Rnd – round
sc – single crochet
sc2tog – single crochet 2 together
sk – skip/skipped
sl st – slip stitch
st/sts – stitch/stitches
WS – wrong side
wst – waistcoat stitch
yds – yards
* to ** – Repeat the instructions between the asterisks the number of times indicated. This repeat will contain multiple instructions.
[ ] – at the end of the row – the total number of stitches
( ) – important notes AND sets of stitches to be worked within one stitch, or space
Special Stitches
Waistcoat Stitch (wst)
The waistcoat stitch is basically a single crochet stitch that is worked between the 2 legs of the stitch, rather than under the top loops of the stitch.
A tutorial follows the pattern below.
Decrease Stitches
The decrease sts (sc2tog) will be worked like the stitch they are being worked into. This means if you are making a sc2tog and the 2 stitches are a wst and sc in the bl, the first part of the sc2tog will be worked as a wst (in the center of the stitch) and the second part of the sc2tog will be worked under the bl of the sc. Whatever the stitch you are making the decrease into is the way the stitch will be worked.
Notes:
Multiple of 5+4
Initial ch 1 does not count as a stitch.
You can make your slip stitches tightly as we will not be working into them.
The decrease sts (sc2tog) will be worked like the stitch they are being worked into. This means if you are making a sc2tog and the 2 stitches are a wst and sc in the bl, the first part of the sc2tog will be worked as a wst (in the center of the stitch) and the second part of the sc2tog will be worked under the bl of the sc. Whatever the stitch you are making the decrease into is the way the stitch will be worked. If this is too confusing you can simply work sc2tog as you would normally – it will change the way the top of the hat looks.
If you’d like to increase the hat height, work more repeat rounds.
Classic Heritage Hat Pattern
This project is crocheted from the bottom-up, beginning with the hat band. The main hat is worked into the hat band and in joined rounds.
Baby (6-12 months) Classic Heritage Hat
Hat Band
Leaving a 8-inch yarn tail, and your 5 mm (H) crochet hook (or size required for gauge):
R1: Ch 11, sk the first ch, 1 sc in each rem ch across, ch 1, turn. [10 sc]
R2-R49: 1 sc in the bl of each of the first 9 sts, 1 sc in the last st, ch 1, turn. [10 sc]
Rotate your hat band to work across the row end.
Main Hat
Using your 6 mm (J) crochet hook (or size required for gauge):
Rnd 1: 1 sc in each row end, sl st to join. [49 sc]
Rnd 2-Rnd 12: Ch 1, *1 wst in the next st, 1 sc in the bl of each of the next 4 sts**. Work from * to ** around to the last 4 sts. 1 wst in the next st, 1 sc in the bl of each of the next 3 sts. Sl st to join. [39 sc, 10 wst]
Hat Shaping – please see the notes section.
Rnd 13: Ch 1, *1 wst in the next st, sc2tog, 1 sc in the bl of each of the next 2 sts**. Work from * to ** around to the last 4 sts. 1 wst in the next st, sc2tog, 1 sc in the bl of the last st. Sl st to join. [29 sc, 10 wst]
Rnd 14: Ch 1, *1 wst in the next st, sc2tog, 1 sc in the bl of the next st**. Work from * to ** around to the last 3 sts. 1 wst in the next st, sc2tog. Sl st to join. [19 sc, 10 wst]
Rnd 15: Ch 1, *1 wst in the next st, sc2tog**. Work from * to ** around to the last 2 sts. Sc2tog. Sl st to join. [10 sc, 9 wst]
Rnd 16: Ch 1, sc2tog around to the last st, 1 wst in the last st. Sl st to join. [9 sc, 1 wst]
Proceed to Finishing Instructions.
Toddler (12-24 months) Classic Heritage Hat
Hat Band
Leaving a 8-inch yarn tail, and your 5 mm (H) crochet hook (or size required for gauge):
R1: Ch 11, sk the first ch, 1 sc in each rem ch across, ch 1, turn. [10 sc]
R2-R49: 1 sc in the bl of each of the first 9 sts, 1 sc in the last st, ch 1, turn. [10 sc]
Rotate your hat band to work across the row end.
Main Hat
Using your 6 mm (J) crochet hook (or size required for gauge):
Rnd 1: 1 sc in each row end, sl st to join. [49 sc]
Rnd 2-Rnd 14: Ch 1, *1 wst in the next st, 1 sc in the bl of each of the next 4 sts**. Work from * to ** around to the last 4 sts. 1 wst in the next st, 1 sc in the bl of each of the next 3 sts. Sl st to join. [39 sc, 10 wst]
Hat Shaping – please see the notes section.
Rnd 15: Ch 1, *1 wst in the next st, sc2tog, 1 sc in the bl of each of the next 2 sts**. Work from * to ** around to the last 4 sts. 1 wst in the next st, sc2tog, 1 sc in the bl of the last st. Sl st to join. [29 sc, 10 wst]
Rnd 16: Ch 1, *1 wst in the next st, sc2tog, 1 sc in the bl of the next st**. Work from * to ** around to the last 3 sts. 1 wst in the next st, sc2tog. Sl st to join. [19 sc, 10 wst]
Rnd 17: Ch 1, *1 wst in the next st, sc2tog**. Work from * to ** around to the last 2 sts. Sc2tog. Sl st to join. [10 sc, 9 wst]
Rnd 18: Ch 1, sc2tog around to the last st, 1 wst in the last st. Sl st to join. [9 sc, 1 wst]
Proceed to Finishing Instructions.
Small Child (3-5 years) Classic Heritage Hat
Hat Band
Leaving a 8-inch yarn tail, and your 5 mm (H) crochet hook (or size required for gauge):
R1: Ch 11, sk the first ch, 1 sc in each rem ch across, ch 1, turn. [10 sc]
R2-R54: 1 sc in the bl of each of the first 9 sts, 1 sc in the last st, ch 1, turn. [10 sc]
Rotate your hat band to work across the row end.
Main Hat
Using your 6 mm (J) crochet hook (or size required for gauge):
Rnd 1: 1 sc in each row end, sl st to join. [54 sc]
Rnd 2-Rnd 16: Ch 1, *1 wst in the next st, 1 sc in the bl of each of the next 4 sts**. Work from * to ** around to the last 4 sts. 1 wst in the next st, 1 sc in the bl of each of the next 3 sts. Sl st to join. [43 sc, 11 wst]
Hat Shaping – please see the notes section.
Rnd 17: Ch 1, *1 wst in the next st, sc2tog, 1 sc in the bl of each of the next 2 sts**. Work from * to ** around to the last 4 sts. 1 wst in the next st, sc2tog, 1 sc in the bl of the last st. Sl st to join. [32 sc, 11 wst]
Rnd 18: Ch 1, *1 wst in the next st, sc2tog, 1 sc in the bl of the next st**. Work from * to ** around to the last 3 sts. 1 wst in the next st, sc2tog. Sl st to join. [21 sc, 11 wst]
Rnd 19: Ch 1, *1 wst in the next st, sc2tog**. Work from * to ** around to the last 2 sts. Sc2tog. Sl st to join. [11 sc, 10 wst]
Rnd 20: Ch 1, sc2tog around to the last st, 1 wst in the last st. Sl st to join. [10 sc, 1 wst]
Proceed to Finishing Instructions.
Child (6-10 years) Classic Heritage Hat
Hat Band
Leaving a 8-inch yarn tail, and your 5 mm (H) crochet hook (or size required for gauge):
R1: Ch 11, sk the first ch, 1 sc in each rem ch across, ch 1, turn. [10 sc]
R2-R54: 1 sc in the bl of each of the first 9 sts, 1 sc in the last st, ch 1, turn. [10 sc]
Rotate your hat band to work across the row end.
Main Hat
Using your 6 mm (J) crochet hook (or size required for gauge):
Rnd 1: 1 sc in each row end, sl st to join. [54 sc]
Rnd 2-Rnd 18: Ch 1, *1 wst in the next st, 1 sc in the bl of each of the next 4 sts**. Work from * to ** around to the last 4 sts. 1 wst in the next st, 1 sc in the bl of each of the next 3 sts. Sl st to join. [43 sc, 11 wst]
Hat Shaping – please see the notes section.
Rnd 19: Ch 1, *1 wst in the next st, sc2tog, 1 sc in the bl of each of the next 2 sts**. Work from * to ** around to the last 4 sts. 1 wst in the next st, sc2tog, 1 sc in the bl of the last st. Sl st to join. [32 sc, 11 wst]
Rnd 20: Ch 1, *1 wst in the next st, sc2tog, 1 sc in the bl of the next st**. Work from * to ** around to the last 3 sts. 1 wst in the next st, sc2tog. Sl st to join. [21 sc, 11 wst]
Rnd 21: Ch 1, *1 wst in the next st, sc2tog**. Work from * to ** around to the last 2 sts. Sc2tog. Sl st to join. [11 sc, 10 wst]
Rnd 22: Ch 1, sc2tog around to the last st, 1 wst in the last st. Sl st to join. [10 sc, 1 wst]
Proceed to Finishing Instructions.
Teen / Adult Small Classic Heritage Hat
Hat Band
Leaving a 8-inch yarn tail, and your 5 mm (H) crochet hook (or size required for gauge):
R1: Ch 11, sk the first ch, 1 sc in each rem ch across, ch 1, turn. [10 sc]
R2-R59: 1 sc in the bl of each of the first 9 sts, 1 sc in the last st, ch 1, turn. [10 sc]
Rotate your hat band to work across the row end.
Main Hat
Using your 6 mm (J) crochet hook (or size required for gauge):
Rnd 1: 1 sc in each row end, sl st to join. [59 sc]
Rnd 2-Rnd 22: Ch 1, *1 wst in the next st, 1 sc in the bl of each of the next 4 sts**. Work from * to ** around to the last 4 sts. 1 wst in the next st, 1 sc in the bl of each of the next 3 sts. Sl st to join. [47 sc, 12 wst]
Hat Shaping – please see the notes section.
Rnd 23: Ch 1, *1 wst in the next st, sc2tog, 1 sc in the bl of each of the next 2 sts**. Work from * to ** around to the last 4 sts. 1 wst in the next st, sc2tog, 1 sc in the bl of the last st. Sl st to join. [35 sc, 12 wst]
Rnd 24: Ch 1, *1 wst in the next st, sc2tog, 1 sc in the bl of the next st**. Work from * to ** around to the last 3 sts. 1 wst in the next st, sc2tog. Sl st to join. [23 sc, 12 wst]
Rnd 25: Ch 1, *1 wst in the next st, sc2tog**. Work from * to ** around to the last 2 sts. Sc2tog. Sl st to join. [12 sc, 11 wst]
Rnd 26: Ch 1, sc2tog around to the last st, 1 sc in the last st. Sl st to join. [11 sc, 1 wst]
Proceed to Finishing Instructions.
Adult Medium Classic Heritage Hat
Hat Band
Leaving a 8-inch yarn tail, and your 5 mm (H) crochet hook (or size required for gauge):
R1: Ch 11, sk the first ch, 1 sc in each rem ch across, ch 1, turn. [10 sc]
R2-R64: 1 sc in the bl of each of the first 9 sts, 1 sc in the last st, ch 1, turn. [10 sc]
Rotate your hat band to work across the row end.
Main Hat
Using your 6 mm (J) crochet hook (or size required for gauge):
Rnd 1: 1 sc in each row end, sl st to join. [64 sc]
Rnd 2-Rnd 26: Ch 1, *1 wst in the next st, 1 sc in the bl of each of the next 4 sts**. Work from * to ** around to the last 4 sts. 1 wst in the next st, 1 sc in the bl of each of the next 3 sts. Sl st to join. [51 sc, 13 wst]
Hat Shaping – please see the notes section.
Rnd 27: Ch 1, *1 wst in the next st, sc2tog, 1 sc in the bl of each of the next 2 sts**. Work from * to ** around to the last 4 sts. 1 wst in the next st, sc2tog, 1 sc in the bl of the last st. Sl st to join. [38 sc, 13 wst]
Rnd 28: Ch 1, *1 wst in the next st, sc2tog, 1 sc in the bl of the next st**. Work from * to ** around to the last 3 sts. 1 wst in the next st, sc2tog. Sl st to join. [25 sc, 13 wst]
Rnd 29: Ch 1, *1 wst in the next st, sc2tog**. Work from * to ** around to the last 2 sts. Sc2tog. Sl st to join. [13 sc, 12 wst]
Rnd 30: Ch 1, sc2tog around to the last st, 1 wst in the last st. Sl st to join. [12 sc, 1 wst]
Proceed to Finishing Instructions.
Adult Large Classic Heritage Hat
Hat Band
Leaving a 8-inch yarn tail, and your 5 mm (H) crochet hook (or size required for gauge):
R1: Ch 11, sk the first ch, 1 sc in each rem ch across, ch 1, turn. [10 sc]
R2-R69: 1 sc in the bl of each of the first 9 sts, 1 sc in the last st, ch 1, turn. [10 sc]
Rotate your hat band to work across the row end.
Main Hat
Using your 6 mm (J) crochet hook (or size required for gauge):
Rnd 1: 1 sc in each row end, sl st to join. [69 sc]
Rnd 2-Rnd 30: Ch 1, *1 wst in the next st, 1 sc in the bl of each of the next 4 sts**. Work from * to ** around to the last 4 sts. 1 wst in the next st, 1 sc in the bl of each of the next 3 sts. Sl st to join. [55 sc, 14 wst]
Hat Shaping – please see the notes section.
Rnd 31: Ch 1, *1 wst in the next st, sc2tog, 1 sc in the bl of each of the next 2 sts**. Work from * to ** around to the last 4 sts. 1 wst in the next st, sc2tog, 1 sc in the bl of the last st. Sl st to join. [41 sc, 14 wst]
Rnd 32: Ch 1, *1 wst in the next st, sc2tog, 1 sc in the bl of the next st**. Work from * to ** around to the last 3 sts. 1 wst in the next st, sc2tog. Sl st to join. [27 sc, 14 wst]
Rnd 33: Ch 1, *1 wst in the next st, sc2tog**. Work from * to ** around to the last 2 sts. Sc2tog. Sl st to join. [14 sc, 13 wst]
Rnd 34: Ch 1, sc2tog around to the last st, 1 wst in the last st. Sl st to join. [13 sc, 1 wst]
Proceed to Finishing Instructions.
Finishing Instructions:
Using the 8-inch tail of yarn you left before starting the hat band, sew the two edges of the hat band together using a whipstitch.
Finish off and weave in your ends.
We will be closing the top of the hat using this simple closing method (see tutorials below).
Weave in any remaining ends securely.
No comments
Write a comment


