Crochet Flat Bell Amigurumi
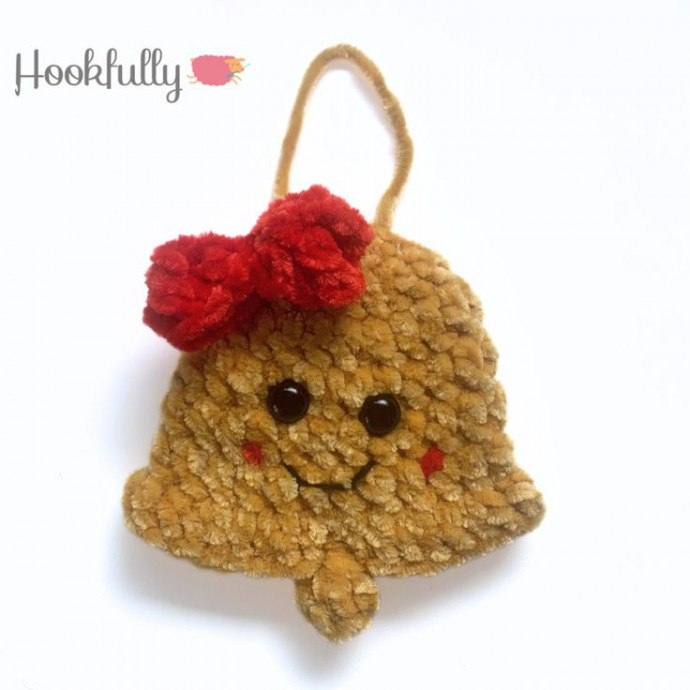
Crocheting flat bell amigurumi can be such a joyful and rewarding experience! These charming little creations are perfect for adding a touch of whimsy to your projects. With a few simple tools and some basic crochet skills, you can create adorable flat bell shapes that can be turned into keychains, ornaments, or even embellishments for bags and accessories. The best part is, you can let your creativity run wild by choosing different colors and yarn textures to make each amigurumi uniquely yours. So grab your crochet hook and get ready to craft some delightful flat bell amigurumi that are sure to bring a smile to anyone's face!
Supplies
- 4mm crochet hook
- DK weight yarn
- Scissors
- Sewing needle
- 10mm Safety eyes
- Black embroidery thread
Yarn
- Weight – DK / Light Worsted/ #3
- Brand – Style craft Squeeze Me DK
- A – Yellow
- B – Red
- Total: 27 yards
Gauge
- 3mm hook: 2” x 2” gauge swatch = 4 rows of 7 dc
Finished Size
- Width 9.5cm X Height 9.5cm
Pattern Notes
- Chains and finishing slip stitches are not included in the stitch count
- The last numbers in brackets are the total number of stitches in the round
- Stitches separated with a comma are to be made in separate spaces. eg. (sc, 2sc) would mean sc in first stitch then 2sc in next stitch
- Change colour while completing the previous stitch.
- Always start in same stitch as slip stitch
- If you have trouble using the MR with fluffy yarn, try making a separate MR with acrylic yarn.
Abbreviations
USA Terminology (UK Translation)
- ch – Chain
- dc – Double crochet
- 2dc – 2 dc in 1 space (increase)
- MR – Magic ring
- PC – Popcorn stitch
- R – Round / Row
- sl st – Slip stitch
- st/sts – Stitch/Stitches
- tr – Treble crochet
Skill Level
Easy
Bell
Round 1
- Use Yellow (A) yarn
- In a MR, ch x 2, dc x 10
- sl st to first st & ch x 2
- (10 sts)
Round 2
- 2dc x 10
- sl st to first st & ch x 2
- (20 sts)
Round 3
- (2dc, dc x 9) 2 times
- sl st to first st & ch x 2
- (22 sts)
Round 4 – 6
- dc x 22
- sl st to first st & ch x 2
- (3 rounds of 22 sts)
Round 7
- 2dc x 2
- (dc, 2dc) 10 times
- sl st to first st & ch x 1
- (34 sts)
Row 8
- skip 16 sts & sl st in 17th st
- PC in the same sts as both sl st
- Fasten off & weave in ends
- Sew a hanging loop to R1 MR
- (1 st)
Face
- Attach safety eyes between R4 & R5, 3 sts visible between them
- With black thread, sew a mouth over R6
- With Red (B) yarn, sew cheeks over R6
Bow
Round 1
- Use Red (B) yarn
- ch x 14 then sl st to first ch to make a circle, then ch 3 more
- tr x 14
- sl st to first st and fasten off
- Wrap the tails around the centre to make a bow
- Sew the bow on the left side of R2
- (14 sts)
No comments
Write a comment


