How to Create a Crochet Chibi Jack Skellington Amigurumi
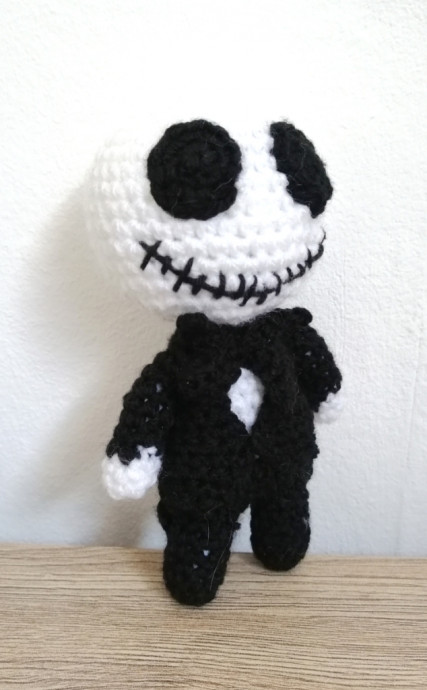
Creating a Crochet Chibi Jack Skellington Amigurumi is a fun and adorable project for any fan of Tim Burton's "The Nightmare Before Christmas." The miniature size and cute design make it a delightful addition to your collection of amigurumi creations. With its iconic striped suit and stitched grin, this Jack Skellington amigurumi captures the charm of the beloved character in a cuddly form. Whether you're a seasoned crocheter or just starting out, crafting this little Jack will surely bring a smile to your face and brighten up your day with its spooky-cute vibe. Get your yarn and hook ready to embark on a crocheting adventure that's both charming and whimsical!
Materials
To make Jack you will need:
- A Crochet hook, 2.5mm
- Black and white yarn
- A tapestry needle and scissors
- Stuffing
- A stitch marker to help you keep track of the start of the round
Please note that you can make Jack using any size crochet hook and yarn weight for a smaller or bigger result. I like using DK as it’s most commonly available. If you make amigurumi, it is usually recommended to go down a bit from the recommended hook size for the yarn to allow for a no-hole look (we don’t want to see the stuffing show through in between stitches)! Using DK yarn and a 2.5mm crochet hook, Jack should be about 14cm tall.
Stitches & Abbreviations
The pattern is written using US crochet terms in continuous spirals. You will need to know the following kinds of stitches to make him:
- Magic Ring (MR)
- Chaining (Ch)
- Single crochet (sc)
- Decrease (dec); preferably using the invisible decrease method
- Increase (inc)
- Slip stitch (sl)
And now, let’s get started!
Head (in White)
Round 1: In a MR, sc 6
Round 2: Inc around (12)
Round 3: (Sc, inc) around (18)
Round 4: (Sc 2, inc) around (24)
Round 5: Sc 2, (inc, sc) x3, sc 6, (inc, sc) x3, sc 4 (30)
Round 6: Sc 3, (inc, sc 2) x3, sc 6, (inc, sc 2) x3, sc 3 (36) (this will help make the face more oval and less round)
Round 7-14 (8 rounds): Sc around (36)
Round 15: Sc 7, (dec, sc 2) x3, sc 6, (dec, sc 2) x2, dec, sc (30)
Round 16: Sc 7, (dec, sc) x3, sc 6, (dec, sc) x2, dec (24), start stuffing
Round 17: (Sc 2, dec) around (18)
Round 18: (Sc, dec) around (12)
Round 19: Dec around (6), fasten off and sew closed
Feet (in Black)
Round 1: In a MR, sc 8
Round 2-7 (6 rounds): Sc around (8), stuff
Make 2, but do not fasten off the second. We will now join them together for the Body.
Round 8: Sc 2, ch 2, then, into any stitch on leg 1, sc 8, sc 2 in back of chains, sc 6 on leg 2 (20)
Round 9-11 (3 rounds): Sc around (20), change to white
Round 12: Sc around (20), stuff
Round 13: Sc 8, dec around (18)
Round 14: Sc 7, dec around (16)
Round 15-16: Sc around (16)
Round 17: Sc, dec, sc 6, dec, sc 5 (14), finish stuffing
Round 18: Sc, dec, sc 5, dec, sc 4 (12), fasten off
Arms (Make 2)
Round 1: In white, in a MR, sc 6
Round 2-3: Sc around (6), change to black
Round 4-11 (8 rounds): Sc around (6), stuff and fasten off
Jacket (in Black)
Row 1: Ch 9, sc 8
Row 2: Inc, ch 5, skip 1 stitch, sc 4, ch 5, skip one stitch, inc (18)
Row 3-4: Sc across (18)
Row 5: Sc 8, inc, sc 9 (19)
Row 6: Inc, sc 17, inc (21)
Row 7-8: Sc across (21)
Row 9: Dec 2, sc 13, dec 2 (17)
Row 10: Dec, sc 13, dec (15)
We will now work on the split part of the jacket
Row 11: Dec, sc 6 (7)
Row 12: Sc 3, dec (4)
Row 13: Sc across (4)
Row 14: Sc 2, dec (3)
Row 15: Sc across (3)
Row 16: Sc, dec (2)
Row 17: Dec (1), fasten off
Repeat this on the other side.
Eyes (in Black; Make 2)
Round 1: In a MR, sc 6
Round 2: Inc around (12)
Round 3: Hdc 4, sl, fasten off
Bow (in Black)
Ch 6, sc 4, sl, (ch 5, sc 4, sl) x3, fasten off
Assembly
First of all, sew the body to the head. Then, sew on the arms to the side. Put on the jacket, then sew on the bow. Next, sew on the eyes and lastly, take some black yarn/thread and embroider a mouth. That’s all there is to it!


