Crochet Big Amigurumi Bee
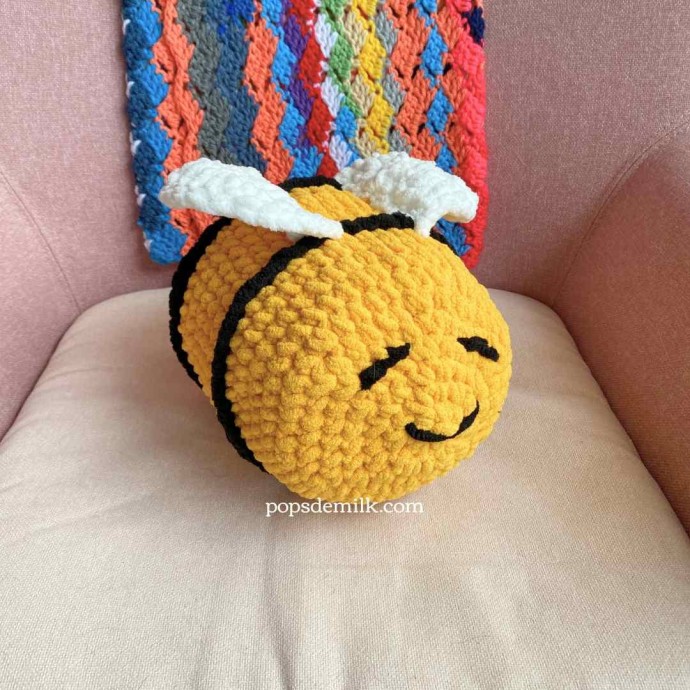
Crocheting a big amigurumi bee can be such a fun and rewarding project! The fluffy yarn and vibrant colors bring this cute little insect to life, making it a delightful addition to any craft collection. Whether you're a crochet enthusiast or a beginner looking for a new challenge, creating a big amigurumi bee allows you to showcase your creativity and patience while enjoying the therapeutic rhythm of working with yarn.
Finished size, after stuffing
Approx. 9” tall, 22” around
Materials
- 9.00mm hook
- 6.00mm hook
- Super bulky (6) yarn in Yellow, White, and Black. I’m using Bernat Blanket.
- Polyfil stuffing, approx. 170-200 grams depending on how firm or soft you prefer
- Yarn needle
- Scissors
- Stitch marker
- Optional: fabric to make a liner. I used an old t-shirt.
Pattern Notes
This bee crochet pattern is worked in continuous rounds, do not join or turn at the end of each round. Keep a somewhat tight tension so there are no gaps in your stitches.
In this pattern, I’ve made the black stripes separately as a strip of chains but you can also work the stripes into the body by changing the yarn color. If you do switch yarn colors for the stripes consider placing them at Rounds 12 and 20 or the rounds of your choosing.
Optional: Use some fabric like an old t-shirt or similar stretchy fabric to make an insert or liner to hold the stuffing inside the body. I made a simple liner by making a tube and closing it at both ends after I added the stuffing.
Bee Body
Round 1: make 9 sc in magic ring
Round 2: inc in each st (18 sts)
Round 3: [sc in next 2 st, inc in next st] x 6 (24 sts)
Round 4: [sc in next 3 st, inc in next st] x 6 (30)
Round 5: [sc in next 4 st, inc in next st] x 6 (36)
Round 6: [sc in next 5 st, inc in next st] x 6 (42 sts)
Round 7: [sc in next 6 st, inc in next st] x 6 (48 sts)
Rounds 8-19: sc in each st around
Round 20: [sc in next 6 sts, dec] x 6 (42 sts)
Round 21: [sc in next 5 sts, dec] x 6 (36 sts)
Round 22: [sc in next 4 sts, dec] x 6 (30 sts)
Start adding stuffing to the body. If you are using a liner, place it inside the body and start to add the stuffing.
Round 23: [sc in next 3 sts, dec] x 6 (24 sts)
Round 24: [sc in next 2 sts, dec] x 6 (18 sts)
Round 25: [sc in next st, dec] x 6 (12 sts)
Round 26: dec x 6 (6 sts)
Add more stuffing before you close the liner and the bee, if needed.
Cut the yarn leaving a long tail for sewing. Use a yarn needle to sew the opening.
Wings, make 2
Row 1: in magic ring, ch 2 (does not count as a st) make 6 dc in magic ring, turn
Row 2: ch 2 (does not count as a st), 2 dc in each st across, turn (12 sts)
Row 3: ch 1 (does not count as a st), sc in the first st and the next 2 sts, 2 hdc in next st, 2 dc in the next 4 sts, 2 hdc in the next st, sc in the last 3 sts
Cut yarn leaving a long tail for sewing.
Black Stripes, make 2
With 6.00mm hook
Make enough chains to fit around the body.
Cut the yarn leaving a long tail for sewing. You can also sew the stripes with regular needle and thread.
Putting the Bee Together
If you’ve made the black stripes separately, use a yarn needle to sew them onto the body wherever you prefer. You can also sew the stripes with regular thread and a sewing needle.
Sew the wings to the body. Align the wings on top of the body with the wrong sides facing and sew.
Tip: Use locking stitch markers or safety pins to hold the stripes and wings in place while you sew.
Use a yarn needle and the black yarn to embroider the eyes and mouth and any embellishments you want to add.
Once you’ve weaved in your ends your snuggly bee is all done and ready to be hugged!

