Crochet Short Row Slip Stitch Vest
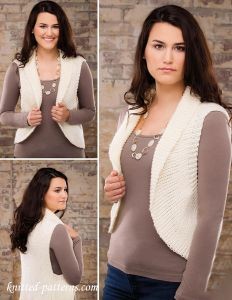
The Crochet Short Row Slip Stitch Vest is a stylish and versatile addition to any wardrobe. With its unique construction using slip stitches and short rows, this vest provides a fun and engaging crochet project for crafters of all levels. The slip stitch technique creates a dense and textured fabric that drapes beautifully, making this vest both flattering and comfortable to wear.
FINISHED SIZES
Instructions given fit size small; changes for medium, large and X-large are in [].
FINISHED MEASUREMENT
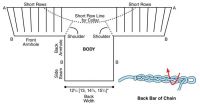
Back Width: 12 1/4 inches (small) [13 inches (medium), 14 1/4 inches (large), 15 1/4 inches (X-large)]
MATERIALS
Universal Yarn Uptown DK light (DK) weight acrylic yarn (3 1/2 oz/273 yds/100g per skein):
3 [3, 4, 4] skeins #102 lily
Size H/8/5mm crochet hook or size needed to obtain gauge
Tapestry needle
GAUGE
18 sl sts = 4 inches; 28 sl st rows = 4 inches
PATTERN NOTES
The Slip-Stitch Vest relies on the stretch of the fabric for shaping.
Slip stitch crochet and short rows along the front provide the necessary stretch.
Sizing is based on back width not bust size.
VEST
Row 1: Ch 31 [35, 39, 43], ch 1 more, sk ch just made, sl st in back bar (see illustration) of each ch across, turn.
Row 2: Ch 1, sk ch just made, sl st in each back lp (see Stitch Guide) across, turn.
Row 3: Ch 1, sk ch just made, sl st in back lp of each of first 24 [28, 32, 36] sts, leaving rem sts unworked, turn.
Row 4: Ch 1, sk ch just made, sl st in each back lp across, turn.
Row 5: Ch 1, sk ch just made, sl st in back lp of each of first 24 [28, 32, 36] sts, sk turning ch, drop down 2 rows to unworked sts, sl st in back lp of each of next unworked 7 sts, turn. (31 [35, 39, 43] sts)
Rows 6-125: [Rep rows 2-5 consecutively] 30 times.
Row 126: Ch 1, sk ch just made, sl st in each back lp across, turn.
Row 127: Ch 1, sk ch just made, sl st in back lp of each of first 24 [28, 32, 36] sts, leaving rem sts unworked, turn.
Row 128: Ch 1, sk ch just made, sl st in each back lp across, turn.
Row 129: Ch 1, sk ch just made, sl st in back lp of each of first 24 [28, 32, 36] sts, sk turning ch, drop down 2 rows to unworked sts, sl st in back lp of each of next unworked 7 sts, ch 76 [80, 84, 88], turn.
Rows 130-214 [130-220, 130-228, 130-236]: Ch 1, sk ch just made, sl st in each back lp across, turn. (107 [115, 123, 131] sts)
Row 215 [221, 229, 237]: Ch 1, sk ch just made, sl st in back lp of each of first 24 [28, 32, 36] sts, leaving rem sts unworked, turn.
Row 216 [222, 230, 238]: Ch 1, sk ch just made, sl st in each back lp across, turn.
Row 217 [223, 231, 239]: Ch 1, sk ch just made, sl st in back lp of each of first 24 [28, 32, 36] sts, sk turning ch, drop down 2 rows to unworked sts, sl st in back lp of each of next unworked 7 sts, turn.
Row 218 [224, 232, 240]: Ch 1, sk ch just made, sl st in each back lp across, turn.
Rows 219-342 [225-348, 233-356, 241-364]: *Rep rows 215-218 [221-224, 229-232, 237-240], rep from * 30 times. At end of last row, fasten off.
FINISHING
Curve ribbed extension around so that the outer row meets the first back row to form a side seam according to schematic.
The non-ribbed edge meets the back lower edge. The ribbed edge ends in the middle of the side and forms the front armhole.
Sl st front lps (see Stitch Guide) tog or sew into place.
Rep for other side.
