Crochet Ice Chip Mitts
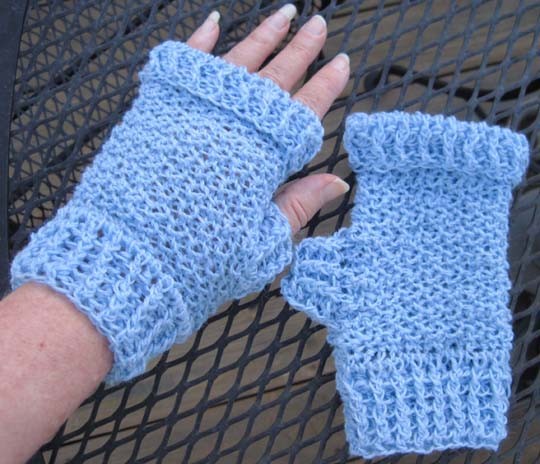
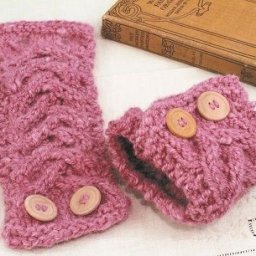
What a unique and fun project! Crochet Ice Chip Mitts are a great way to keep your hands warm and stylish during the winter months. You can use a soft, chunky yarn and a large hook to create a thick, puffy fabric that will keep your hands cozy. To add the "ice chip" design, you can use a contrasting yarn or a stitch pattern that resembles the texture of ice.
Skill level: Intermediate
Size: To fit average woman’s hand. Approximately 7.5” long x 7” circumference (unstretched)
Materials:
200 yds. sock-weight* yarn
*Note: there may be differences in “sock-weight” yarns from brand to brand, so finished mitt results may vary.
Size H/8 (5 mm) crochet hook, or size needed to achieve gauge
Row counter (optional)
Tapestry needle
Gauge: In pattern, 18 sts & 20 rows = 4” with sock-weight yarn on size H/8 (5 mm) hook
Pattern stitch: *Sc in front loop only (FLO) of next stitch, sc in back loop only
(BLO) of next stitch, rep from *.
Pattern notes:
Mitts are worked in flat pieces from lower edge to top, then slip-stitch seamed along sides, leaving an opening for thumb. Thumb stitches are picked up and worked around thumb opening. Lower ribbing is picked up from opposite side of foundation chain and worked down.
Because of the textured nature of the fabric formed by the stitch pattern, it may be difficult to count stitches and rows. Count stitches across top of work and count rows either using a row counter or by counting the “bumps” in the fabric (1 “bump” = 2 rows). Make sure to begin each row of textured pattern area by working the first stitch in front loop only (FLO) and end each row by working the last stitch in back loop only (BLO).
Ch 3 at beginning of double crochet rows counts as a stitch.
Special stitches:
Front loop only (FLO): single crochet in next stitch, inserting hook through front loop only of top two loops, rather than through both loops.
Back loop only (BLO): single crochet in next stitch, inserting hook through back loop only of top two loops, rather than through both loops.
Front post double crochet (fpdc): wrap yarn around hook once (in preparation for a double crochet), then insert hook from right to left and from front to back to front around post of designated stitch and complete the double crochet.
Back post double crochet (bpdc): wrap yarn around hook once (in preparation for a double crochet), then insert hook from right to left and from back to front to back around post of designated stitch and complete the double crochet.
Terms/Abbreviations: back loop only (BLO), back post double crochet (bpdc), beginning (beg), chain (ch), decrease (dec), double crochet (dc), each (ea), front loop only (FLO), front post double crochet (fpdc), hook (hk), increase (inc), loop (lp), repeat (rep), skip (sk), slip stitch (sl st), stitch (st), together (tog)
Mitt (make 2)
Row 1 (RS): Ch 35, sc in 2nd ch from hk and in ea ch across, turn (34 sc)
Row 2 (WS): Ch 1, sc in front loop only (FLO) of first sc, sc in back loop only
(BLO) of next sc, *sc in FLO of next sc, sc in BLO of next sc, rep from * across, turn.
Rows 3-24: Rep Row 2.
Begin upper rib:
Row 25 (RS): Ch 3; working through both top loops again, dc in next sc & in ea sc across, turn (34 dc)
Row 26 (WS): Ch 3, *fpdc around next dc, bpdc around next dc, rep from * across, end with dc in top of beg ch-3, turn.
Row 27 (RS): Ch 3, *fpdc around next fpdc, bpdc around next bpdc, rep from * across, end with dc in top of beg ch-3. Do not turn, do not cut yarn.
Seam and thumb opening:
Fold piece in half vertically with right sides together. Working evenly along ends of rows, slip stitch seam for 3.5” to create upper portion of mitt. Fasten off.
Rejoin yarn 1.5” further along seam from where yarn was fastened off. Slip stitch remainder of seam. Do not cut yarn. Turn piece right side out.
Lower rib (begin working in joined rounds with RS facing throughout):
Rnd 1: Ch 3, dc in next 33 foundation ch around, join with sl st to top of beg ch-3, do not turn (34 dc)
Rnd 2: Ch 3, fpdc around next dc, *bpdc around next dc, fpdc around next dc, rep from * around, join with sl st to top of beg ch-3, do not turn.
Rnds 3-6: Ch 3, fpdc around next fpdc, *bpdc around next bpdc, fpdc around next fpdc, rep from * around, join with sl st to top of beg ch-3, do not turn.
At end of Rnd 6, fasten off.
Thumb (worked in joined rnds with RS facing throughout):
Attach yarn at side seam at lower end of thumb opening.
Rnd 1: Ch 3, work 15 dc evenly around opening, join with sl st to top of beg ch-3, do not turn (16 dc)
Rnd 2: Ch 3, fpdc around next dc, *bpdc around next dc, fpdc around next dc, rep from * around, join with sl st to top of beg ch-3, do not turn.
Rnds 3-4: Ch 3, fpdc around next fpdc, *bpdc around next bpdc, fpdc around next fpdc, rep from * around, join with sl st to top of beg ch-3. At end of Rnd 4, fasten off and weave in all tails.
Fold top rib down to outside to form cuff.
Make second mitt same as the first.
Options: If desired, embellish mitts with buttons or crocheted flowers.

