Stunning Crochet Top with V-Neck on the Back
Introduction
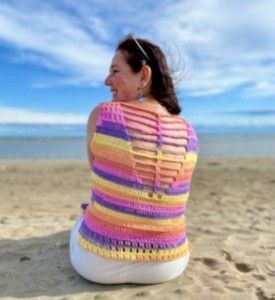
Discover the vibrant world of crochet with this stunning and eye-catching colorful top! Perfect for those who love to stand out from the crowd, this unique piece features a beautiful V-neck on the back, adding a touch of elegance and allure to your outfit. The intricate crochet work showcases a variety of bold and vivid colors, creating a mesmerizing pattern that is sure to turn heads wherever you go.
Whether you're heading to a summer festival, a beach party, or simply want to add a pop of color to your everyday wardrobe, this crochet top is the perfect choice. The V-neck on the back adds a touch of sophistication and femininity, making it a versatile piece that can be dressed up or down for any occasion.
The colorful crochet design not only adds a burst of energy to your ensemble but also showcases the skill and artistry of the crochet technique. Made with love and attention to detail, this top is a true statement piece that will make you feel confident and stylish. So why settle for ordinary when you can embrace the extraordinary with this crochet top?
Materials
The pattern uses only basic crochet stitches - single crochets and trebles and chains.
This easy-to-fit top is really a crocheter's dream, made with the airy stitches, is worked in rows.
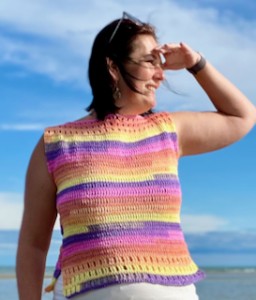
Size: Women - Medium Size
This can easily be adapted to a smaller size or bigger size just by reducing or increasing the number of chains and rows for the coat and as well as making less or more chains in the basic chain.
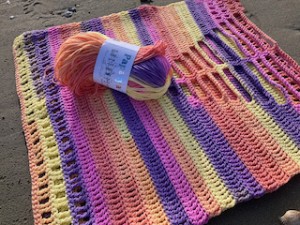
The crochet top with V-neck on the back is crocheted with soft cozy premium acrylic yarn.
This is a beautifully colored yarn made of premium acrylic with an anti-pilling treatment.
The soft structure of the fiber is slightly terry-style.
Weight: 100g
One ball: 250m.
100% acrylic
Recommended Hook: 3.5 mm
For this women's medium size, you will need only 2.5 skeins.
Colors:
One color self-striping.
Scissors and tapestry needle.
Difficulty Level
Level 1 – Easy, for beginners.
US Crochet Terms
- SlSt – slip stitch
- CH/s – chain/s
- SC - single crochet
- DC - double crochet
- TR - treble
- SK - skip
- T - turn
- ST/s - stitch(es)
- REP - repeat
- YO – yarn over
Pattern Notes
1) Before you start, take a measurement. I would recommend determining the width of your top. If you want to have your top wider, make a longer foundation chain at the beginning of the front/back panel. If you want to have your top narrower, make a shorter foundation chain at the beginning of the front/back panel.
2) This pattern is for Medium women size, but you can easily adapt to a smaller size or bigger size just by reducing or increasing the number of chains and rows for the top and making less or more chains in the basic chain.
3) A ch1 at the beginning of the row DOESN'T COUNT as a stitch.
4) A ch3 at the beginning of the row/round DOESN'T COUNT as a stitch.
5) The top measures:
Front Panel
Length: 54 cm / 21 inch
Width: 44 cm / 17 inch
Back Panel
Length: 54 cm / 21 inch
Width: 44 cm / 17 inch
*Measurements are taken from the garment lying flat, before the yarn has stretched out/dropped.
5) The top is worked in 2 basic pieces:
A) Front Panel
B) Back Panel
Crochet Top with V-Neck on the Back - The Written Pattern
Work in rows, turn your work when you finish each row using the same crochet hook with the same yarn.
Rectangle
Crochet Hook 3.50 mm.
Make a slip knot and chain foundation chain.
Ch 74 chains (Multiple of 6 + 2 (72 + 2))
R1: ch1, 1sc in 2nd chain from hook, 1sc in each st till end of row, turn (74 st)
R2: ch3, 1tr in 1st st, 1tr in next st, *ch1, sk 1st, 1tr in next 2st*, repeat from * to * till end of row, turn (74 st) (24 ch1sp)
R3: ch1, 1sc in each st till end of row, turn (74 st)
R4-R5, R6-R7 = R2-R3
R8: ch3, 1tr in each st till end of row, turn
R9: ch1, 1sc in each st till end of row, turn
R10 – R39: repeat R8–R9
R40: ch3, 1tr in 1st st, 1tr in next st, *ch1, sk 1st, 1tr in next 2st* repeat from * to * till end of row, turn (74 st) (24 ch1sp)
R41: ch1, 1sc in each st till end of row, turn (74 st)
R42 – R45: repeat R40 and R41
Fasten off your work and hide all loose tails and you are all done with your front panel.
Creating the Back Panel
Let’s make a back panel: repeat the instructions and make the same panel.
START TO CREATE V-NECK FROM ROW 22!
R1: ch1, 1sc in 2nd chain from hook, 1sc in each st till end of row, turn (74 st)
R2: ch3, 1tr in 1st st, 1tr in next st, *ch1, sk 1st, 1tr in next 2st*, repeat from * to * till end of row, turn (74 st) (24 ch1sp)
R3: ch1, 1sc in each st till end of row, turn (74 st)
R4-R5, R6-R7 = R2-R3
R8: ch3, 1tr in each st till end of row, turn
R9: ch1, 1sc in each st till end of row, turn
R10 – R21: repeat R8–R9
R22: ch3, 1tr in 1st st, 1tr in next 33 st,
ch2, sk 2st, 1tr in next 2st, ch2, sk 2st
1tr in next 34 st, turn
R23: ch1, 1sc in each st till end of row, turn
R24: ch3, 1tr in 1st st, 1tr in next 31 st,
ch4, sk 4st, 1tr in next 2st, ch4, sk 4st
1tr in next 32 st, turn
R25: ch1, 1sc in each st till end of row, turn
R26: ch3, 1tr in 1st st, 1tr in next 29 st,
ch6, sk 6st, 1tr in next 2st, ch6, sk 6st
1tr in next 30 st, turn
R27: ch1, 1sc in each st till end of row, turn
R28: ch3, 1tr in 1st st, 1tr in next 27 st,
ch8, sk 8st, 1tr in next 2st, ch8, sk 8st
1tr in next 28 st, turn
R29: ch1, 1sc in each st till end of row, turn
R30: ch3, 1tr in 1st st, 1tr in next 25 st,
ch10, sk 10st, 1tr in next 2st, ch10, sk 10st
1tr in next 26 st, turn
R31: ch1, 1sc in each st till end of row, turn
R32: ch3, 1tr in 1st st, 1tr in next 23 st,
ch12, sk 12st, 1tr in next 2st, ch12, sk 12st
1tr in next 24 st, turn
R33: ch1, 1sc in each st till end of row, turn
R34: ch3, 1tr in 1st st, 1tr in next 21 st,
ch14, sk 14st, 1tr in next 2st, ch14, sk 14st
1tr in next 22 st, turn
R35: ch1, 1sc in each st till end of row, turn
R36: ch3, 1tr in 1st st, 1tr in next 19 st,
ch16, sk 16st, 1tr in next 2st, ch16, sk 16st
1tr in next 20 st, turn
R37: ch1, 1sc in each st till end of row, turn
R38: ch3, 1tr in 1st st, 1tr in next 17 st,
ch18, sk 18st, 1tr in next 2st, ch18, sk 18st
1tr in next 18 st, turn
R39: ch1, 1sc in each st till end of row, turn
R40: ch3, 1tr in 1st st, 1tr in next st, *ch1, sk 1st, 1tr in next 2st*, repeat from * to * 5 times
ch20, sk 20st, 1tr in next 2st, ch20, sk 20st
1tr in next 2 st, *ch1, sk 1st, 1tr in next 2st*, repeat from * to * till end of row, turn
R41: ch1, 1sc in each st till end of row, turn
R42: ch3, 1tr in 1st st, 1tr in next st, *ch1, sk 1st, 1tr in next 2st*, repeat from * to * 5 times
ch21, sk 21st, 1tr in next 2st, ch21, sk 21st
1tr in next 2 st, *ch1, sk 1st, 1tr in next 2st*, repeat from * to * till end of row, turn
R43: ch1, 1sc in each st till end of row, turn
R44: ch3, 1tr in 1st st, 1tr in next st, *ch1, sk 1st, 1tr in next 2st*, repeat from * to * 4 times
ch23, sk 23st, 1tr in next 2st, ch23, sk 23st
1tr in next 2 st, *ch1, sk 1st, 1tr in next 2st*, repeat from * to * till end of row, turn
R45: ch1, 1sc in each st till end of row, turn
Join the front and back panel on shoulders: join the shoulders from the corner of the back panel.
Joining the Panels
We will continue with the same yarn and the same hook to crochet the shoulders as follows:
R46: ch3, 1 tr to 1st st on the back panel, sl st to 1st st on the front panel, 1 tr in next st on the back panel, sl st in next st on the front panel, *sl st in next st on the front panel, skip 1 st on the back panel, 1 tr to the next st on the back panel, sl st in next st on the front panel, 1 tr in next st on the back panel, sl st in next st on the front panel*, repeat from * to * 4 times. Cut the yarn, sew the end.
Re-join a new yarn on the opposite side and crochet in the same way: ch3, 1 tr to 1st st on the back panel, sl st to 1st st on the front panel, 1 tr in next st on the back panel, sl st in next st on the front panel, *sl st in next st on the front panel, skip 1 st on the back panel, 1 tr to the next st on the back panel, sl st in next st on the front panel, 1 tr in next st on the back panel, sl st in next st on the front panel*, repeat from * to * 4 times. Cut the yarn, sew the end.
Join the front and back panel on sides:
Join your panels with slip stitches.
Join the top so that the right sides are facing each other (inside). Join the wrong sides together.
On the sides, we sew 27 rows from the bottom up, leaving 18 rows unjoined. Join stitch to stitch.
Fasten off your work and hide all loose tails and you are all done with your amazing top.
You just created a beautiful cheerful crochet top with V-neck on the back and I hope you enjoy this pattern!


