Crochet Easter Egg Cover Wrap with Button
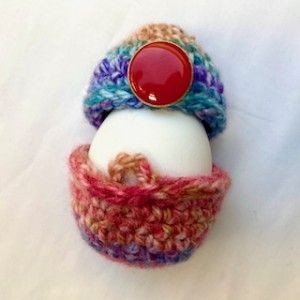
Transform your Easter eggs into adorable works of art with these charming crochet egg covers. Handcrafted with love and attention to detail, these egg wraps are the perfect way to add a touch of whimsy to your Easter decorations. Each cover features a delicate button closure, ensuring that your eggs stay snug and secure inside.
MATERIALS
Any scrappy yarn you like. Ideal is self striping or rainbow yarn.
I used: Brigita: 100% acrylic, 100g / 200m
3 mm crochet hook
Scissors
Sewing/Embroidery and yarn needle/tapestry needle for sewing pieces together and weaving in ends
Markers
Pins
These EASY EASTER EGG WRAP COVERS are designed to fit a standard egg size M.
I recommend trying the piece over the egg as you go. It should fit over comfortably without having to stretch or being too loose. If you find it too tight to fit over your egg, go up a hook size. If you find it very baggy around your egg, go down a hook size.
Difficulty Level: Level 1 – Easy, for beginners
The pattern uses the following basic US crochet stitches:
SlSt – slip stitch
CH/s – chain/s
SC - single crochet
SK - skip
T - turn
ST/s - stitch(es)
REP – repeat
This pattern requires familiarity with stitches used, attaching yarn, sewing parts together with a sewing needle.
Invisible Join – Crochet Technique:
We will be using an invisible join technique to finish off the egg animal bodies. This will give you a neat, seamless, edge around. To do this, cut your yarn after the last stitch, leaving a couple of inches of tail, and pull the end up through the last stitch made. Use your yarn needle to thread the end through under both loops of the second stitch along, and back into the middle of that last stitch. Pull to tighten, creating a faux stitch top over the first stitch. You may notice the real first stitch top poking out a little at the back. Thread the end up through the back loop of the real first stitch, and weave the end into the inside of the body to secure. Trim off any excess.
PATTERN NOTES
1) A ch1 at beg of the row DOESN'T count as a stitch
2) Magic ring = the starting point for crocheting in a spiral. Use which ever method you prefer.
3) Continuous rounds - EASY EASTER EGG WRAP COVER both parts are worked up in continuous rounds, which means that you will not be joining the last stitch of the round with the first one. Instead you will need to keep track of where each round started and how many stitches you have made because after each round you will continue right on to the stitches of the next round (with no join). It is useful to use a stitch marker or piece of yarn to mark the start or end of each round.
4) ( ) – The number of stitches that should be in a completed round/row are placed in brackets at the end of that round’s/row’s instructions.
5) When slip stitching to level off, ensure you keep the stitch the same tension as your other stitches, do not pull this tight as if joining rounds.
6) This EASY EASTER EGG WRAP COVER measures:
EGG is 3 inch long / 8 cm
EGG circumference is 5inch / 13 cm
6) You can make the EASY EASTER EGG WRAP COVER bigger with a thicker yarn or a larger hook size.
7) There is just minimal sewing, you will only sew both parts together - this is quick and easy to do, there are no tricks.
THE WRITTEN PATTERN
THE BOTTOM PART
We will be working in continuous spiral rounds, without joining rounds.
Do not join rounds.
Keep track of your rounds by marking your first stitch with a stitch marker.
Using your chosen colour yarn, start with a magic ring,
Ch1 at the beginning of round don't count as a stitch.
Make a magic ring
R1: ch1, 6sc in magic ring, sl st (6sc)
R2: *2sc in each sc from R1 around* rep from * to * till end of round (12 sc)
R3: *1sc in next st, 2sc in next st * rep from * to * till end of round (18 sc)
R4: *1sc in next 2st, 2sc in next st * rep from * to * till end of round (24 sc)
R5: *1sc in next 3st, 2sc in next st * rep from * to * till end of round (30 sc)
R6 - R10: 1sc in each st around (30 sc)
R11: sl st in each st around (30 sc)
CHAIN: chain 5 or more chains, skip 2 sk, join the chain withe next st.
Fasten off.
THE TOP
We will be working in continuous spiral rounds, without joining rounds.
Do not join rounds.
Keep track of your rounds by marking your first stitch with a stitch marker.
Using your chosen colour yarn, start with a magic ring,
Ch1 at the beginning of round don't count as a stitch.
Make a magic ring
R1: ch1, 4sc in magic ring, sl st (4sc)
R2: *2sc in each sc from R1 around* rep from * to * till end of round (8 sc)
R3: *1sc in next st, 2sc in next st * rep from * to * till end of round (12 sc)
R4: *1sc in next st, 2sc in next st * rep from * to * till end of round (18 sc)
R5: *1sc in next 2st, 2sc in next st * rep from * to * till end of round (24 sc)
R6 - R8: 1sc in each st around (30 sc)
R11: sl st in each st around (30 sc), fasten off with an invisible join
BUTTON: attached the button on R7
Attaching both parts together:
Turn both parts. Work on wrong sides. Center both parts. Start working on the opposite side of the attached BUTTON!
Use your yarn needle and the longer tail end to attach both parts together - join 3 or 4 stitches, stitch to stitch.
Congratulations! You have now completed your EASY EASTER EGG WRAP COVER.

