
Crochet Butterfly Pot Holder Pattern

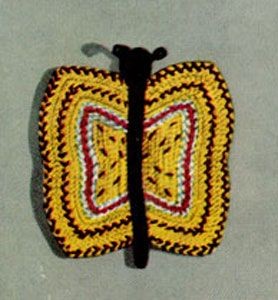
The Crochet Butterfly Pot Holder is a delightful and practical addition to any kitchen. With its whimsical design and vibrant colors, it brings a cheerful touch to your cooking space. Not only does this pot holder protect your hands from hot pots and pans, but it also adds a charming decorative element to your home. The intricate crochet work gives it a handmade feel that adds warmth to your kitchen decor. Whether you're using it to handle hot dishes or simply displaying it as a cute accessory, this butterfly pot holder is sure to bring a smile to your face every time you see it. It's a lovely way to add some personality and functionality to your culinary endeavors.
Materials Needed
Coats & Clark's O.N.T. "Speed-Cro-Sheen" Mercerized Cotton, Art. C.44: 2 balls of No. 10-A Canary Yellow. A few yards of No. 1 White. No. 76-A Aqua, No. 123-A Flamingo, No. 49-A Killarney and No. 12 Black.
Milwards Steel Crochet Hook: No. 2/0 (double zero). A bone ring.
Gauge
Gauge: 6 sc make 1 inch; 5 rows make 1 inch.
Instructions
Starting the Butterfly
Starting at center with Yellow, ch 10. 1st Row: Sc in 2nd ch from hook, sc in each ch across. Ch 1, turn.
2nd Row: 2 sc in first sc (an inc), sc in each sc to within center sc. Sl st in center sc, sc in each sc across, 2 sc in last sc. Ch 1, turn.
3rd Row: Inc 1 sc, sc in each sc to sl st, sl st in sl st and complete other half of row as before. Repeat 3rd row until 8 rows have been completed.
9th Row: Inc 1 sc, sc in each sc to sl st, sl st in sl st and break off (upper side of butterfly). Attach thread to the opposite side of starting chain and complete to correspond. Now work in rnds. Attach Aqua to the end of starting chain.
Working in Rounds
1st Rnd: Ch 1, insert hook in first st, draw loop through, drop Aqua, pick up White and draw through both loops on hook, insert hook in first st of the next row, draw loop through, drop White and pick up Aqua and draw through both loops on hook. Work in this manner around, alternating colors, always making 3 sc in corners and sc over sc and sl st over sl st. Join and do not break off.
2nd Rnd: Attach Flamingo and, working in back loop only, make sc in each sc around, sl st in each sl st and 3 sc in center sc of each corner. Join and break off.
3rd Rnd: Pick up Aqua and White and make sc in each st around, alternating colors as before. Join and break off.
4th and 5th Rnds: Attach Yellow and work in pattern, making sl st over sl st and 3 sc in each corner.
6th Rnd: Attach Black and work as before, alternating Yellow and Black. Break off Black.
7th and 8th Rnds: Working with Yellow only, repeat 4th rnd.
9th Rnd: Attach Killarney and work as before, alternating Yellow and Killarney. Join and break off.
Body of the Butterfly
Body: With Black, make a chain 8 inches long. Sc in 2nd ch from hook and in each ch across, making sl st. Ch 1 and sl st in last ch (tail end). Now, working along the opposite side of chain, make sc in each ch across, making 7 sc in last ch (head). Break off. Sew in place. With Black, embroider a few stitches over the center of wings as shown.
Make another piece exactly the same. With wrong sides facing, sew pieces neatly together.
Antennae
Antennae: With Black, ch 7, sl st in first ch, ch 17, sl st in 7th ch from hook, sl st in next 10 ch and break off. Sew in place.
With Black, sc closely around the bone ring. Sew in place.