CrochetMenScarvesHatsGlovesSweatersCardigansSocksOther clothingWomenScarvesHatsGlovesShawls and cover upSweatersCardigansSocksSlippersBagsOther clothingChildrenScarvesHatsGlovesSweatersCardigansSocksSlippersOther clothingHomeBlankets and plaidsRugsHome decorationsPetsSchemesKnittingOther hand-madeChat
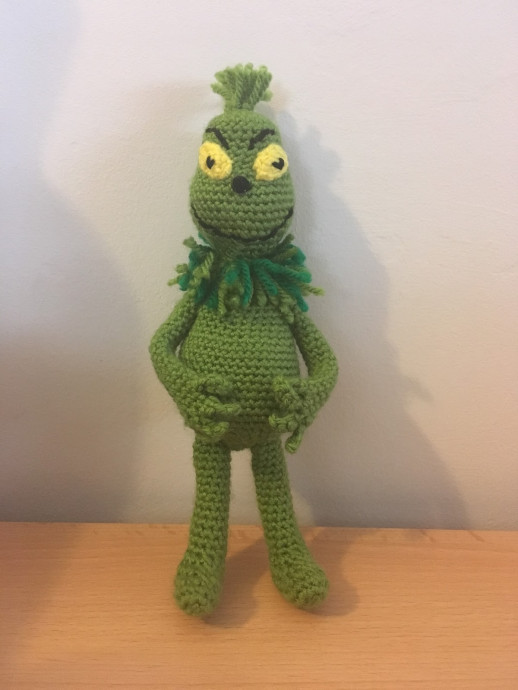
Crochet The Grinch Toy

Crocheting The Grinch toy can be a wonderfully festive and creative project that adds a touch of whimsy to your holiday décor. With his signature scowl and fuzzy green texture, The Grinch toy is sure to bring a smile to anyone's face. From carefully selecting the perfect shade of green yarn to adding the finishing touches like his mischievous grin, crocheting The Grinch allows you to personalize each detail and make him your own.
Whether you're an experienced crocheter looking for a new challenge or a beginner eager to dive into a fun project, crafting The Grinch toy can be a delightful way to spread some holiday cheer and showcase your crafting skills.You will need:
- Yarn needle
- Soft toy filling.
- 3mm crochet hook
- 2mm crochet hook used for the eyes only
- Pipe cleaner to make limbs posable (optional)
- DK Yarn. Approx. 120m
Stitches and abbreviations used:
(I use US crochet terms)
MC - Magic circle/ring (sc unless otherwise specified)
Ch - Chain
SC - Single crochet
Inc - Increase stitch (2 single crochets into one stitch)
Dec - Decrease stitch (single crochet 2 stitches together)
ST - Stitch
SLST - Slip stitch
FLO – Front Loop only
BLO – Back Loop only
HDC – Half Double Crochet
R – Round or Row
FO - finish Off
Other things to note....
This is worked in continuous rounds. It is helpful to use a stitch marker to keep track.
The number in ( ) at the end of each round indicates the total stitch count for that round.
* * indicates repeated series of stitches.
Use invisible decreases for a neater finished product.
Stitches in [ ] are worked into one stitch.
Remember to stuff the product little and often as you work.
Head, Neck & Body – Green
1.
MC (6)
2.
*INC * (12)
3.
*1sc, inc * (18)
4.
*2sc, inc * (24)
5-10.
Sc (24)
11.
*2sc, inc * (32)
12.
*7sc, inc * (36)
13-17.
Sc (36) – Start stuffing head.
18.
*4sc, dec * (30)
19.
*3sc, dec * (24)
20.
*2sc, dec * (18)
21.
*1sc, dec * (12)
22.
FLO – sc (12)
23.
Sc (12)
24.
BLO – sc (12) – Make sure neck is firmly stuffed so it is not flimsy.
25.
*1sc, inc * (18)
26.
*2sc, inc * (24)
27.
*3sc, inc * (30)
28-31.
Sc (30)
32.
*4sc, inc * (36)
33-34.
Sc (36)
35.
19sc, *inc, 1sc * x6, 5sc (42) – The inc in this row makes the front of the belly.
36-45.
Sc (42) – Stuff the body until closing.
46.
*5sc, dec * (36)
47.
*4sc, dec * (30)
48.
*3sc, dec * (24)
49.
*2sc, dec * (18)
50.
*1sc, dec * (12)
51.
*dec * (6)
FO – add any extra stuffing needed. Close hole.
Feet & Legs x2 – Green
1.
CH 9.
2.
1sc in the 3rd chain from the hook, 1sc into the next 5 chains, 3sc into the last chain, 1sc into the back of each 6 chains, 3sc into the space between the skipped chains 1 and 2. (18)
3.
6sc, inc x3, 6sc, inc x3 (24)
4.
Sc (24)
5.
4sc, dec x6, 8sc (18)
6.
4sc, dec x4, 6sc (14)
7.
2sc, dec x4, 4sc (10) – Stuff the foot section leaving room for a pipe cleaner if desired
8-21.
Sc (10) –add pipe cleaner to the leg and stuff around it.
FO close hole – Leaving yarn tail to sew the legs to the side of the body.
Arms x2 – Green
1.
MC (6)
2.
*Inc, 2sc * (8)
3-18.
Sc (8) – Insert pipe cleaner or stuff arm.
19.
4sc, ch4, 3sc down chain, 4sc to finish the round. (8) – the chained section will make the thumb.
20.
1sc into first 3 stitches, skip next 2st, 1sc into the next 3 stitches (6)
21.
1sc into st 1 of the round, ch 4, 3sc down chain, 1sc into st 6.
1sc into st 2 of the round, ch 4, 3sc down chain, 1sc into st 5.
1sc into st 3 of the round, ch 4, 3sc down chain, 1sc into st 4. – This last finger maybe fiddly and easier to do using a smaller hook.
FO – Leaving long yarn tail to close any gaps in fingers and then thread up to the start of the arm to attach to the body.
Eyes x2 – Yellow – 2mm hook
1.
ch 5
2.
Starting in 2nd chain from hook, 1sc, 2hdc, 1sc, turn and work into the back loops of the starting chain, 1sc, 2hdc, 1sc
FO – Leaving yarn tail to sew to the face.
Neck Ruffle – Cut strands of green. Working in FLO left from R24 of the neck, put approx. 3 strands through per stitch and loop through using the crochet hook. In the picture shown, there are 2 strands of body green and 1 strand of deep green per stitch. Cut down to desired length.
Head Tuft – Using the same technique as for the neck ruffle, add strands of yarn to the stitches of the first round of the head.
Face – Use a stand of black yarn to embroider the facial features on.

can't wait to make something, I like all of these as ND don't know which to start first.lol