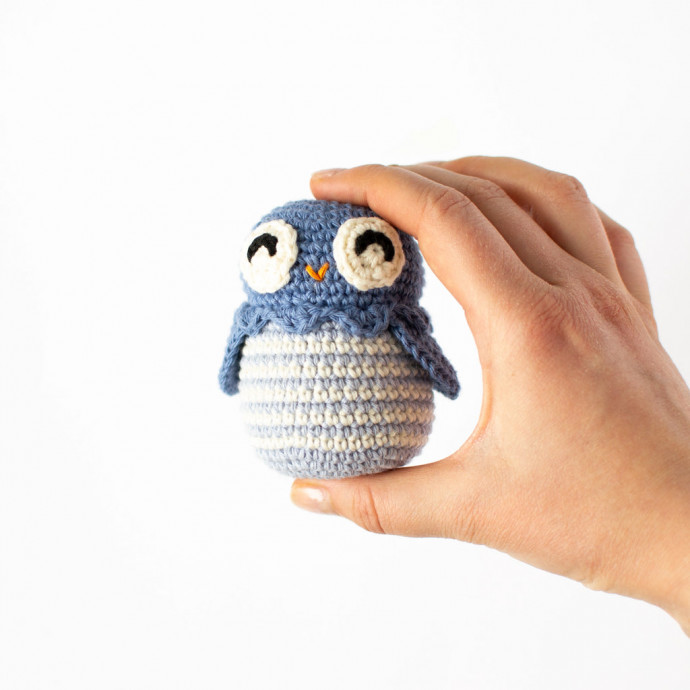
Crochet Amigurumi Owl Tutorial

If you're looking to add a touch of cuteness to your crochet collection, diving into making a Crochet Amigurumi Owl is a fantastic choice! These adorable little owls are perfect for both beginners and experienced crocheters, offering a fun and rewarding project. With their big eyes and sweet details, they make wonderful gifts for kids and owl enthusiasts alike. The best part is that you can let your creativity shine by choosing different yarn colors to personalize each owl. So, grab your crochet hooks and let's bring these charming creatures to life with stitches and smiles!
Abbreviations (US Terms)
Click on the (underlined) stitch to go to the video tutorial.
r - row
st - stitch
ch - chain
sl st - slip stitch
sc - single crochet
hdc - half double crochet
inc - increase
dec - decrease
bl - back loop
fl - front loop
cc - colour change
[b< ... >]x... - repeat the instructions in the brackets x-times
(...) - the number of stitches at the end of the round.
Materials
- Cotton yarn (50g = 160cm)
- Crochet hook size 3 mm
- Stuffing
- Needle
- Scissors
- Pins (optional)
- Stitch marker (optional)
Color Key
A - Blue
B - Light blue
C - White
D - Black
E - Orange
Instructions
Head
- The head is crocheted with yarn A.
r 1: 2 ch, 6 sc in the second chain from the hook. (6) = magic circle
r 2: [inc]x6. (12)
r 3: [1 sc, inc]x6. (18)
r 4: [2 sc, inc]x6. (24)
r 5: [3 sc, inc]x6. (30)
r 6: [4 sc, inc]x6. (36)
r 7: [5 sc, inc]x6. (42)
r 8-12: 42 sc. (42)
r 13: [5 sc, dec]x6. (36)
r 14 (fl): [skip 1 st, 5 hdc in next st, skip 1 st, sl st in next st]x9. (9 hdc groups) - Cut off the yarn and fasten the ends.
Body
- The body is made with yarn B and C.
r 1: 2 ch, 6 sc in the second chain from the hook. (6) = magic circle
r 2: [inc]x6. (12)
r 3: [1 sc, inc]x6. (18)
r 4: [2 sc, inc]x6. (24)
r 5: [3 sc, inc]x6. (30)
r 6: [4 sc, inc]x6. (36)
r 7: [5 sc, inc]x6. (42) - Change colour in between every row to make the body striped.
r 8-17: 42 sc. (42)
r 18: [5 sc, dec]x6. (36) - Cut off the yarn but save approx. 30 cm so that you have something to attach the head to the body with.
- Fasten off the other yarn end.
Wings (x2)
- The wings are crocheted with colour A.
r 1: 2 ch, 4 sc in the second chain from the hook. ch, turn. (4)
r 2: [inc]x4. ch, turn. (8)
r 3: [1 sc, inc]x4. ch, turn. (12)
r 4: [2 sc, inc]x4. ch, turn. (16)
r 5: [3 sc, inc]x4. ch. (20)
- Crochet 11 sc along the straight edge of the wing.
- Cut off the yarn and fasten the yarn ends.
Eyes (x2)
- The eyes are not crocheted in a spiral but with a seam.
- End each row with a sl st in the first stitch of the row and a ch. These stitches are not counted for at the end of the row.
- The new row always starts in the same stitch as the sl st.
- Start to crochet with colour C.
r 1: 2 ch, 8 sc in the second ch from the hook. sl st, ch. (8) = magic circle
r 2: [inc]x8. (16)
- End the row with an invisible join.
- Cut off the yarn, but save approx. 20 cm so that you have something to attach the eyes to the head with.
- Fasten the other yarn end.
- Embroider or sl st crochet a black U on each eye.
Assembling
- Attach the head (back loops) and the wings to the body and stuff Bob as you go. Start at the back and sew together 2 stitches. Sew together 11 stitches and at the same time the wing. Sew together 10 stitches. Sew together 11 stitches and at the same time the second wing. Sew together the last 2 stitches.
- Stitch down the scalloped edge.
- Attach the eyes to the head with 3 sc in between them.
- Embroider a beak between the eyes on row 11.
