Crochet Classic Cardigan

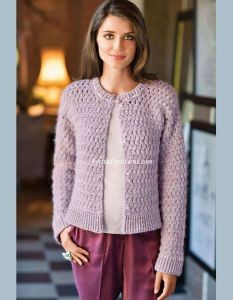
The Crochet Classic Cardigan is a versatile and timeless piece that every wardrobe needs. With its intricate crochet design and cozy feel, this cardigan is perfect for adding a touch of elegance to any outfit. Whether you're heading to a coffee date or a casual day at the office, this cardigan will effortlessly elevate your look.
Its classic style makes it a go-to piece for any season, making it a must-have in your collection. You'll love how comfortable and stylish you feel while wearing this charming crochet cardigan!SIZE: actual bust 86 (94, 102, 110)
MATERIALS
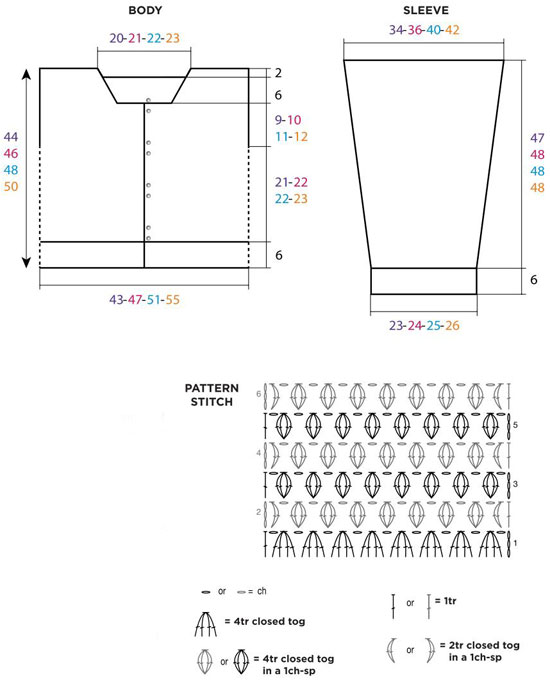
Work 12.5 sts and 6 rows over Patt st (above second row) to measure 10 x 10cm/4 x 4in using 5mm hook, or size required to obtain tension.
SPECIAL STITCH PATTERNS
1rtrf: Work 1tr, inserting hook around the whole stem of tr of previous row in front of work.
1rtrb: Work 1tr, inserting hook around the whole stem of tr of previous row at back of work.
Patterned Rib (Patt rib)
Using 4.5mm hook, worked over an odd number of sts for foundation chain + 3 for beg of first row.
Row 1: 1tr in fifth ch, then 1tr in each foll ch.
Row 2: 3ch, miss first tr, *1rtrb in next st, 1rtrf in next st *; rep from * to *.
Row 3: 3ch, miss first tr, *1rtrf in next st, 1rtrb in next st *; rep from * to *. After row 3, rep from row 2.
Pattern Stitch (Patt st)
Using 5mm hook, worked over a number of sts divisible by 4 + 3.
Row 1: (RS)4ch (replaces 1tr, 1ch-sp), tr4tog working 1tr in each of the 4 first sts, then across all row work tr4tog working each tr in 1 st, end with 1tr in last st.
Row 2: 3ch (replaces 1tr), tr2tog working the 2tr in first ch-sp, 1ch, *tr4tog working the 4tr in next ch-sp, 1ch *; rep from * to * , end row with tr2tog and 1tr in last ch-sp.
Row 3: 4ch (replaces 1tr, 1ch-sp), then *tr4tog in next 1ch-sp, 1ch *; rep from * to *, end row with 1tr in last st. After row 4, rep from row 2.
PATTERN NOTES
Cardigan is made holding together one strand of yarn A with one strand of yarn B. Wind both yarns together prior to knitting to ensure an even finish.
LOWER BODY
Using 4.5mm hook, make a foundation chain of 217 (233, 253, 273)ch. Work in Patt rib (see Special Stitch Patterns) for eight rows - 213(229, 247, 277)tr. Change to 5mm hook and work even in Patt st (see Special Stitch Patterns) over the 109(121, 125, 141) m sts until work measures 28(28, 28, 30)cm/11 (11, 11, 12)in [21 (21, 21, 23) rows] total.
TOP OF LEFT FRONT
Cont and work only over the first 28 (30, 32, 36) sts until work measures 37 (38, 40, 43)cm/14 1/2 (15, 15 3/4, 17)in [26 (27, 28, 31) rows] total. NECK S & L: Work row until 9 (-, 11, -) sts rem, miss 1 st, then work 1tr in next ch-sp.
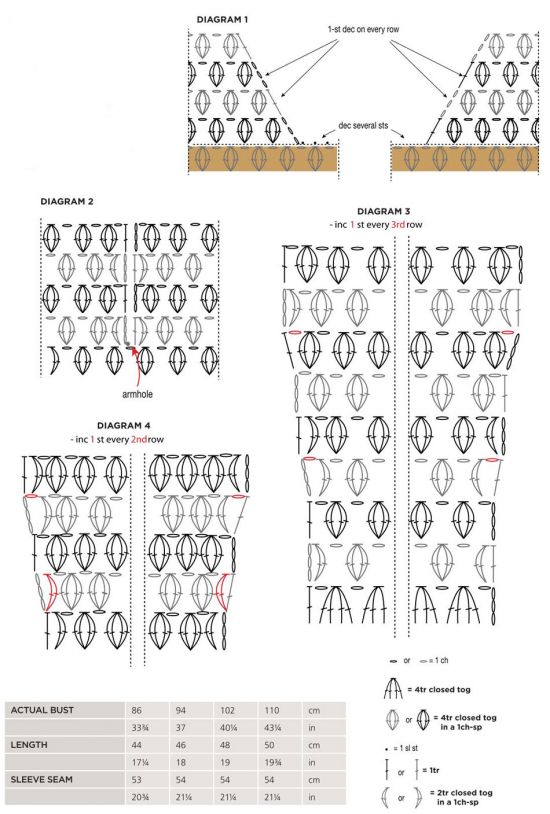
M & XL: Work 1sl st in each of the - (9, -, 11) first sts, then work 3ch, 4tr closed tog in next ch-sp and work row to end. Cont and dec on neck side 1 st three times on every row (see Diagram 1). Once you have completed the last dec, you have 17 (18, 19, 22) sts rem for shoulder. Fasten off.
TOP OF RIGHT FRONT
Work even in in Patt st over the last 28 (30, 32, 36) sts of lower body until work measures 37 (38, 40, 43)cm/14 1/2(15, 15 3/4, 17)in [26 (27, 28, 31) rows] total.
NECK
S & L: Work 1sl st in each of the first 8 (-, 10, -) sts, then work 3ch, 4tr closed tog in next ch-sp and work row to end.
M & XL: Work row until -(10, -, 12) sts rem, miss 1 st, then work 1tr in next ch-sp. Cont and dec on neck side 1 st three times on every row (see Diagram 1). Once you have completed the last dec, you have 17 (18, 19, 22) sts rem for shoulder. Fasten off.
TOP OF BACK
Work in Patt st over the rem sts of lower body starting with last st of left front and ending with first st of right front (see Diagram 2) - 57 (61, 65, 73) sts. Work even until work measures 43 (44, 46, 49)cm/17 (17 1/2, 18, 19 1/4)in [29 (30, 31, 34) rows] total. NECK Work over the first 16 (17, 18, 21) sts, then miss 1 st, 1tr in next ch-sp and fasten off. Miss the next 21 (23, 25, 27) sts for neck, then work 1sl st in next ch-sp, 3ch and work row to end. Fasten off.
SLEEVES
Using 4.5mm hook, make a foundation chain of 57( 61, 65, 69)ch. Work in Patt rib for eight rows - 53 (57, 61, 65)tr. Change to 5mm hook and work in Patt st [29 (31, 33, 35) sts] inc at each end as foll:
S & M : 1 st eight times every third row (see Diagram 3).
L & XL: 1 st five times every third row, 1 st five times every second row (see Diagrams 3 & 4).
Note: When you inc 1 st every second row, depending on which row you are working you will be working either 1ch, or 2tr closed tog. Cont and work even over the rem 45 (47, 53, 55) sts until work measures 53 (54, 54, 54)cm/20 3/4 (21 1/4, 21 1/4, 21 1/4)in [35 (37, 37, 37) rows] total. Fasten off.
FINISHING
Join shoulder seams.
COLLAR
Work as foll along neck edge:
Row 1: Work 69 (75, 81, 87)dc - 21 (23, 24, 26) sts along each front, 27 (29, 33, 35) sts along back.
Row 2: 3ch (replaces first tr), 1tr in second st and in each foll tr.
Row 3: 3ch, miss first tr, *1rtrb in next st, 1rtrf in next st *; rep from * to *.
Row 4: 3ch, miss first tr, *1rtrf in next st, 1rtrb in next st *; rep from * to *. Fasten off. Sew sleeves into position. Sew sleeve seams. Thread the beaded string through the last row of Patt rib at bottom of each sleeve. Slip it over 3tr, then under 3tr, over 3tr, under 3tr and so on then cut string and stitch in place using sewing thread.
Thread beaded string through second row of collar, starting with left edge: slip it over 3tr, then under 3tr, over 3tr, under 3tr and so on, and shape a loop on right front to use as a button loop. Stitch in place using sewing thread. To achieve a similar result to that shown, thread two lengths of the beaded string, with a loop to use a button loop. Attach eight buttons to left front (see placement on schematic). Slide buttons in between 1tr and 1 ch of Patt st to wear. Secure and weave in ends.


