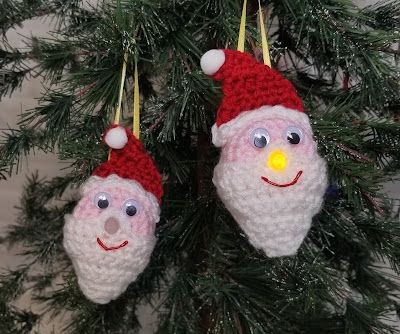
Crochet Lighted Santa Claus Ornament

Looking for a charming addition to your holiday decor? The Crochet Lighted Santa Claus ornament is a delightful choice that brings warmth and coziness to any space. This festive ornament not only features a jolly Santa design but also includes a soft, twinkling light that adds a magical touch to your Christmas tree or mantel.
Crafted with care and attention to detail, this ornament is sure to spread holiday cheer and create a festive atmosphere in your home. Whether you're decorating for a family gathering or simply want to add a touch of whimsy to your living space, the Crochet Lighted Santa Claus ornament is a cheerful and inviting option that will bring smiles to all who see it.YARN
HOOK & OTHER MATERIALS
SKILL LEVEL
STITCH GUIDE
SIZES/FINISHED MEASUREMENTS
GAUGE
NOTES
2. Face is worked in continuous rounds without joining.
FACE
Round 8 (optional): Repeat Round 3 once more if needed to fit tealight.
BEARD
With (B) ch 18
Row 1: sc in 2nd ch from hook and in next 6 ch, skip 3 ch, sc in last 7 ch (14 sc and a ch3 loop)
Row 2: ch 1, turn, sc in each st across.
Row 3: ch 1, turn, sc in 1st st, skip 1 st, sc in next 10 st, skip 1 st, sc in last st (12 sc)
Row 4: ch 1, turn, sc in 1st st, skip 1 st, sc in next 8 st, skip 1 st, sc in last st (10 sc)
Row 5: ch 1, turn, sc in 1st st, skip 1 st, sc in next 6 st, skip 1 st, sc in last st (8 sc)
Row 6: ch 1, turn, sc in 1st st, skip 1 st, sc in next 4 st, skip 1 st, sc in last st (6 sc)
Row 7: ch 1, turn, sc in 1st st, skip 1 st, sc in next 2 st, skip 1 st, sc in last st (4 sc)
Row 8: ch 1, turn, sc in 1st st, skip 2 st, sc in last st (2 sc)
Finish off.
HAT
Row 1: With (B) ch 11, hdc in 3rd ch from hook and in each ch across (9 hdc)
finish off (B), turn
Row 2: Join (C), ch 2 (counts as 1st hdc now and throughout), hdc2tog, hdc in next 4 st, hdc2tog (7 hdc)
Row 3: ch 2, turn, hdc2tog, hdc in next 2 st, hdc2tog (5 hdc)
Row 4: ch 2, turn, hdc in next 4 st, ch 4, turn
Row 5: hdc in 3rd ch from hook and in next ch, hdc in next 2 st, hdc2tog, finish off.
ASSEMBLY
Sew the top row of the beard across the front of the face making sure the ch 3 loop is centered over the center hole. Next lay the hat across the top of the face along the 4th row and sew into place. Loop a piece of yarn or ribbon through top, behind the hat, for hanger, secure.
