Create Your Own Crochet Puffy Heart Basket: A Unique Handmade Gift Idea


Looking to add a touch of charm to your home decor or searching for a unique handmade gift idea? Why not try creating a Crochet Puffy Heart Basket! This delightful pattern combines the functionality of a basket with the sweetness of puffy hearts, making it a lovely addition to any room. Whether you're a crochet enthusiast or a beginner looking for a fun project, crafting a Crochet Puffy Heart Basket is a great way to express your creativity and spread some handmade love.
Skill Level
Easy
Stitch Key | US Terms
- ch(s) – chain/chains
- ch-sp – chain space
- hdc – half double crochet
- ps – 7 loop puff stitch
- rnd(s) – round/rounds
- sk – skip
- sl st – slip stitch
- st(s) – stitch/stitches
- y – yards
Materials
Size 6, super bulky yarn (6oz./170g (106yd/97m)
Approximate yardage needed:
- Mini – Color A 24y, Color B 12y, Color C 14y
- Med – Color A 44y, Color B 28y, Color C 30y
- Tray – Color A 52y, Color B 20y, Color C 22y
L11/8mm Crochet Hook (or size to meet gauge)
Tapestry Needle
Scissors
Flexible Measuring Tape
Optional Screw On Tags
Gauge | Working In The Round
First 3 Rounds in Pattern = 4-4.25 Inches with L Hook. Please be sure to check your gauge before starting, as tension can vary greatly from person to person and depending on the yarn used.
Special Stitches
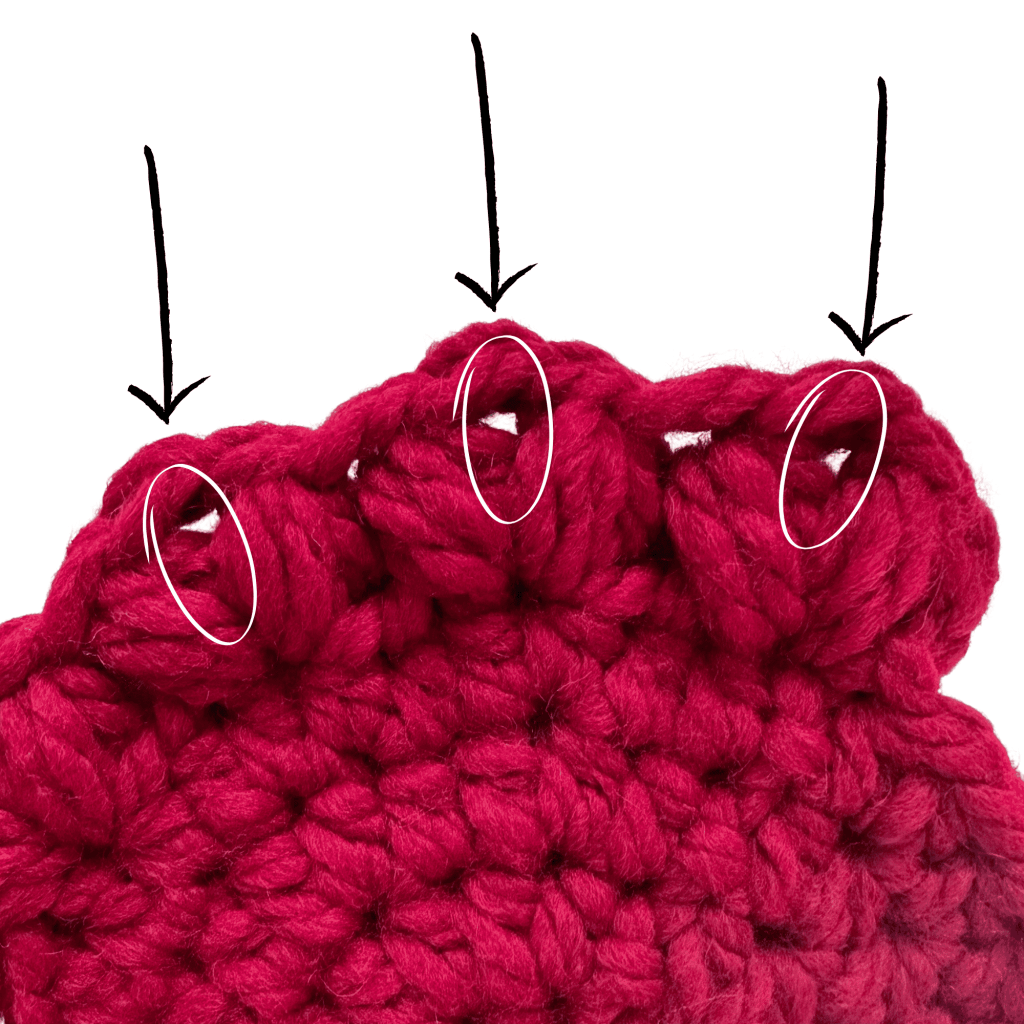
Chain Space (ch-sp)
A chain space is the space/gap in your work that is created by making a chain. The space is located below the chain. Normally you’d insert your hook into the front and back loops of the stitch, but when you work into a chain space you insert your hook into the space underneath the chain.
Invisible Join
After completion of the last stitch of the round, fasten off. With a tapestry needle, weave tail end under both loops of the first stitch of the round. Next, weave through the back loop only, of the last stitch of the round. Weave in tail.
7 Loop Puff Stitch (ps)
Crochet puff stitches are a series of unfinished half double crochet stitches that are worked together. For this tutorial, we’re going to use 3 half double crochets to create our puff stitch. Some puff stitches require a chain 1, to finish off the stitch, but this pattern only chains one where noted.
Tips for Working Puff Stitches
Work with loose tension and pull loops up to the height of the working row.
- Yarn over, insert hook in indicated stitch, yarn over, pull up a loop (3 loops on hook).
- [Yarn over, insert hook in same stitch, yarn over, pull up a loop] 2x (7 loops on hook).
- Yarn over and pull through all seven loops on hook.
Tips & Tricks
The key to having a sturdy basket is to create a very tight stitch using a thick yarn. The completed basket should be very sturdy, yet flexible. Over time it can become misshaped. You can easily re-shape with your hands. It can be helpful to form it around a heavy bowl about the same size, then remove the bowl to reveal a nice, new, even shape. If your basket is quite loose, you may need to go down a hook size or two.
Written Instructions For The Puffy Heart Crochet Basket Pattern
- Beginning chains of each round do NOT count as the first stitch.
- When switching colors, fasten off & join new color with a slip stitch. The first puff stitch of the round will hide the joins, so no fancy method is needed.
- Unless otherwise noted, join each puff stitch round in the first chain space, between the first & second puff stitch of each round.
- If you prefer an alternate method to the magic circle (on round 1), substitute the following: Ch4, join with slip stitch in 4th chain from hook, chain 1, work 9 half double crochets in circle, join with slip stitch in beginning half double crochet. (9hdc)
Mini Basket Instructions
Starting with color A:
- Rnd 1. Create a magic circle, work 9 half double crochet in circle, join with slip stitch in beginning half double crochet. (9hdc)
- Rnd 2. Chain 1, work 2 half double crochet in each stitch around, join with slip stitch in beginning half double crochet. (18hdc)
- Rnd 3. Chain 1, *half double crochet in next stitch, 2 half double crochet in next stitch, repeat from * around, join with slip stitch in beginning half double crochet. (27hdc)
- Rnd 4. Chain 1, *half double crochet in next 2 stitches, 2 half double crochet in next stitch, repeat from * around, join with slip stitch in beginning half double crochet. (36hdc) (diameter should measure about 5 ¼” across)
Starting Sides Of Mini Basket
- Rnd 5. Chain 1, *work a puff stitch, chain 1, puff stitch all in the next stitch, skip next 2 stitches, repeat from * around, join with slip stitch in beginning chain space. (24ps, 12chs)
If switching colors, fasten off & weave in loose ends.
Join Color B
- Rnd 6. Chain 1, *puff stitch, chain 1, puff stitch in each chain space around, join with slip stitch in beginning chain space. (24ps, 12chs)
- If switching colors, fasten off & weave in loose ends.
Join Color C
- Rnd 7. Repeat round 6, but Do NOT join. (24ps, 12chs)
- Rnd 8. Loosely slip stitch around, fasten off using the invisible join method, weave in loose ends, add optional logo tag. (36sl st)
Your basket is complete, enjoy!!
Medium Basket Instructions
Starting with color A:
- Rnd 1. Create a magic circle, work 9 half double crochet in circle, join with slip stitch in beginning half double crochet. (9hdc)
- Rnd 2. Chain 1, work 2 half double crochet in each stitch around, join with slip stitch in beginning half double crochet. (18hdc)
- Rnd 3. Chain 1, *half double crochet in next stitch, 2 half double crochet in next stitch, repeat from * around, join with slip stitch in beginning half double crochet. (27hdc)
- Rnd 4. Chain 1, *half double crochet in next 2 stitches, 2 half double crochet in next stitch, repeat from * around, join with slip stitch in beginning half double crochet. (36hdc)
- Rnd 5. Chain 1, *half double crochet in next 3 stitches, 2 half double crochet in next stitch, repeat from * around, join with slip stitch in beginning half double crochet. (45hdc) (diameter should measure about 6 ¾”-7” across)
Starting Sides Of Medium Basket
- Rnd 6. Chain 1, *work a puff stitch, chain 1, puff stitch all in the next stitch, skip next 2 stitches, repeat from * around, join with slip stitch in beginning chain space. (30ps, 15chs)
- Rnd 7. Chain 1, *puff stitch, chain 1, puff stitch in each chain space around, join with slip stitch in beginning chain space. (30ps, 15chs)
- If switching colors, fasten off & weave in loose ends.
Join Color B
- Rnd 8-9. Repeat round 7. (30ps, 15chs)
- If switching colors, fasten off & weave in loose ends.
Join Color C
- Rnd 10. Repeat round 7. (30ps, 15chs)
- Rnd 11. Repeat round 7, but Do NOT join. (30ps, 15chs)
- Rnd 12. Loosely slip stitch around, fasten off using the invisible join method, weave in loose ends, add optional logo tag. (45sl st)
Your basket is complete, enjoy!!
Tray Instructions
Starting with color A:
- Rnd 1. Create a magic circle, work 9 half double crochet in circle, join with slip stitch in beginning half double crochet. (9hdc)
- Rnd 2. Chain 1, work 2 half double crochet in each stitch around, join with slip stitch in beginning half double crochet. (18hdc)
- Rnd 3. Chain 1, *half double crochet in next stitch, 2 half double crochet in next stitch, repeat from * around, join with slip stitch in beginning half double crochet. (27hdc)
- Rnd 4. Chain 1, *half double crochet in next 2 stitches, 2 half double crochet in next stitch, repeat from * around, join with slip stitch in beginning half double crochet. (36hdc)
- (diameter should measure about 5 ¼” across)
- Rnd 5. Chain 1, *half double crochet in next 3 stitches, 2 half double crochet in next stitch, repeat from * around, join with slip stitch in beginning half double crochet. (45hdc)
- Rnd 6. Chain 1, *half double crochet in next 4 stitches, 2 half double crochet in next stitch, repeat from * around, join with slip stitch in beginning half double crochet. (54hdc)
- Rnd 7. Chain 1, *half double crochet in next 5 stitches, 2 half double crochet in next stitch, repeat from * around, join with slip stitch in beginning half double crochet. (63hdc) (diameter should measure about 9” across)
Starting Sides Of Tray
- Rnd 8. Chain 1, *work a puff stitch, chain 1, puff stitch all in the next stitch, skip next 2 stitches, repeat from * around, join with slip stitch in beginning chain space. (42ps, 21chs)
- If switching colors, fasten off & weave in loose ends.
Join Color B
- Rnd 9. Chain 1, *puff stitch, chain 1, puff stitch in each chain space around, join with slip stitch in beginning chain space. (42ps, 21chs)
- If switching colors, fasten off & weave in loose ends.
Join Color C
- Rnd 10. Repeat round 9 but, Do NOT join. (42ps, 21chs)
- Rnd 11. Loosely slip stitch around, fasten off using the invisible join method, weave in loose ends, add optional logo tag. (63sl st)
Your baskets are complete, enjoy!!
- Recipes
-
 Cilantro Lime Rice
-
 Sweet Potato Soup with Roasted Cauliflower Crumbles
-
 Americano Cocktail
- Funny Pictures
-
 Funny Pics of the Day
-
 Funny Pics for Your Scrolling
-
 Some Pics to See When You’re Bored
- Crochet Ideas
-
 Crochet Crop Top
-
 Crochet Easter Sheep and Duck Egg Bags
-
 Crochet Summer Top
- Lifehacks
-
 How to Crochet the Plaid Stitch Photo Tutorial
-
 How To Crochet The 3-Colored Crosshatch Stitch Tutorial
-
 Flower With Stem Stitch Photo Tutorial
- DIY
-
 DIY Seashell Hair Pins
-
 Crochet Smiling Flowers
-
 Paper Cup Mini Easter Basket Gifts
- Knitting Ideas
-
 Knitted Twist and Shout Hat
-
 Knitted Pom-Pom Booties
-
 Knitted Rabbit Dolls