Crochet Bear Squish
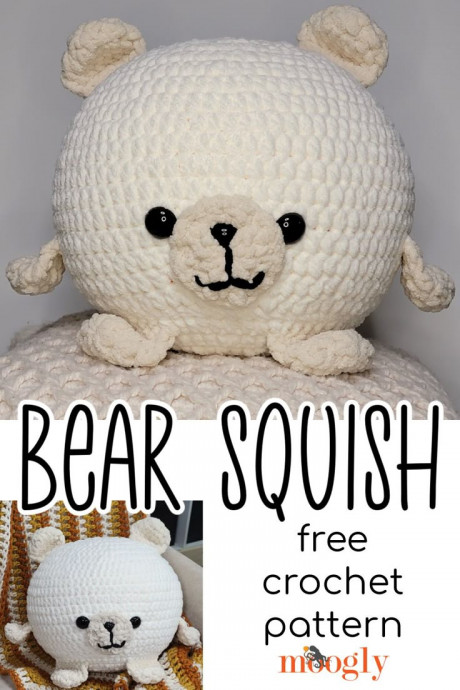
Crochet Bear Squish is a delightful handmade toy that melts the hearts of everyone who meets it. With its cozy yarn and adorable design, this little bear brings a touch of warmth and happiness wherever it goes. Its squishy texture makes it perfect for cuddling, making it an ideal companion for both children and adults. Whether displayed as a charming decoration or hugged tightly during bedtime, Crochet Bear Squish is sure to bring a smile to your face with its lovable charm and comforting presence.
US-L, 8.0 mm hook, Susan Bates
250 yds Bernat Blanket (6 - Super Bulky; 100% polyester; 300g/10.5 oz; 201 m/220 yds)
A: Vintage White (most of a ball)
B: Birch (less than half a ball)
C: Coal (less than 1 yard)
10" Microbead Pillow Ball or Fiberfill
2 Safety Eyes - 24mm
1 Safety Nose - 19mm
Stitch Markers
Gauge: 5"/10cm across after Rnd 3.
Size: approx 10" across/tall excluding ears, arms, and feet
NOTES:
Rounds are worked in a spiral. Do not ch 1 at the beginning of a rnd or join any rnds with a sl st unless specifically directed in the pattern.
Move a stitch marker along the first st of each rnd as you work to keep track of your progress.
Some pieces move from Rounds to Rows.
BEAR SQUISH INSTRUCTIONS:
Ears - Make 2 with Color B, leaving a long tail for sewingArms and Legs - Make 4 with Color B
Rnd 1: Make a magic circle, ch 1, sc in the ring, 6 hdc in the ring. (7 sts)
Rnd 2: 2 hdc in each st around. (14 sts)
Rnd 3: Hdc in next st, sc in next 5 sts, hdc in next 2 sts, sc in the next 5 sts, hdc in next st. (14 sts) Weave in your first end now.
Row 4: Fold piece flat, ch 1, sc through next st and last st, sc through next 6 sets of sts. (7 sts)
Row 5: Ch 1, sc in each st across; break yarn and finish off. Set pieces aside.
Body - Make 1 with Color A
Rnd 1: With Color A, make a magic circle, ch 1, sc in the ring, 9 hdc in the ring. (10 sts)
Rnd 2: 2 hdc in each st around. (20 hdc)
Rnd 3: *Hdc in the next st, 2 hdc in the next st; rep from * around. (30 hdc)
Rnd 4: *2 hdc in the next st, hdc in the next 2 sts; rep from * around. (40 hdc)
Rnd 5: *Hdc in the next 3 sts, 2 hdc in the next st; rep from * around. (50 hdc)
Rnd 6: *Hdc in the next st, 2 hdc in the next st, hdc in the next 3 sts; rep from * around. (60 hdc)
Rnd 7: Hdc in the next 5 sts, 2 hdc in the next st, *hdc in the next 9 sts, 2 hdc in the next st; rep from * until 4 sts rem, hdc in last 4 sts. (66 hdc)
Rnd 8: *2 hdc in the next st, hdc in the next 10 sts; rep from * around. (72 hdc)
Rnd 9: Hdc in the next 8 sts, 2 hdc in the next st, *hdc in the next 17 sts, 2 hdc in the next st; rep from * until 9 sts rem, hdc in last 9 sts. (76 hdc)
Rnds 10 - 14: Hdc in each st around. After Rnd 14, use stitch markers to space Arms around RS in stitch numbers 17 - 23 and 55 - 61.
Rnd 15: Working through both layers for those stitches, hdc in each st around.
Rnd 16: *Hdc in the next 17 sts, hdc2tog; rep from * around. (72 sts)
Rnd 17: *Hdc in next 10 sts, hdc2tog; rep from * around. (66 sts)
Rnd 18: Hdc in next 5 sts, hdc2tog, *hdc in next 9 sts, hdc2tog; rep from * around until 4 sts rem, hdc in last 4 sts. (60 sts)
Rnd 19: Sc in next st, sl st in next st, break yarn and seamless join. Set Body aside.
Belly - Make 1 with Color A
Rnd 1 - 5: Rep Rnd 1 - 5 of Body. (50 hdc) Use stitch markers to space Feet around RS of Rnd 5 at st numbers 16 - 22, and 29 - 35. Use these stitch markers to attach the last row of each foot to the RS of the belly.
Rnd 6: Working through both layers for those sts, *hdc in the next st, 2 hdc in the next st, hdc in the next 3 sts; rep from * around. (60 hdc)
Rnd 7: Sc in next st, sl st in next st, break yarn, and seamless join leaving a long tail for sewing. Set Belly aside.
Snout - Make 1 with Color B
Rnd 1: Make a magic circle, ch 1, sc in the ring, 9 hdc in the ring. (10 sts)
Rnd 2: 2 hdc in each st around. (20 hdc)
Rnd 3: Sc in next st, sl st in next st, break yarn and seamless join leaving a long tail for sewing. Set Snout aside.
Bear Squish Assembly
1 - Add Ears to Body: Sew the Ears opposite each other, with Rnd 19 (back of Body) centered behind them. Curve Row 5 of the Ears slightly and sew to Rnds 4 - 6 of the Body, as shown.
2 - Add Safety Eyes to Body: Attach the Safety Eyes (or embroider them on) to Body at Rnd 14/15 (or as desired). Be sure to face the Eyes away from Rnd 19 of the Body, approximately 8 - 9 stitches apart, as shown.
3 - Finish and Add Snout: With Color C, embroider on a smile, or the face desired. Attach the Saftey Nose (or embroider it on) between Rnds at the top of the face. Sew the finished Snout to the Body between the eyes, as shown.
4 - Final Assembly: Insert stuffing or ball into Body. Use stitch markers to attach Belly to Body, making sure that the Feet are nicely centered on either side of the face. Using long tail of Belly piece, whipstitch the Belly to the Body. Weave in end.


