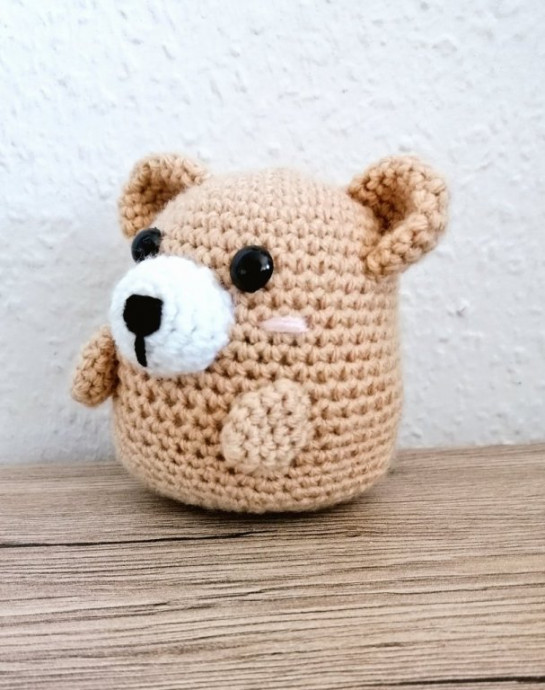
Crochet Coffee Bear

The Crochet Coffee Bear is an adorable creation that brings warm and fuzzy vibes to any setting. With its cute design and cozy charm, this handmade plushie is a delightful addition to your collection or a thoughtful gift for a loved one. Whether you're a crochet enthusiast looking for a fun project or simply someone who appreciates handmade treasures, this Coffee Bear is sure to bring a smile to your face.
Materials
To make the coffee bear you will need:
– A Crochet hook, 2.5mm
– Brown and white DK yarn, plus a bit of black yarn for the nose and pink for the cheeks (you could use any colors you wanted to, though!)
– A tapestry needle and scissors
– Stuffing
– Safety eyes (I used 12mm)
– A stitch marker to help you keep track of the start of the round
Please note that you can make the coffee bear using any size crochet hook and yarn weight for a smaller or bigger result. I like using DK as it’s most commonly available. If you make amigurumi, it is usually recommended to go down a bit from the recommended hook size for the yarn to allow for a no-hole look (we don’t want to see the stuffing show through in between stitches)! Using DK yarn and a 2.5mm crochet hook, he should stand about 12cm tall.
Stitches & Abbreviations
The pattern is written using US crochet terms in continuous spirals. You will need to know the following kinds of stitches to make him:
– Magic Ring (MR)
– Single crochet (sc)
– Decrease (dec); preferably using the invisible decrease method
– Increase (inc)
And now, let’s get started!
Body
Round 1: 6 sc into a Magic Ring
Round 2: Inc around (12)
Round 3: (Sc, inc) around (18)
Round 4: (Sc 2, inc) around (24)
Round 5: (Sc 3, inc) around (30)
Round 6: (Sc 4, inc) around (36)
Round 7: (Sc 5, inc) around (42)
Round 8-22 (15 rounds total): Sc around (42)
Pleace eyes between rounds 12 and 13, approx. 5-6 stitches apart
Round 23: (Sc 6, inc) around (48)
Round 24: (Sc 7, inc) around (54)
Round 25: Sc around (54), start stuffing
Round 26: (Sc 7, dec) around (48)
Round 27: (Sc 6, dec) around (42)
Round 28: (Sc 5, dec) around (36)
Round 29: (Sc 4, dec) around (30)
Round 30: (Sc 3, dec) around (24)
Round 31: (Sc 2, dec) around (18), finish stuffing
Round 32: (Sc, dec) around (12)
Round 33: Dec around (6), fasten off and close
Ears (Make 2)
Round 1: 6 sc into a Magic Ring
Round 2: Inc around (12)
Round 3: (Sc, inc) around (18)
Round 4-6 (3 rounds total): Sc around (18), fasten off
Hands (Make 2)
Round 1: 6 sc into a Magic Ring
Round 2: (Sc, inc) around (9)
Round 3-5: Sc around (9), fasten off
Nose
Round 1: Using white, 6 sc into a Magic Ring
Round 2: Inc around (12)
Round 3: (Sc, inc) around (18)
Round 4-5 (2 rounds total): Sc around (18), fasten off
Assembly
Sew on nose centered right below/between the eyes and stuff. Use some black yarn to embroider a nose (you could also use a safety nose for this), then use pink yarn to embroider on some cheeks/blush. Sew on the arms (the top point of the arms should be on the same round as the lowest part of the nose), then sew the ears onto the head. Neither the arms nor the ears are stuffed. Done!


