Crochet The Snow Queen
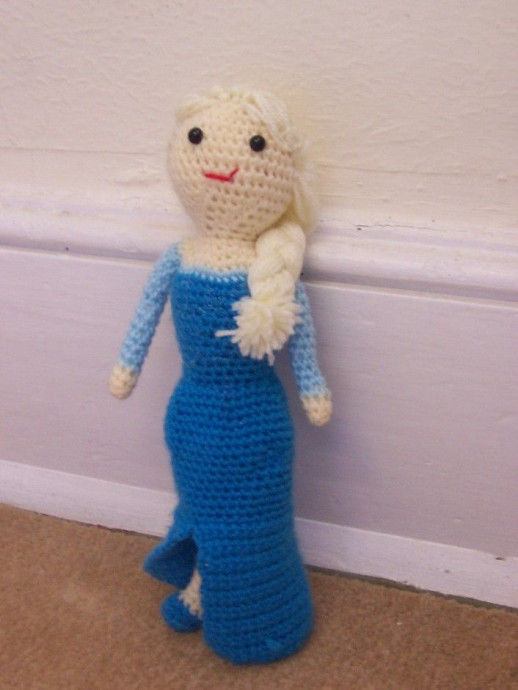
Have you heard about "Crochet The Snow Queen"? It's a delightful pattern that allows you to create your very own magical snow queen character using just yarn and a hook. With intricate details and unique design, this crochet project is perfect for those looking to add a touch of whimsy to their creations.
You will need:
~ DK thickness yarn in bright blue, pale blue, flesh and yellowish-white.
~ 4.00mm crochet hook
~ 8mm safety eyes
~ Small amount of red yarn
~ yarn needle
~ clear glitter nail varnish (optional) alternatively, you could use sparkly blue yarn.
~Stuffing
Sc = single crochet
sc2tog = single crochet decrease
BLO = Back Loops Only
sl st = slip stich
Head, Bodice and Skirt
Rnd 1: Using flesh, make 6 sc in a magic ring (6)
Rnd 2: 2sc in each st around (12)
Rnd 3: [1sc in next st, 2sc in next st] rep around (18)
Rnd 4: [1sc in next 2 sts, 2sc in next st] rep around (24)
Rnd 5: [1sc in next 3 sts, 2sc in next st] rep around (30)
Rnd 6: [1sc in next 4 sts, 2sc in next st] rep around (36)
Rnds 7-12: 1sc in each st around. (36)
Rnd 13: [1sc in next 4 sts, sc2tog] rep around (30)
Rnd 14: [1sc in next 3 sts, sc2tog] rep around (24)
Rnd 15: [1sc in next 2 sts, sc2tog] rep around (18)
Rnd 16: [1sc in next st, sc2tog] rep around (12)
insert safety eyes between rounds 8 and 9, about 5 stitches apart.
Rnd 17: sc in each st around (12)
Stuff head
Rnd 18: [1sc in next st, 2sc in next st] rep around (18)
Rnd 19: [1sc in next 2 sts, 2sc in next st] rep around (24)
Rnd 20: [1sc in next 3 sts, 2sc in next st] rep around (30)
Change to Pale Blue
Rnd 21: [1sc in next 4 sts, 2sc in next st] rep around (36)
Change to Bright Blue
Rnds 22 – 24: 1sc in each st around (36)
Rnd 25: [1sc in next 4 sts, sc2tog] rep around (30)
Rnds 26 – 27: 1sc in each st around (30)
Rnd 28: [1sc in next 8 sts, sc2tog] rep around (27)
Rnd 29: 1sc in each st around (27)
Rnd 30: [1sc in next 7 sts, sc2tog] rep around (24)
Rnds 31 – 32: 1sc in each st around (24)
Rnd 33: [1sc in next 3 sts, 2sc in next st] rep around(30)
Rnd 34: 1sc in each st around (30)
Rnd 35: [1sc in next 4 sts, 2sc in next st] rep around(36)
Rnd 36: 1sc in each st around (36)
Rnd 37: [1sc in next 5 sts, 2sc in next st] rep around (42)
Rnds 38 – 40: 1sc in each st around (42)
Rnd 41: [1sc in next 12 sts, sc2tog] rep around (39)
Rnd 42: [1sc in next 11 sts, sc2tog] rep around (36)
Rnds 43 – 48: 1sc in each st around (36)
1sc in each st till your stitch is approximately aligned with Elsa’s right eye. Ch1, turn.
Now we will work in rows to create the skirt slit.
Row 1: sc2tog, 1sc in next 34 sts, ch1 turn (35)
Row 2: 1sc in each st, ch1 turn (35)
Row 3: sc2tog, 1sc in next 33 sts, ch1 turn (34)
Rows 4 – 18: 1sc in each st, ch1 turn (34)
Row 19: 1 sc in each st, F/O, weave in end.
Stuff body till waist.
Legs (make 2)
Rnd 1: using blue, make 6sc in a magic ring (6)
Rnd 2: [1sc in next 2 sts, 2sc in next st] rep around (8)
Rnd 3: 2sc in each st (16)
Rnd 4: BLO for this round, 1sc in each st (16)
Change to Flesh
Rnd 5: [1sc in next 2 sts, sc2tog] 6 times, 1sc in last 2 sts (10)
Rnd 6: [1sc in next 3 sts, sc2tog] 2times, 1sc in last 3sts (8)
Stuff foot. Lightly stuff leg as you go along.
Rnds 7 – 27: 1sc in each st around (8)
On the first leg, sl st in next st, F/O leaving a tail.
On the second leg, sl st in the second st to the right of the sl st on the first leg. 1Sc in next 7sts. Sl st in the st next to the last st of the second leg, sc in next 6sts (16)
Change to Bright Blue.
Rnd 1: [1sc in next st, 2sc in next st] rep around (24)
Rnds 2 – 3: 1sc in each st around (24)
F/O leaving a tail for sewing. Use the tail from the first leg to sew up the hole between the legs. Stuff.
Flip the skirt up over the head and sew on the legs at the waist.
Use clear glitter nail varnish to fill in her bodice and make it sparkly (optional)
WARNING: If you use this method please keep the doll well away from naked flame.
Arms (make 2)
Rnd 1: using Flesh, make 6sc on a magic ring (6)
Rnds 2 – 3: 1sc in each st around (6)
Change to Pale Blue
Rnds 4 – 16: 1sc in each st around, stuffing lightly as you go. (6)
Change back to Flesh
Rnd 17: 1sc in each st around (6)
F/O, sew to body so that the last row of Pale Blue aligns with the row of Pale Blue at the top of the bodice.
Use a little Red yarn to embroider a mouth.
To Make the Hair:
Cut several 50cm strands of yellowish-white yarn and attach one strand at a time aloing rounds 7 – 11 of the head. You will only need to attach in every other stitch of each round. Braid into a single plait, tie the end with a double strand of yellowish-white yarn and flick the end over one shoulder. You may need to sew it in place.
To make the top hair, cut several 25cm strands of yellowish-white yarn and attach a row or two along the top of the ‘forehead’. Trim sew it just overlaps the highest row of hair you attached for the plait. Sew down lightly and tuck any obvious ends into the plait hair.
Finally, to make the fringe, Attach two or three 25cm strands at a time to the center of the forehead, swirl back over head and trim accordingly. Lightly sew each bunch of hair in place as you attach it.
You may wish to use any remaining nail polish to add sparkly ‘snow flakes’ to her hair.
And you’re done!

