Crochet Sammie the Turtle Amigurumi Pattern
Crochet Sammie the Turtle Overview
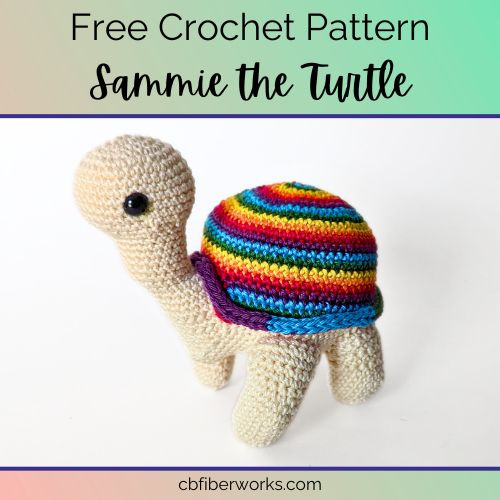
Crochet Sammie the Turtle is a delightful and charming amigurumi pattern that is perfect for both beginners and seasoned crocheters alike. With its cute shell design and adorable eyes, Sammie becomes a lovable companion to crochet. The step-by-step instructions are easy to follow, allowing you to create your own little turtle buddy in no time.
Project Materials
- Yarn: Animation (DK weight/7 skeins)
Color A:
Ivory (105 yds)Color B:
Fiesta Red (10yds)Color C:
Clementine (7yds)Color D:
Bumblebee (7yds)Color E:
Jalapeño (7yds)Color F:
Azure (7yds)Color G:
Mulberry (7yds)
- 2.5mm hook
- 6mm Safety eyes
- Stitch markers
- Tapestry Needle
- Scissors
- Poly-fill/Stuffing
- Sewing pins
Stitch Abbreviations
(**) – See Project Notes section
- MR – magic ring (**)
- Sc – single crochet (**)
- Inc – increase (**)
- Dec – decrease (**)
- St(s) – stitch(es)
- Ch – chain
- Sk – skip
- FLsc – front loop single crochet
- Crab – crab stitch (**) (optional)
- Rnd – round
- (#) – the number inside is the stitch count for the Rnd
- [ ] – repeat the stitches inside the brackets the given number of times
Project Notes
- Final dimensions: H: 4.5in. x L: 4.5in. x W: 3in.
- This project is written in US terminology.
- Sammie is worked in the round with several elements seamed together.
- Unless otherwise specified, work in continuous rounds without using a slip stitch to join rows.
- Move stitch markers up every row as you go.
- Whenever you fasten off, use the invisible join to make the edges of your pieces smoother.
- Magic Ring: Create a magic ring and work the specified number of single crochet into it (ex. MR6 = 6sc into the ring).
- Single Crochet: Unless otherwise specified, this project uses the yarn under technique. Insert your hook into the stitch, yarn under, pull up a loop (2 loops on your hook), yarn over, and pull through both loops.
- Increase: Work 2sc into the same stitch.
- Decrease: Unless otherwise specified, use the invisible decrease method. Insert your hook into the front loop of the next stitch, then insert your hook into the front loop of the following stitch, yarn over and pull through the first loop (3 loops on the hook), then yarn over and pull through all 3 loops on the hook.
- Crab Stitch: This stitch is a single crochet worked in the opposite direction.
- Changing colors works the same as when using sc.
- Invisible Join: This is a method of fastening off used to create smoother edges. Follow the steps below:
- Cut the yarn and pull up the working loop.
- Using a tapestry needle, insert the hook into the next stitch (working under both loops) and pull the yarn through.
- Then insert the hook under the back loop only of the last stitch (where you fastened off) and pull the yarn through.
- Pull the yarn tail to tighten and pull the first and last stitches closer together. Then tie a knot on the back side of the piece to hold it in place.
- Depending on the instructions, either leave the yarn tail for later or weave it in.
Pattern
Head
Use Color A (white).
Rnd 0: MR6
Rnd 1: inc 6 times. (12)
Rnd 2: [inc, sc] 6 times. (18)
Rnd 3: [sc, inc, sc] 6 times. (24)
Rnd 4: [inc, 3sc] 6 times. (30)
Rnd 5: [2sc, inc, 2sc] 6 times. (36)
Rnds 6-10: sc around. (36) (5 rnds)
Rnd 11: [2sc, dec, 2sc] 6 times. (30)
Place a stitch marker in the first and fourth decreases of Rnd 12. These 4 decreases mark the center of the face and will help determine where to put the eyes.
Rnd 12: sc, dec 4 times, [6sc, dec] 2 times, 5sc. (24)
Place eyes on the sides of the head between Rnds 7-8 with 10-11 sts in between. Start stuffing the head and neck as you go. Remove the stitch markers from the decreases.
NOTE: Depending on your tension, if you notice the neck of your turtle starting to twist, you may need to slightly adjust Rnds 13-22. The decreases and increases should be as centered as possible, falling in line with the front of the face and the back of the head.
Rnd 13: dec 3 times, 2sc, [dec, 4sc] 2 times, dec, 2sc. (18)
Rnds 14-19: sc around. (18) (6 rnds)
Rnd 20: sc, dec 3 times, 4sc, inc 3 times, 4sc. (18)
Rnd 21: dec, sc, dec, 5sc, inc 3 times, 5sc. (19)
Rnd 22: dec 2 times, 6sc, inc 3 times, 6sc. (20)
Rnd 23: sc around. (20)
Rows 24-33 are worked in flat rows. Remove the stitch marker when you get to Row 25. Do not ch 1 when you turn.
Row 24: 9sc. (9) Leave the remaining sts unworked.
Row 25: turn, 14sc. (14) Leave the remaining sts unworked.
NOTE: For Rows 26-33, you will have 1st remaining that you will leave unworked.
Row 26: turn, 13sc. (13)
Row 27: turn, 12sc. (12)
Row 28: turn, 11sc. (11)
Row 29: turn, 10sc. (10)
Row 30: turn, 9sc. (9)
Row 31: turn, 8sc. (8)
Row 32: turn, 7sc. (7)
Row 33: turn, 6sc. (6)
Rnd 34 and on are worked in the round again. When you work down the sides, you’re working into the sts that were leftover each time we turned for Rows 24-33. Place your stitch marker in the first st of Rnd 34.
Rnd 34: turn, 6sc, working down the side: 4sc, working across the bottom: inc 2 times, 2sc, inc 2 times, working up the side: 4sc. (24)
Continue stuffing the neck as you go.
Rnd 35: 7sc, inc, 3sc, [inc, sc] 4 times, 3sc, inc, sc. (30)
Rnd 36: 8sc, [inc, 2sc] 6 times, 4sc. (36)
Rnd 37: 14sc, inc, 7sc, inc, sc, inc, 7sc, inc, 3sc. (40)
Rnd 38: 3sc, dec, 5sc, inc, 3sc, [inc, 9sc] 2 times, inc, 3sc, inc, sc. (44)
Rnd 39: 2sc, dec 2 times, 8sc, [inc 2 times, 9sc] 2 times, inc 2 times, 6sc. (48)
Rnd 40: sc, dec 2 times, 6sc, inc 2 times, 4sc, inc 2 times, 16sc, inc 2 times, 4sc, inc 2 times, 5sc. (54)
Rnd 41: sc, dec, 10sc, inc 2 times, 5sc, inc 2 times, 12sc, inc 2 times, 5sc, inc 2 times, 9sc, dec. (60)
Rnds 42-54: sc around. (60) (13 rnds)
Rnd 55: [4sc, dec, 4sc] 6 times. (54)
Rnd 56: [7sc, dec] 6 times. (48)
Rnd 57: [3sc, dec, 3sc] 6 times. (42)
Make sure to firmly stuff the body as you go. You may need to squish and adjust to get the body to round out.
Rnd 58: [5sc, dec] 6 times. (36)
Rnd 59: [2sc, dec, 2sc] 6 times. (30)
Rnd 60: [3sc, dec] 6 times. (24)
Rnd 61: [sc, dec, sc] 6 times. (18)
Rnd 62: [sc, dec] 6 times. (12)
Rnd 63: dec 6 times. (6)
Fasten off with a short yarn tail (6-8in.) and use a tapestry needle to sew the remaining hole closed. Then weave the remaining yarn tail into the body.
Front Legs x2
Use Color A (white).
Rnd 0: MR6
Rnd 1: inc 6 times. (12)
Rnd 2: [inc, sc] 6 times. (18)
Rnd 3: sc around. (18)
Rnd 4: dec, 8sc, inc, 7sc. (18)
Rnd 5: sc, dec, 7sc, inc, 7sc. (18)
Rnd 6: repeat Rnd 4. (18)
Rnd 7: repeat Rnd 5. (18)
Rnds 8-9: sc around. (18) (2 rnds)
Rnd 10: sc, inc, 7sc, dec, 7sc. (18)
Rnd 11: inc, 8sc, dec, 7sc. (18)
Rows 12-16 are worked in flat rows. Remove the stitch marker when you get to Row 12. Do not ch 1 when you turn.
Row 12: turn, 12sc. (12) Leave the remaining sts unworked.
NOTE: For Rows 13-16, you will have one st remaining that you will leave unworked.
Row 13: turn, 11sc. (11)
Row 14: turn, 10sc. (10)
Row 15: turn, 9sc. (9)
Row 16: turn, 8sc. (8)
Rnd 17 is worked in the round again. When you work down the sides, you’re working into the sts that were leftover each time we turned for Rows 12-16. Place your stitch marker in the first st of Rnd 17.
Rnd 17: turn, 8sc, working down the side: 2sc, working across the bottom: 6sc, working up the side: 2sc. (18)
Fasten off with a medium yarn tail (10-12in.) for sewing later. Stuff each leg.
Back Legs x2
Use Color A (white).
Rnd 0: MR6
Rnd 1: inc 6 times. (12)
Rnd 2: [inc, sc] 6 times. (18)
Rnd 3: sc around. (18)
Rnd 4: dec, 8sc, inc, 7sc. (18)
Rnd 5: sc, dec, 7sc, inc, 7sc. (18)
Rnd 6: sc around. (18)
Rnd 7: sc, inc, 7sc, dec, 7sc. (18)
Rnd 8: inc, 8sc, dec, 7sc. (18)
Rows 9-13 are worked in flat rows. Remove the stitch marker when you get to Row 9. Do not ch 1 when you turn.
Row 9: turn, 12sc. (12) Leave the remaining sts unworked.
NOTE: For Rows 10-13, you will have one st remaining that you will leave unworked.
Row 10: turn, 11sc. (11)
Row 11: turn, 10sc. (10)
Row 12: turn, 9sc. (9)
Row 13: turn, 8sc. (8)
Rnd 14 is worked in the round again. When you work down the sides, you’re working into the sts that were leftover each time we turned for Rows 9-13. Place your stitch marker in the first st of Rnd 14.
Rnd 14: turn, 8sc, working down the side: 2sc, working across the bottom: 6sc, working up the side: 2sc. (18)
Fasten off with a medium yarn tail (10-12in.) for sewing later. Stuff each leg.
Tail
Use Color A (white).
Rnd 0: MR6
Rnd 1: sc around. (6)
Rnd 2: inc, 5sc. (7)
Rnd 3: sc around. (7)
Rnd 4: inc, 3sc, inc, 2sc. (9)
Rnd 5: sc around. (9)
Rnd 6: inc, 3sc, inc, 4sc. (11)
Rnd 7: sc around. (11)
Fasten off with a medium yarn tail (10-12in.) for sewing later. Stuffing the tail is optional. If you used thinner yarn like I did, it’s not necessary, but with chunkier yarn you may need to add a bit of stuffing.
6-Color Spiral Shell
Before you start, read these notes:
- This shell uses 6 colors.
- I recommend keeping note of the order of your colors because it will impact how you work each row. For mine, this is the order:
- Color B (red) = 1st
- Color C (orange) = 2nd
- Color D (yellow) = 3rd
- Color E (green) = 4th
- Color F (blue) = 5th
- Color G (purple) = 6th
- Rather than using a stitch marker to mark the start of a Rnd, you’ll work each color in order from first to 6th to complete one Rnd. You’ll always start the Rnd with the first color unless otherwise noted.
- It’s easy to get all these colors tangled, so to work neatly, I recommend having all 6 colors lined up in order on a flat surface.
- If you crochet right-handed and work counter-clockwise, at the end of each Rnd, rotate the work back (clockwise) to untwist the strands.
- If you crochet left-handed and work clockwise, at the end of each Rnd, rotate the work back (counter-clockwise) to untwist the strands.
- The steps for Rnd 0 are written for right-handed crocheters working counter-clockwise. If you’re left-handed, you’ll follow the same steps, but place each st to the right of the starting sc rather than the left (working clockwise).
Start with Color B (red).
Rnd 0: follow the steps below
- B: create a MR and work 1 sc into it. Remove your hook and place a stitch marker into the working loop.
- C: to the left of first st, attach Color C to the MR with a ch 1, then work 1 sc. Remove your hook and place a stitch marker into the working loop.
- D: to the left of second st, attach Color D to the MR with a ch 1, then work 1 sc. Remove your hook and place a stitch marker into the working loop.
- E: to the left of third st, attach Color E to the MR with a ch 1, then work 1 sc. Remove your hook and place a stitch marker into the working loop.
- F: to the left of fourth st, attach Color F to the MR with a ch 1, then work 1 sc. Remove your hook and place a stitch marker into the working loop.
- G: to the left of fifth st, attach Color G to the MR with a ch 1, then work 1 sc. Remove your hook and place a stitch marker into the working loop.
You should have a total of 6sts in the MR (one of each color).
Pull the tail of the MR to cinch it closed, making sure to keep all of the other yarn tails toward the back of the work. When you start Rnd 1, you’ll be working directly into the st of the next color. (Ex. red into orange, orange into yellow, etc…)
Rnd 1: B: inc, C: inc, D: inc, E: inc, F: inc, G: inc. (12)
NOTE: Rnd 1 is written in an expanded format to emphasize that you’ll work the exact same instructions for each color around (unless otherwise noted). However, the following Rnds have been condensed so it’s easier to read.
Rnd 2: B–G: inc, sc. (18)
Rnd 3: B–G: sc, inc, sc. (24)
Rnd 4: B–G: inc, 3sc. (30)
Rnd 5: B–G: 2sc, inc, 2sc. (36)
Rnd 6: B–G: inc, 5sc. (42)
Rnd 7: B–G: 3sc, inc, 3sc. (48)
Rnd 8: B–G: inc, 7sc. (54)
Rnd 9: B-G: 4sc, inc, 4sc. (60)
Rnds 10-16: B-G: 10sc. (60) (7 rnds)
For Rnds 17-20, we’ll be creating a gap where the shell will fit around the back of the turtle’s neck. When indicated, you’ll fasten off (cut the yarn) with the current color, skip 6 stitches and then re-attach that color.
NOTE: The stitch counts for Rnds 17-20 do not include the skipped stitches. The ch 1 from attaching does not count as a stitch.
Rnd 17: B-F: 10sc, G: 2sc, fasten off, sk 6sts, attach Color G with a ch 1, 2sc. (54)
Rnd 18: B-E: 10sc, F: 2sc, fasten off, sk 6sts, attach Color F with a ch 1, 2sc, G: 10sc. (54)
Rnd 19: B–D: 10sc, E: 2sc, fasten off, sk 6sts, attach Color E with a ch 1, 2sc, F–G: 10sc. (54)
Rnd 20: B–C: 10sc, D: 2sc, fasten off, sk 6sts, attach Color D with a ch 1, 2sc, E–G: 10sc. (54)
Now fasten off and cut all colors except Color B (red) (the first color). Take a moment to weave in all the ends to clean things up.
For Rnd 21, when you work ‘down/up the side,’ you’ll work one st into the side of each of the 4 rows.
Rnd 21: 12sc, down the side: 4sc, across the bottom, 6FLsc, up the side: 4sc, 42sc. (68)
NOTE: For the next section, the Shell Edge, there are 2 options: I-cord or the Crab stitch. You only need to do one. Pick the I-cord if you want a thicker edge and don’t mind sewing. Pick the Crab stitch if you want a thinner edge and don’t want to sew.
Fasten off with a short yarn tail (6-8in.) and use a tapestry needle to weave in all the ends.
Shell Edge 1: (I-Cord)
NOTE: The following instructions use all 6 colors (B-G), but if you’d prefer one color, just follow the same instructions without the color changes.
Start with Color B (red).
Row 0: B: ch 3. Insert the hook into the 2nd ch from the hook, yarn over and pull up a loop (2 loops). Insert the hook into the next ch, yarn over and pull up a loop (3 loops).
Row 1: Remove the hook from the first 2sts (hold them so they don’t unravel), ch 1. Put the second loop back on the hook, ch 1. Put the third loop back on the hook, ch 1.
Repeat Row 1 with Color B (red) for 9 more rows.
Row 11: C: Remove the hook from the first 2sts (hold them so they don’t unravel), ch 1 with Color C (orange). Put the second loop back on the hook, ch 1. Put the third loop back on the hook, ch 1.
Repeat Row 1 with Color C for 9 more rows.
Row 21: D: Remove the hook from the first 2sts (hold them so they don’t unravel), ch 1 with Color D (yellow). Put the second loop back on the hook, ch 1. Put the third loop back on the hook, ch 1.
Repeat Row 1 with Color D for 9 more rows.
Row 31: E: Remove the hook from the first 2sts (hold them so they don’t unravel), ch 1 with Color E (green). Put the second loop back on the hook, ch 1. Put the third loop back on the hook, ch 1.
Repeat Row 1 with Color E for 9 more rows.
Row 41: F: Remove the hook from the first 2sts (hold them so they don’t unravel), ch 1 with Color F (blue). Put the second loop back on the hook, ch 1. Put the third loop back on the hook, ch 1.
Repeat Row 1 with Color F for 9 more rows.
Row 51: G: Remove the hook from the first 2sts (hold them so they don’t unravel), ch 1 with Color G (purple). Put the second loop back on the hook, ch 1. Put the third loop back on the hook, ch 1.
Repeat Row 1 with Color G for 9 more rows.
I created a total of 61 rows, but this number can be adjusted. The goal is to be able to wrap the I-cord around the base of the shell without stretching it. Depending on tension you may need more or fewer rows.
Yarn over and pull through 2 loops, yarn over and pull through the last 2 loops.
Fasten off with a long yarn tail (14-16in.).
Use a tapestry needle to weave in all the yarn tails except for the long one that we fastened off with at the end.
Use a tapestry needle and the long yarn tail to sew the two ends together.
Attaching the Shell Edge
This is easier if you place the shell onto your turtle’s back, but you are NOT sewing the shell to the turtle.
Pin the Shell Edge to the last Rnd of the Shell and then use a tapestry needle to sew the I-cord to the front loops of the Rnd only. Remove the shell from the turtle and weave the remaining yarn tail into the inside of the shell.
Shell Edge 2: (Crab Stitch)
Start with Color B (red).
Holding the shell upside down with the neck gap facing you, use 2 stitch markers to mark the center 18sts. You should have the 6sts across the bottom, 4sts going up each side and 2sc along each top edge.
Insert your hook into the first of these 18sts (yellow stitch marker) and attach Color B (red) in the front loop with a ch 1. This ch 1 does not count at a stitch.
NOTE: Work Rnd 1 in the front loop ONLY.
Rnd 1: B: 18 Crab st, G: 10 Crab st, F: 10 Crab st, E: 10 Crab st, D: 10 Crab st, C: 10 Crab st. (68)
Fasten off with a short yarn tail (6-8in.). Cut all the other colors as well. Use a tapestry needle to weave in all the ends.
Assembly: Legs
NOTE: Place the shell on the back of your turtle to help you place the legs.
Pin the Front Legs to the sides of the body between Rnds 41-46 with about 11sts in between. The top edge of each leg should be just below the edge of the shell. The Front Legs should also be angled at a slight diagonal, going forward.
Pin the Back Legs to the sides of the body between Rnds 52-58 with about 9sts in between. The top edge of each leg should be just below the edge of the shell.
Use a tapestry needle and the yarn tail from each leg to sew each leg to the body. You may need to add a bit more stuffing as you go, but be careful not to over-stuff. Then weave all the yarn tails into the body.
Assembly: Tail
NOTE: Place the shell on the back of your turtle to help you place the tail.
Pin the Tail on the back of the body, between the Back Legs (between Rnds 59-62). The top edge of the tail should meet the bottom edge of the shell. Use a tapestry needle and the yarn tail to sew the tail to the body. Then weave in the remaining yarn tail.


