Crochet Hernando the Hedgehog

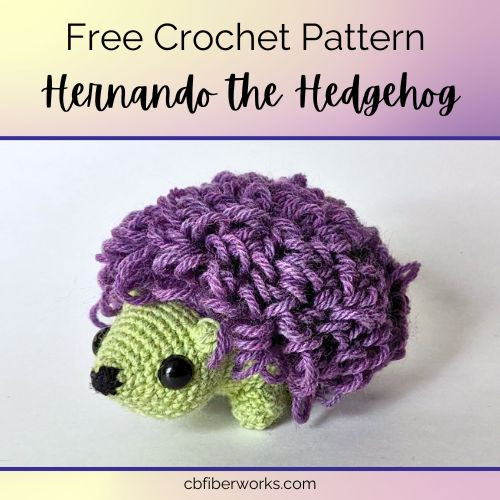
Crochet Hernando the Hedgehog is an adorable handmade toy that brings joy to both kids and adults alike. With his adorable little spines and cute button eyes, Hernando is the perfect companion for snuggles and playtime. Each stitch lovingly crafted by hand gives him a unique personality that is hard to resist.
Project Materials
- Yarn: Wool of the Andes (worsted, 3 skeins)
- Color A: Coal (1yd)
- Color B: Aloe Heather (44yds)
- Color C: Starling Heather (62yds)
- 3.00mm hook
- 10mm Safety eyes
- Stitch markers
- Tapestry needle
- Sewing pins
- Scissors
- Polyfil
Stitch Abbreviations
(**) – See Project Notes section
- MR – magic ring (**)
- Sc – single crochet (**)
- Inc – increase (**)
- Dec – decrease (**)
- St(s) – stitch(es)
- BLsc – back loop single crochet
- FLhdc – front loop half double crochet
- FLdc – front loop double crochet
- Lp – loop stitch (**)
- Lp inc – loop stitch increase (**)
- Lp dec – loop stitch decrease (**)
- Rnd – round
- ( ) – enclosed instructions are all worked in the same st
- (#) – the number inside is the stitch count for the Rnd
- [ ] – repeat the stitches inside the brackets the given number of times
Project Notes
- Final dimensions: H: 3.5in. x W: 4in. x L: 5.5in.
- This project is written in US terminology.
- Hernando is worked in the round with a few elements sewn on.
- Unless otherwise specified, work in continuous rounds without using a slip stitch to join rows.
- Move stitch markers up every row as you go, always keeping it in the first st of the rnd.
- Magic Ring: Create a magic ring and work the specified number of single crochet into it (ex. MR6 = 6sc into the ring).
- Single Crochet: Unless otherwise specified, this project uses the yarn under technique. Insert your hook into the stitch, yarn under, pull up a loop (2 loops on your hook), yarn over, and pull through both loops.
- Increase: work 2sc into the same stitch.
- Decrease: Unless otherwise specified, use the invisible decrease method. Insert your hook into the front loop of the next stitch, then insert your hook into the front loop of the following stitch, yarn over and pull through the first loop (3 loops on the hook), then yarn over and pull through all 3 loops on the hook.
- Loop Stitch (Lp):
- Insert your hook into the next stitch.
- Yarn over, then reach over and grab the second strand from your tension finger.
- Pull both loops through the stitch (keeping your finger inside the loop you created). There should be 3 loops on your hook.
- Remove your finger from the loop and push the loop down on the back side of your work, holding it in place with your middle finger. Yarn over and pull through all 3 loops on your hook.
- Loop Stitch Increase (LP inc):
- To work a loop stitch increase, just work 2 Lp stitches into the same stitch as you would with a regular single crochet increase.
- Loop Stitch Decrease (Lp dec):
- Insert your hook into the next stitch, yarn over and pull up a loop.
- Insert your hook into the next stitch.
- Yarn over.
- Reach over and grab the second strand from your tension finger.
- Pull both loops through the stitch. You should have 4 loops on your hook.
- Yarn over and pull through all 4 loops.
- The loop stitch can be tricky so if you need help, watch the first part of this video tutorial on the basic loop stitch.
Pattern
Head & Body
Start with Color A (black).
Rnd 0: MR6
Change to Color B (green) in the last stitch. Continue working only in Color B.
Rnd 1: sc around. (6)
Rnd 2: inc 6 times. (12)
Rnd 3: sc around. (12)
Rnd 4: [inc, sc] 6 times. (18)
Rnd 5: sc around. (18)
Rnd 6: [sc, inc, sc] 6 times. (24)
Rnd 7: sc around. (24)
Rnd 8: [inc, 3sc] 6 times. (30)
Rnd 9: sc around. (30)
In Rnd 10, we’ll be adding the ears.
Rnd 10: 3sc, (FLhdc, 2FLdc, FLhdc), 8sc, (FLhdc, 2FLdc, FLhdc), 17sc. (36)
For Rnd 11, we’ll be ignoring the ears created in Rnd 10 (FLhdc, 2FLdc, FLhdc) and only working into the sc and the unworked back loops.
Rnd 11: 3sc, fold the ear down toward the nose: sc in the unworked back loop from Rnd 10, 8sc, fold the ear down toward the nose: sc in the unworked back loop from Rnd 10, 17sc. (30)
Rnd 12: sc around. (30)
Place the safety eyes between rows 6 and 7 with about 7 or 8 stitches in between. Looking from the side, the eyes should be set slightly below the ears.
Rnd 13: [dec, 3sc] 6 times. (24)
Rnd 14: [sc, dec, sc] 6 times. (18)
Rnd 15: [sc, inc, sc] 6 times. (24)
Stuff the head and continue stuffing the body as you work.
Rnd 16: [inc, 3sc] 6 times. (30)
Rnd 17: [2sc, inc, 2sc] 6 times. (36)
Rnds 18-30: sc around. (36) (13 rnds)
Rnd 31: [2sc, dec, 2sc] 6 times. (30)
Rnd 32: [dec, 3sc] 6 times. (24)
Rnd 33: [sc, dec, sc] 6 times. (18)
Rnd 34: [dec, sc] 6 times. (12)
Rnd 35: dec 6 times. (6)
Fasten off with a short yarn tail (6-8in.) and use a tapestry needle to sew the remaining hole closed. Weave in the remaining tail.
Legs x4
Use Color B (green).
Rnd 0: MR6
Rnd 1: inc 6 times. (12)
Rnd 2: BLsc around. (12)
Rnds 3-4: sc around. (12) (2 rnds)
Fasten off with a short yarn tail (6-8in.) for sewing later.
Assembly: Legs
Pin the 4 legs to the body. The front legs should rest between Rows 17-21 with 2-3 sts in between. The back legs should rest between Rows 24-28 with 2-3 sts in between. Stuffing the legs is optional because they may be too shallow to be stuffed (depending on the yarn you use). I just tucked the loose tail from the magic ring inside each one.
Use a tapestry needle to sew each leg to the body and weave in the remaining yarn tails.
Fluffy Back Piece
Use Color C (purple).
NOTE: The initial MR is made with single crochet, not the loop stitch.
Rnd 0: MR6
Rnd 1: Lp inc 6 times. (12)
Rnd 2: [Lp inc, Lp] 6 times. (18)
Rnd 3: [Lp, Lp inc, Lp] 6 times. (24)
Rnd 4: [Lp inc, 3Lp] 6 times. (30)
Rnd 5: [2Lp, Lp inc, 2Lp] 6 times. (36)
Rnd 6: [Lp inc, 5Lp] 6 times. (42)
Rnd 7: [3Lp, Lp inc, 3Lp] 6 times. (48)
Rnds 8-11: Lp around. (48) (4 rnds)
Rnd 12: 10Lp, [Lp dec, Lp] 3 times, 29Lp. (45)
Rnd 13: 8Lp, [Lp dec, Lp] 3 times, 28Lp. (42)
Fasten off with a long yarn tail (14-16in.) for sewing later.
Assembly: Fluffy Back Piece
To pin the back piece, first locate the edge where you’ve decreased in the final 2 rnds. These decreases will line up with the butt of your hedgehog (just behind the back legs). Tuck the body into the back piece and pin these decreases down first.
Then pull the opposite edge of the back piece up and pin it to the back of the head (just above the crease of the neck).
Finally, pin each side by pushing the body up into the back piece and pinning the edges down. The back piece should run diagonally downward from the back of the head to the butt. Double check that both sides are even.
NOTE: You may see a little gap or puckering on each side because the back piece isn’t the exact same shape as the body. Use pins to push the edges down as flush as you can.
Use a tapestry needle and the yarn tail to sew the edge of the back piece to the body all the way around. Weave the remaining yarn tail into the body.
Bonus Customization Option: Fur
If you want your hedgehog to be fluffier: After attaching the back piece, you can cut the loops. Then use a carding brush to brush out the fibers until fluffy. One of my testers did this to create an adorable punk-themed hedgehog!


