Crochet Grape Vine: A Fun and Charming DIY Project
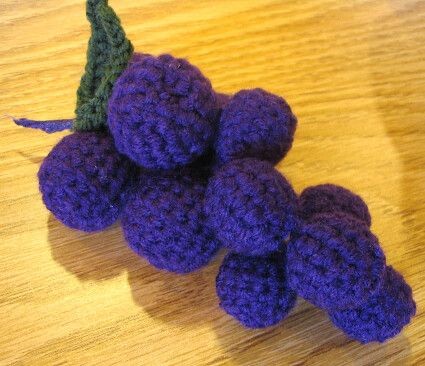
If you're looking for a charming addition to your home decor or a fun project to work on, the crochet grape vine is a great choice! This delightful craft involves creating intricate grapevine designs using crochet techniques, resulting in a unique and whimsical piece. Whether you're an experienced crocheter or just starting out, this project offers a mix of creativity and relaxation. You can personalize your grape vine with different yarn colors to match your style or create a one-of-a-kind gift for a friend. With a bit of patience and some basic crochet skills, you'll have a lovely crochet grape vine to cherish or share with others in no time!
Materials Required
Using an E hook and worsted weight yarn in purple, you will be making two different sizes of grapes. The first is made with a...
Grape Patterns
2 Cm Wooden Bead [Make 5]
Sc8 into ring
*Sc1, sc2 into 1 st* around
*Sc1, sc2 into 1 st* around
Sc around, 3x
[Insert bead]
*Sc1, sc2tog* around
*Sc1, sc2tog* around
Cut thread, gather remaining stitches together and pull tight, fastening off and leaving a long tail.
1.5 Cm Wooden Bead [Make 7]
Sc6 into circle
*Sc1, sc2 into 1 st* around
*Sc1, sc2 into 1 st* around
Sc around, 2x
[Insert bead]
*Sc1, sc2tog*
*Sc1, sc2tog*
Cut yarn leaving a long tail, gather remaining stitches together and pull tight.
Leaf Pattern
Ch10, sc into 2nd stitch from hook, sc twice more, dc 3 times, tc twice, and then 4 tc into the last stitch
Continue around and on the opposite side, tc twice, dc 3 times, sc twice
Cut yarn and sl st through final stitch.
Assembly Instructions
Okay, this is a little bit tricky and I’m not sure if I can fully explain it in a comprehensible manner.
What I did first was arrange the larger beads into positions that I thought looked alright, and then tied them together at the top. I then proceeded to tie the other smaller beads between the larger ones, allowing them more or less space to hang below. As my bunch of grapes grew, I continued tying the remaining small beads to the other small ones already attached.
Continue until you use up all of your beads, and weave ends into the sides EXCEPT for the ones up top. Tie the leaf around the ends at the top to secure. Finally, I twisted all of the remaining loose ends of yarn together and sealed them with a thin coat of mod-podge to form the stem. Let dry and enjoy the new addition to your fruit bowl!


