Crochet Pietro the Clown
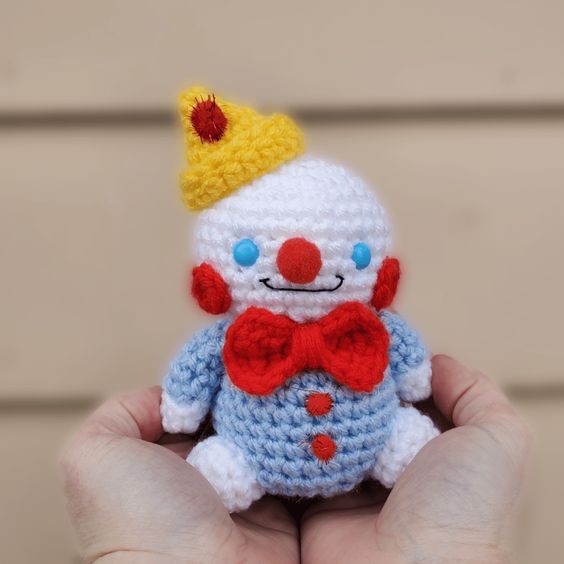
Crochet Pietro the Clown is a delightful and whimsical amigurumi character that brings joy and laughter wherever he goes. With his vibrant colors and charming expression, Pietro is a wonderful addition to any crochet enthusiast's collection. This lovable clown is perfect for adding a touch of fun to a child's playroom or even as a cheerful decoration in a cozy corner of your home.
Abbreviations
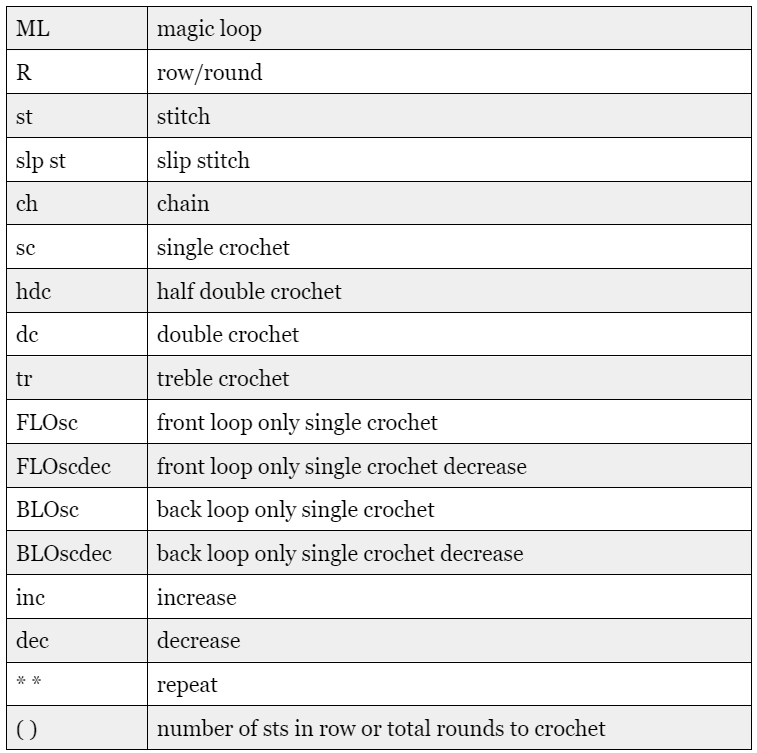
Some of these may not be used in the pattern – these are the stitches that I use most frequently! If you see an abbreviation that you are unfamiliar with, please refer back to this chart.
Head
Start with white yarn
R1: ML 6sc
R2: inc in each st (12)
R3: *sc, inc* (18)
R4: *2sc, inc* (24)
R5: *3sc, inc* (30)
R6 – R11: sc around (6 rounds total)
R12: *3sc, dec* (24)
R13: *2sc, dec* (18)
R14: *sc, dec* (12)
Add eyes here, in between rows 9 and 10, about 5 stitches apart. Stuff head.
R15: dec in all st (6)
Fasten off, leaving long tail for sewing.
Face Details
Glue puffball nose on with hot glue gun. Embroider mouth with black embroidery thread.
Cheeks
Make 2 using red yarn
R1: ML 6sc
Fasten off and weave in tail. Hot glue cheeks to face.
Hat
Use yellow yarn
R1: ML 3sc
R2: inc in each st (6)
R3: *sc, inc* (9)
R4: *2sc, inc* (12)
R5: *3sc, inc* (15)
R6: *4sc, inc* (18)
R7: sc around
R8: Slp st to first stitch of R7 to close, then ch 2. Turn work, then BLOhdc in each stitch along the brim of the hat. Slp st to first hdc to close round.
R9: Slp st around
Fasten off, and weave in all tail ends. Stuff hat lightly, then hot glue to top of head at an angle. Hot glue puffball to front of hat.
Body
Use blue yarn here
R1: ML 6sc
R2: inc in each st (12)
R3: *sc, inc* (18)
R4: *2sc, inc* (24)
R5: *3sc, inc* (30)
R6 – R11: sc around (6 rounds total)
R12: *3sc, dec* (24)
R13: *2sc, dec* (18)
R14: *sc, dec* (12)
Stuff body here.
R15: dec in all st (6)
Fasten off, cinch remaining 6 sts, and weave in all ends. Attach head to body with tail end from head by whip stitching all the way around. Tie knot and weave in tail end from head.
Bow Tie + Puffball Buttons
Use red yarn
R1: Ch 8
R2: turn, and sc down chain
R3 – R5: sc in each st
R6: sc around border of bow tie, chaining 1 st to turn the corners. On last side, slp st and stop halfway through. Cut long tail, and wrap it around and around the center of the bow tie, cinching it and creating the middle part of the tie. Tie knot on back of bow tie to secure wraps.
Use remaining tail end to sew bow tie around neck. Secure both sides with a straight stitch directly into fabric of body. Once secured, tie a knot and weave in the remaining tail end.
Once bow tie is attached, hot glue the puffball buttons on directly underneath.
Arms
Make two using white then blue yarn
R1: ML 6sc
R2 – R3: sc around – change colors to blue in last sc of R3 (6)
R4: now working in blue, inc once then sc around (7)
R5 – R8: sc around, lightly stuffing arm as you work
Fasten off and leave tail for sewing. Attach either arm to sides of body with whip stitches, then secure lower part of arm by tacking to body. Tie knot and weave in remaining tail.
Feet
Make two using white yarn
R1: ML 6sc
R2: *sc, inc* (9)
R3 – R4: sc around
Fasten off, leaving long tail for sewing. Lightly stuff each foot, then use tail to whip stitch to body.


