Crochet Christmas Tree

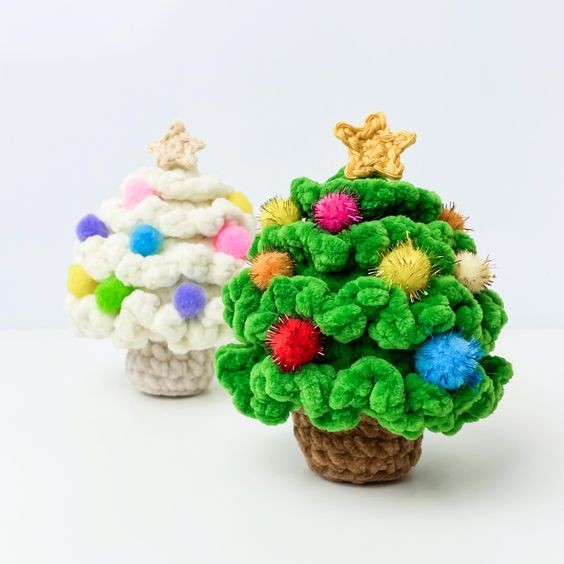
Crochet Christmas trees are a delightful addition to any holiday décor! Whether you're crafting one as a festive centerpiece for your home or as a thoughtful gift for a loved one, this DIY project is sure to bring holiday cheer. With just a few basic crochet stitches and some colorful yarn, you can create a charming tree that can be customized to match your unique style. From classic green to funky rainbow colors, the possibilities are endless. Get your creativity flowing and enjoy the cozy and festive vibes that a crochet Christmas tree brings to your home during the holiday season!
Yarn used
Other Items used
- US G/4.5mm Crochet Hook- Poly fill
Abbreviations and stitches
**This pattern uses US Crochet Terms**
Pattern
Tree
(Green yarn and larger hook)
R1: 6 SC in a MR
R2: (SC, inc) x 3 (9)
R3: (2 SC, inc) x 3 (12)
Add stitch markers to FLs of first and last stitch of R3
R4: 12 SC in BLO
R5: (SC, inc) x 6 (18)
R6: 18 SC
Add stitch markers to FLs of first and last stitch of R6
R7: In BLO: (2 SC, inc) x 6 (24)
R8: 24 SC
R9: (3 SC, inc) x 6 (30)
Add stitch markers to FLs of first and last stitch of R9
R10: 30 SC in BLO
R11: (4 SC, inc) x 6 (36)
R12: 36 SC
Add stitch markers to FLs of first and last stitch of R12
R13: In BLO: (2SC, dec) x 9 (27)
R14: (SC, dec) x 9 (18)
R15: 9 dec (9)
Close and cut the yarn. Tuck the tail into the tree.
Frills
Top frill only:
Attach yarn in one of the unstitched front loops of R3, ch 1
(SC, DC) in each unstitched FL around
Sl st to first frill
Close and cut the yarn. Tie the two tails together, and pull the knot into the tree
Other frills:
Attach the yarn in one of the unstitched front loops of (R6, R9, R12), ch 1(SC, DC, SC) in each unstitched FL around
Sl st to first frill
Close and cut the yarn. Tie the two tails together, and pull the knot into the tree
Trunk
(Brown yarn and larger hook)
R1: 9 SC in a MR (crochet loosely so you can pull the ring closed)
(Alternative method: Ch 2, make 9SC in 2nd ch from hook)
R2: 9 inc (18)
R3: 18 SC in BLO
R4-5: 18 SC
Close with sl st. Cut the yarn, leaving a long tail for sewing.
Stuff the trunk
Use tail to sew the trunk to the base of the tree, at R14 (one round before the end)
Add more stuffing before you reach the end
Star
(Medium/ worsted weight yarn and smaller hook)
R1: 5 SC in a MR, sl st to 1st SC
R2: (ch 2, sl st into 2nd ch from hook, sl st into next st on R1) x 5
Close and cut the yarn, leaving a long tail for sewing
Use a yarn needle to bring the yarn tail to the back of the star, and tie the yarn tails together
Sew the star on to the top of the tree
Finishing Touches
Glue pom-poms on to the tree


