Crochet Christmas Tree Farm Runner
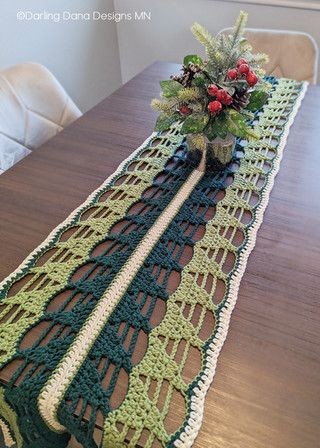
Are you ready to bring some cozy holiday charm into your home? The Crochet Christmas Tree Farm Runner is the perfect addition to your festive decorations this season. This whimsical and nostalgic runner features adorable crochet Christmas trees that will add a touch of warmth and joy to your space. Whether you use it as a centerpiece on your dining table or as a welcoming accent in your entryway, this runner is sure to spark a sense of holiday cheer.
Pattern:
Materials:
- 4.5 mm hook
- Worsted Weight Yarn (4)- I used I love this Cotton Yarn (Hobby Lobby) in “Sage”, “Forest” and “Ivory” (You’ll need 2 of each)
- Yarn Needle
Abbreviations:
- SC : Single Crochet
- HDC: Half Double Crochet
- DC: Double Crochet
- CH: Chain
- SL ST: Slip Stitch
- Dc2tog: Double Crochet two together
- SC2tog: Single Crochet two together
Special Notes:
*You’ll see in a couple rows DC2tog using the same stitch as your previous stitch (with 2 dc2tog in a row). When you see this extra note- it just means that you have 3 stitches to dc2tog in, so you will be using the middle stitch in both dc2tog- going from 3 stitches to 2.
Color A: Forest
Color B: Sage
Color C: Ivory
Pattern:
*The pattern is worked in 2 halves- you’ll make two of the following and then seam them together to create the full runner.
Color A
Chain 197
Row 1: Dc in 3rd Chain from hook, dc in next 3, *dc2tog, ch 3, dc2tog, dc in next 3, rep to last 3, dc in last 3, turn.
Row 2: Ch 2 (counts as 1st dc), dc in next 4, *dc2tog, ch 5, sk ch3 sp, dc2tog, dc in next, rep from * to last 3, dc in last 3, turn.
Row 3: Ch 2 (counts as 1st dc), dc in next 2, dc2tog, ch 7, *sk ch5, dc2tog, using same stitch as part of your previous dc2tog, dc2tog in prev/next st, ch 7, rep from * to last 6, dc2tog, dc in next 4, turn.
Row 4: Ch 2 (counts as 1st dc), dc in next 2, dc2tog, *ch 9, sk ch7, dc2tog, rep from * to last 2, dc in last 2, turn.
Finish Off.
Color B:
Reattach yarn at end of previous color/row.
Row 5: Sc in first 3, *sc2tog (in ch 9), sc in next 5, sc2tog, sk dc2tog from previous row, continue from * to last ch 9, sc2tog (in ch 9), sc in next 5, sc2tog, sc in last 4, turn.
Row 6: Ch 2, dc in next 1, sc2tog, ch 3, *dc2tog, dc in next 3, dc2tog, ch 3, rep from * to last 3, dc2tog, dc in last st, turn.
Row 7: Ch 7 (counts as dc + ch 5), sk 1 dc and ch 3, *dc2tog, dc in next, dc2tog, ch 5, sk 3, rep from * to last 3, dc2tog, dc, in last, turn.
Row 8: Ch 9 (counts as dc + ch 7), sk 1 dc2tog + ch 5, dc2tog in next 2 (using same stitch as last dc2tog in next), *ch 7, sk 5, dc2tog in next 2 (using same stitch as last dc2tog in next), rep from * to last ch 5, ch 5, sk 5, dc In ch 6. Turn/
Row 9: Ch 7 (counts as dc + ch 5), sk ch 5, dc2tog, *ch 9, sk ch 7, dc2tog, rep from * to last ch 9, ch 7, dc in ch 8, turn.
Finish Off.
Color A:
Reattach yarn at end of previous color/row.
Row 10: Sc in next 6, sc2tog, *sk 1, sc2tog, sc in next 5, sc2tog, to last dc2tog, ch 7, sk 1, sc2tog, sc in last 4, turn.
Finish Off.
Color C:
Reattach yarn at end of previous color/row.
Row 11: Ch 2, dc in each stitch across.
Finish Off.
Color B:
*Working on other side of work (start of row 1). Reattach yarn.
Row 12: Ch 1, sc across.
Finish Off.
Color C:
Reattach yarn at end of previous color/row (Row 12)
Row 13: Ch 3, hdc across.
*For the first half- finish off. On the second half, you’ll turn and sl st BLO the 2 pieces together along Row 13. (Make sure the pattern aligns correctly before seaming.
Finish Off.
Sew in ends.
*I chose not to finish off the ends after blocking but you can add fringes or a simple border using dc stitches to match the border along the sides.

