Crochet White Bunny with Skirt Amigurumi
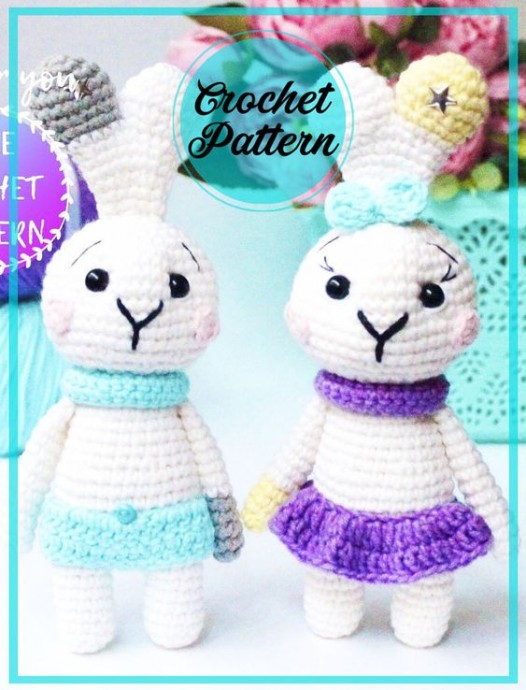
Create your very own adorable crochet bunny with a charming skirt using the Amigurumi technique. This delightful project allows you to showcase your creativity and crochet skills while crafting a lovable companion. The crochet bunny, made with soft white yarn, will be a perfect addition to any nursery or as a thoughtful gift for a loved one. With this crochet pattern, you can bring this cute bunny to life by following step-by-step instructions. The Amigurumi technique ensures that your bunny will have a beautifully textured appearance, making it even more huggable. The addition of a skirt adds a touch of whimsy and personality to the bunny, making it truly one-of-a-kind. Whether you're an experienced crocheter or just starting out, this project is suitable for all skill levels. So grab your crochet hook, choose your favorite yarn, and get ready to create a precious crochet bunny with a delightful skirt that will surely bring joy to anyone who sees it.
Abbreviations
AR – Amigurumi Magic ring
App – application
ll – lift loop
sc : Single Crochet
inc : Increase
dec : Decrease
tr : Triple Crochet/ Treble Crochet
st: Stitch
dc : Double Crochet
hdc: Half Double Crochet
sl-st : Slip Stitch
ch : Chain
..in : make increase into same stitch as many as the number which is given in front of “inc” abbreviation (exp; 3inc, 4inc..).
FLO : Crochet into front loops only
BLO : Crochet into back loops only
BL : Bobble Stitch – do 5dc all in the same stitch and then yarn over and pull through all the loops on your hook (the original loop + 1 loop for each partially completed dc).
Materials
1. Yarn.
When knitting, I used YarnArt Jeans.
Colors: N 46 – gray, N 01 – white, N 72 – purple, N – 76 –
blue, N 74 – pink, N – 67 – lemon.
2.Hook
3. Filling – holofiber
4. Eye beads with a diameter of 8 mm
5.Switching needles
6. Needle for stitching
7.scissors
The size of the finished toy using these materials is about 7,5 inch
1.HEAD
We use yarn in color N 01:
We fill the part in the process of knitting.
1.) 6 sc in AR (6)
2.) 6 inc (12)
3.) (1 sc , inc)*6 (18)
4.) 1 sc, inc, (2 sc, inc)*5, 1 sc (24)
5.) (3 sc, inc)*6 (30)
6.) 2 sc, inc, (4 sc, inc)*5, 2 sc (36)
7.) (5 sc, inc)*6 (42)
8.) – 13.) 42 sc (42, 6 rows)
14.) 5 sc, dec (36)
15.) 2 sc, dec, (4 sc, dec)*5, 2 sc (30)
16.) (3 sc, dec)*6 (24)
17.) 1 sc, dec, (2 sc, dec)*5, 1 sc (18)
18.) (1 sc, dec)*6 (12)
Next, we knit 2 dec, sl st, leave the thread in order to tighten the hole.
We tighten the hole by threading a needle into each front half-loop, as shown in the photo, remove (hide) the thread in the product, cut it off.
The example shows how to tighten the hole.
Photos on the next page.
2. EARS (2 details)
We do not fill in the details.
We knit one eyelet from 1 to 7 rows of gray yarn.
1.) 6 sc in AR (6)
2.) 6 inc (12)
3.) (1 sc, inc)*6 (18)
4.) – 5.) 18 sc (18, 2 rows)
6.) (1 sc, dec)*6 (12)
7.) – 8.) 12 sc (12, 2 rows)
9.) dec, 10 sc (11)
10.) 6 sc, dec, 3 sc (10)
11.) – 12.) 10 sc (10, 2 rows)
Knit 2 more sc, sl st. We fix the thread, cut it off.
If desired, the ear can be glued / sewed decor
3. RIGHT LEG
We use white yarn.
We fill the part in the process of knitting.
1.) 6 sc in AR (6)
2.) 6 inc (12)
3.) – 8.) 12 sc (12, 6 rows)
We fix the thread, cut it off.
4. LEFT LEG
We use white yarn.
We fill the part in the process of knitting.
1.) 6 sc in AR (6)
2.) 6 inc (12)
3.) – 9.) 12 sc (12, 7 rows)
We fix the thread, cut it off.
Do not cut the thread, continue to knit.
5. BODY
We recruit 3 ch, 12 sc on the right leg,
3 sc – on transition,
12 sc – on the left,
3 sc – on the transition.
We put a marker, mark the beginning of the row.
1.) – 7.) 30 sc (30, 7 rows)
8.) (4 sc, dec)*5 (25)
9.) – 11.) 25 sc (25, 3 rows)
12.) 5 sc, dec, 10 sc, dec, 6 sc (23)
13.) – 14.) 23 sc (23)
Change the color to blue/lemon, continue to knit:
15.) (3 sc, inc)*5, 3 sc (28)
16.) – 17.) 28 sc (28)
We knit sl st, fix the thread, cut it off.
We turn off the blue part.
6. HANDS (2 PARTS)
Details are not filled.
We knit one hand according to the description:
Yarn gray / lemon color.
1.) 6 sc in AR (6)
2.) (1 sc, inc)*3 (9)
3.) – 5.) 9 sc (9, 3 rows)
Change the color to white.
6.) – 13.) 9 sc (9, 8 rows)
Fold the part in half and knit 4 sc. We fix the thread, cut it off.
We knit the second handle according to the above description with white yarn from 1 to 13 rows.
7. TAIL
We use white yarn.
1.) 6 sc in AR (6)
2.) 6 inc (12)
3.) 12 sc (12)
4.) (2 sc, dec)*3 (9)
We knit sl st, fix the thread, cut it off.
We fill the part a little.
8. PANTS FOR A BOY
We dial 30 ch, sl st we close the ring.
1.) 2 ch, 29 dc, sl st,
2.) 2 ch, 29 dc, sl st,
We continue to knit.
Gusset.
1.) 1 ch, 3 sc, turn
2.) 1 ch, 3 sc, turn
3.) 1 ch, 3 sc, сс
Sew / knit visually in the middle of the pants in the opposite direction.
Turned inside out.
9. SKIRT FOR GIRLS
We dial 30 ch, sl st we close the ring.
1.) 2 ch, 1 dc, 29 inc of dc, sl st
2.) 2 ch, 59 dc, sl st.
We fix the thread, cut it of
10. BOW FOR THE GIRL
In AR: 3 ch, 3 TC, 3 ch, sc,
3 ch, 3 TC, 3 ch, sl st
Tighten the AR, leave small tails. We tie a bow in the middle with tails, tie a knot, cut the thread.
11. Cheeks
In AR: 6 sc, sl st.
We tighten the hole.
We tie a knot with tails.


