Crochet Adorable Rooster

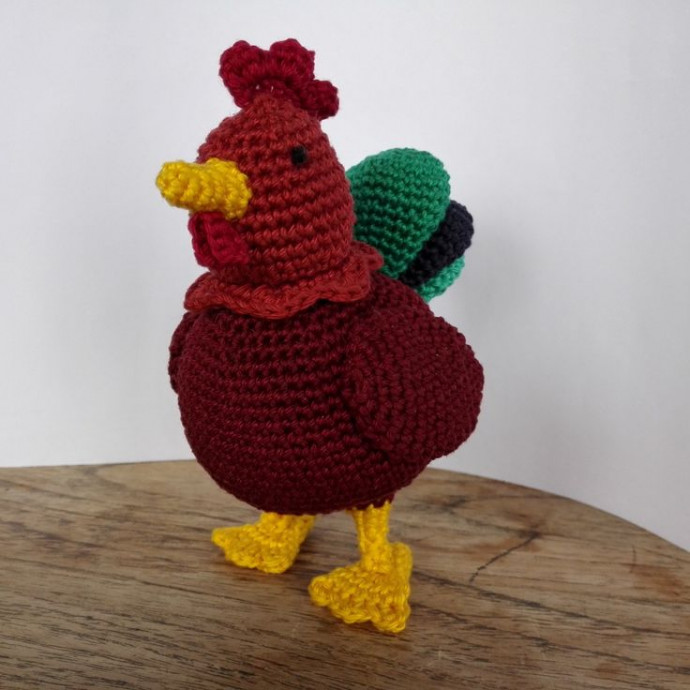
Crocheting an adorable rooster can be a delightful and rewarding project! With its vibrant colors and charming details, creating a crocheted rooster allows you to showcase your creativity and skill while adding a touch of whimsy to your home decor or gift-giving. From its cheerful comb to its fluffy tail feathers, each stitch brings this feathery friend to life.
Whether you're a seasoned crocheter or just starting out, crafting a lovable rooster is sure to bring a smile to your face and brighten up any space with its playful charm. So grab your hooks, yarn, and a sprinkle of creativity, and let's get crocheting our very own cuddly rooster!Skills required
- magic ring
- crocheting in spiral
- single crochet stitch (sc)
- increasing
- decreasing
- double crochet stitch
- half double crochet stitch
- slip stitch
- changing color
Abbrevations
- sc – single crochet
- inc – increase
- dec – decrease
- dc – double crochet
- hdc – half double crochet
- slst – slip stitch
- sc n – single crochet n times
- [inc, sc] 6x – repeat the thing between the brackets 6 times
- (dc,sc) – do the thing between the brackets in one stitch
- (36) – at the end of the round, you will have 36 stitches
You will need
- 2,5mm crochet hook (size 1/B in US, size 12 in Canada)
- 125g/50m 100% cotton yarn (also called sport, 12wpi or 5 ply) in colors:
- body-color (I used a reddish brown) – I used 11 gram/28 meter for the body and 3 gram/8 meter per wing
- head-color (I used a lighter brown) – I used 5 gram/13meter
- yellow – I used 4 gram/10 meter
- red – I used 1-2 gram/5 meter
- tail colors (I used 2 shades of green and a dark blue, but you can choose to do them all the same color or all a different color) – I used 4 gram/10 meter for the large, 3 gram/8 meter for the medium and 2 gram/5 meter for the smallers
- black for embroidering the eyes – Just a tiny scrap
- Stuffing (this can be polyester fiberfill, fabric scraps or the inside of an old pillow)
- yarn needle, scissors
Of course you can use any yarn, as long as you change the size of your crochet hook accordingly. You can look at pictures of roosters and see what colors you think are best for your rooster!
TAIL
The tail is made in 3 parts, you can choose different colors for each part or make them all the same color. After making the tail, the largest part is sown on closest to the head, the others closer to the rear.
small
- sc6 in ring (6)
- inc 6x (12)
- [inc, sc3] 3x (15)
- [inc, sc4] 3x (18)
- sc18 (18)
- sc18 (18)
- sc18 (18)
- [dec, sc4] 3x (15)
- [dec, sc3] 3x (12)
- Finish off, leave no tail
medium
- sc6 in ring (6)
- inc 6c (12)
- [inc, sc] 6x (18)
- [inc, sc2] 6x (24)
- sc24 (24)
- sc24 (24)
- sc24 (24)
- [dec, sc6] 3x (21)
- [dec, sc5] 3x (18)
- sc18 (18)
- [dec, sc4] 3x (15)
- [dec, sc3] 3x (12)
- Finish off, leave no tail
large
- sc6 in ring (6)
- inc 6c (12)
- [inc, sc] 6x (18)
- [inc, sc2] 6x (24)
- [inc, sc3] 6x (30)
- sc30 (30)
- sc30 (30)
- sc30 (30)
- [dec, sc3] 6x (24)
- [dec, sc6] 3x (21)
- sc21 (21)
- [dec, sc5] 3x (18)
- [dec, sc4] 3x (15)
- [dec, sc3] 3x (12)
- Finish off, leave no tail

WINGS 2x (body color)
- sc6 in ring (6)
- [inc, sc] 3x (9)
- [inc, sc2] 3x (12)
- [inc, sc3] 3x (15)
- [inc, sc4] 3x (18)
- sc18 (18)
- [inc, sc5] 3x (21)
- sc 21 (21)
- sc 21 (21)
- sc 21 (21)
- sc 21 (21)
- [inc, sc6] 3x (24)
- [dec, sc2] 6x (18)
- [dec, sc] 6x (12)
- dec 6x (6)
- Finish off and leave a tail for sewing
FEET
You can choose to make a standing or sitting rooster. If you want a standing version, you have to make legs as well as feet. For the feet you can choose to make them with or without toes!
FEET 2x (easy sitting version, no toes, yellow)
- sc6 in ring (6)
- [inc, sc2] 2x (8)
- sc8 (8)
- [inc, sc3] 2x (10)
- sc10 (10)
- [inc, sc4] 2x (12)
- sc12 (12)
- dec 6x (6)
- Finish off and leave a tail for sewing
FEET 2x (intermediate standing version, with toes, yellow)
- sc4 in ring (4)
- sc4 (4)
- [inc, sc] 2x (6)
- [inc, sc2] 2x (8)
- sc8 (8)
- [inc, sc3] 2x (10)
- [inc, sc4] 2x (12)
- [inc, sc5] 2x (14)
Fold this and work in 2 loops at a time
- sc6, ch1, turn
- (hdc, hdc), (slst), ch1, (dc), (dc), ch1, (slst), (hdc, hdc, ch1, slst)
- Finish off and leave a tail for sewing
LEGS 2x (intermediate standing version, yellow)
START WITH YELLOW
- sc3 in ring (3)
- sc3 (3)
- sc3 (3)
- sc3 (3)
- inc, sc2 (4)
- [inc, sc] 2x (6)
- [inc, sc2] 2x (8)
CHANGE COLOR TO BODY-COLOR
- [inc, sc3] 2x (10)
- Finish off and leave a tail for sewing
BEAK (yellow)
- sc4 in ring (4)
- [inc, sc] 2x (6)
- sc6 (6)
- [inc, sc2] 2x (8)
- [inc, sc3] 2x (10)
- Finish off and leave a tail for sewing
WATTLE (red)
There are 2 ways to make the wattle and you only have to make one, so you can choose which one you prefer. The first attaches the wattle as you go. The second is easier, but you have to attach the wattle afterwards.
Attach as you go (intermediate)
- ch2, turn
- start in second stitch from hook: sc3
- Sow the yarn through a stitch in row 4 of the beak
- ch2 (as close to the beak as possible), turn
- start in second stitch from hook: sc3
- Sow the 2 tails into the inside of the beak and knot them
Attach later (easy)
- ch8, turn
- start in second stitch from hook: sc3, slst, sc3
- Finish off and leave a tail for sewing, sew the middle of this wattle to row 4 of the beak
COMB (red)
- ch7, turn
- start in second stitch from hook: sc6, ch2, turn
- start in third stitch from hook: (dc, dc), (sc, slst), ch2, (dc, dc, dc), ch2, (slst, sc), (dc,dc), ch2 (slst)
- Finish off and leave a tail for sewing
BODY+HEAD
The body is crocheted bottom-up, so you start with the body-color. In row 16, 18 and 20 we attach the tail to the bottom as we go.
- sc6 in ring (6)
- inc 6x (12)
- [inc, sc] 6x (18)
- [inc, sc2] 6x (24)
- [inc, sc3] 6x (30)
- [inc, sc4] 6x (36)
- [inc, sc5] 6x (42)
- [inc, sc6] 6x (48)
- [inc, sc7] 6x (54)
- sc 54x
- inc, sc2, inc, sc50 (56)
- sc, inc, sc2, inc, sc51 (58)
- sc2, inc, sc2, inc, sc52 (60)
- sc5, inc, sc54 (61)
- sc4, inc, sc56 (62)
- sc2, dec, sc5 through both sides of the tail (small) and through the body, dec, sc51 (60)
- sc2, dec, sc3, dec, sc51 (58)
- dec, sc5 through both sides of the tail (medium) and through the body, dec, sc49 (56)
- dec, sc54 (55)
- sc, sc5 through both sides of the tail (large) and through the body, dec, sc47 (54)
- [dec, sc3] 3x, sc24, [dec, sc3] 3x (48)
- sc48 (48)
- [dec, sc6] 6x (42)
- sc42 (42)
- [dec, sc5] 6x (36)
- [dec, sc4] 6x (30)
CHANGE TO HEAD-COLOR AND START STUFFING THE BODY
- [dec, sc3] 6x (24)
- sc24 (24) IN BACK LOOPS ONLY
- [inc, sc3] 6x (30)
- sc30 (30)
- sc30 (30)
- sc30 (30)
- sc30 (30)
- [dec, sc3] 6x (24)
- sc24 (24)
- sc24 (24)
- [dec, sc2] 6x (18)
ADD MORE STUFFING. Try not to overstuff the body, since this will make the rooster lose its shape.
- [dec, sc] 6x (12)
- dec 6x (6)
- Finish off, leave no tail
COLLAR (head color)
Crochet in the front loops of the body (row 28), which you previously left open. Bind the yarn to the loop you want to start in.
[skip, (5hdc), skip, slst] 6x
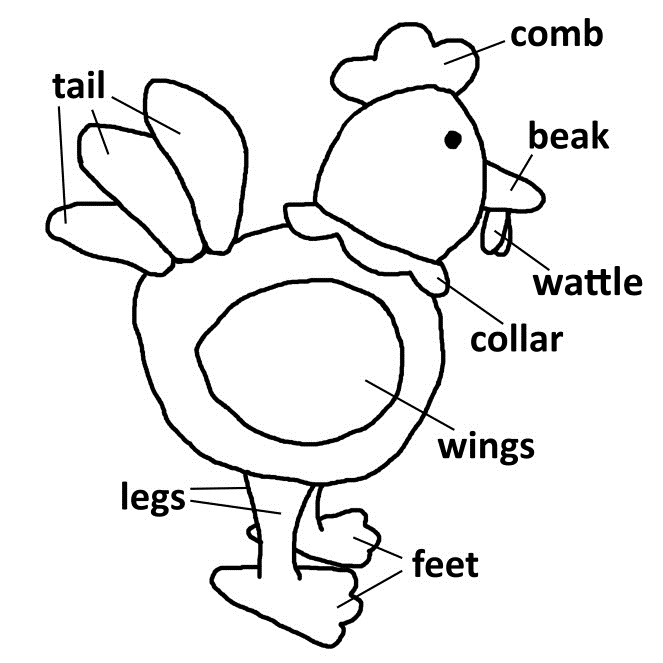
- The beak between row 6 and 10 of the head (counting from the top).
- The comb is placed between the first and 5th row of the head (counting from the top).
- The eyes (I did french knots) are placed on the 6th row of the head (counting from the top) with 9 stitches between them.
- The top of the wings is placed on row 24.
- The feet with legs are placed between row 6 and 9 with about 4 stitches between them. Make sure to tilt the body (and adjust the placement if necessary) so the rooster can stand on its own. If you are not making legs, the pointy side of the feet will be placed on row 10. I had about 4 stitches between the two feet.
