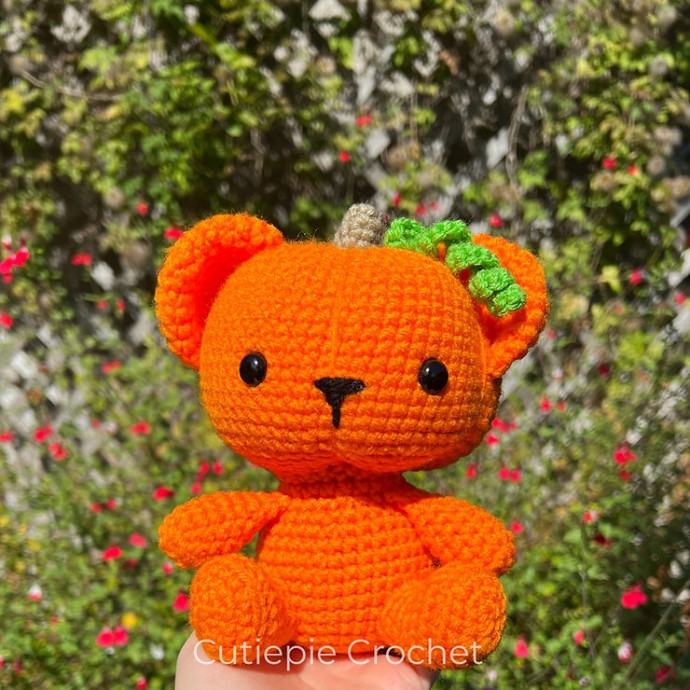
Crochet Pumpkin Bear Amigurumi

If you're looking to add some adorable fall charm to your home decor or give a unique handmade gift, consider the Crochet Pumpkin Bear Amigurumi! This delightful creation combines the coziness of a bear with the festive spirit of a pumpkin, making it a perfect companion for the autumn season. Whether you're an experienced crocheter or a beginner looking for a fun project, this cute amigurumi is a great way to flex your crafting skills and spread some seasonal joy.
For this pattern you will need:
-Worsted weight yarn (size 4)
-Polyester Fiber Fill
-3.75mm crochet hook
-Yarn needle
-Scissors
-Stitch markers
Abbreviations:
Mr- magic ring
St- stitch
Sc- single crochet
Inc- increase (sc twice in one stitch)
Dec- decrease (sc two stitches together)
BLO- sc in back loops only
Head:
Round 1: mr 6 [6]
Round 2: inc x6 [12]
Round 3: (sc 1, inc)x6 [18]
Round 4: (sc 2, inc)x6 [24]
Round 5: (sc 3, inc)x6 [30]
Round 6: (sc 4, inc)x6 [36]
Round 7: (sc 5, inc)x6 [42]
Round 8: (sc 6, inc)x6 [48]
Round 9: (sc 7, inc)x6 [54]
Round 10: (sc 8, inc)x6 [60]
Rounds 11-21: sc around [60]
*Insert safety eyes in between rounds 17 and 18, 11 st apart*
Round 22: (sc 8, dec)x6 [54]
Round 23: (sc 7, dec)x6 [48]
Round 24: (sc 6, dec)x6 [42]
Round 25: (sc 5, dec)x6 [36]
Round 26: (sc 4, dec)x6 [30]
Round 27: (sc 3, dec)x6 [24]
Tie off, leaving an extra long tail for sewing. Stuff to medium firmness.
Body:
Round 1: mr 6 [6]
Round 2: inc x6 [12]
Round 3: (sc 1, inc)x6 [18]
Round 4: (sc 2, inc)x6 [24]
Round 5: (sc 3, inc)x6 [30]
Round 6: (sc 4, inc)x6 [36]
Round 7: (sc 5, inc)x6 [42]
Rounds 8-12: sc around [42]
Round 13: sc 6, dec, (sc 12, dec)x2, sc 6 [39]
Round 14: (sc 11, dec)x3 [36]
Round 15: sc 5, dec, (sc 10, dec)x2, sc 5 [33]
Round 16: (sc 9, dec)x3 [30]
Round 17: sc 4, dec, (sc 8, dec)x2, sc 4 [27]
Round 18: (sc 7, dec)x3 [24]
Tie off. Leave a long tail for sewing. Stuff firmly.
Stem:
In Brown
Round 1: mr 6 [6]
Round 2: BLO sc around [6]
Round 3: (sc 1, inc)x3 [9]
Rounds 4-5: sc around [9]
Round 6: sc 3, inc x3, sc 3 [12]
Tie off, leaving a long tail for sewing. Stuff lightly.
Vine:
In Green
Ch 20
In 2nd ch from hook: sc 3x in each of the first 5 st, inc x13, sc 1
Tie off, leaving a long tail for sewing. [42]
Ears (x2):
Round 1: mr 6 [6]
Round 2: inc x6 [12]
Round 3: (sc 1, inc)x6 [18]
Round 4: (sc 2, inc)x6 [24]
Round 5: (sc 3, inc)x6 [30]
Rounds 6-7: sc around [30]
Tie off, leaving a long tail for sewing.
Arms (x2):
Round 1: mr 6 [6]
Round 2: inc x6 [12]
Rounds 3-7: sc around [12]
Round 8: (sc 2, dec)x3 [9]
Round 9: sc around [9]
Stuff lightly. Sc opening in half, tie off, leaving a long tail for sewing.
Legs (x2):
Ch 5
Round 1: (starting in 2nd ch from hook) sc 3, inc, (flip work and crochet on the un-worked side of ch) sc 3, inc [10]
*You are now working in the round*
Round 2: (sc 1, inc)x5 [15]
Round 3: (sc 2, inc)x5 [20]
Round 4: BLO sc around [20]
Round 5: sc around [20]
Round 6: sc 6, dec x4, sc 6 [16]
Round 7: sc 5, dec x3, sc 5 [13]
Round 8-9: sc around [13]
Tie off, leaving a long tail for sewing. Stuff lightly.
Tail:
Round 1: mr 6 [6]
Round 2: inc x6 [12]
Round 3-4: sc around [12]
Stuff lightly. Sc opening in half, tie off, leaving a long tail for sewing.
Assembly:
Attach the body to the base of the head with the open sides together and sew through both loops of the last row of either piece to connect.
-Using a yarn needle and the extra long tail from the head, (keeping the yarn in a straight line) bring the needle up to the top of the head and out through the bottom where you want the next line to be. Pull the yarn tight enough to make an indent, but not so tight that you snap the yarn. Repeat this step to make as many bumps on your pumpkin as you want. And then embroider the nose.
Sew the stem onto the top center of the head, attach ears after that, then add the vine, attaching it to the base of the stem.
Pin arms and legs into place to ensure they’re all lined up properly, and the bear can sit up on its own, then sew everything down.
-Finish up by adding the tail to the lower center back of the bear.
-After you finish sewing everything down, you are all done!
