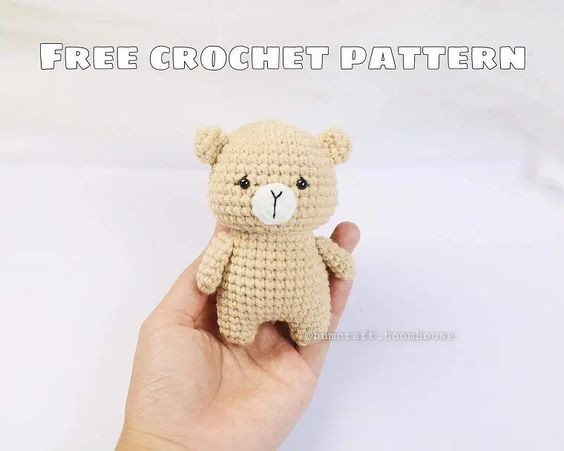
Crochet Amigurumi Mini Bear

The Crochet Amigurumi Mini Bear is an adorable and fun project for any crochet enthusiast. These miniature bears are perfect for displaying on a shelf, giving as a unique gift, or even adding a cute touch to your keychain! The process of making them is not only enjoyable but also satisfying as you see a fluffy bear come to life with just a few simple crochet stitches.
You can customize your mini bears with different colors, styles, and even accessories like tiny bows or scarves to give them a unique personality. Creating these little cuties is a great way to unwind, get creative, and spread some handmade charm to those around you. Grab your crochet hook and yarn, and let's get crafty with these Crochet Amigurumi Mini Bears!You will need:
- YarnArt Jeans yarn (55% cotton, 45% acrylic; 50 g/160 m) in light brown and white
- 2.25 mm crochet hook
- 5 mm safety eyes
- Black thread
- Sewing needle
- Pink beeswax crayon or makeup blush
- Some pins
- Scissors
- Fiberfill for stuffing
Free crochet mini bear pattern
Abbreviations:
R – row
ch – chain
sc – single crochet
inc – increase (2 sc in one stitch)
dec – decrease (2 sc together)
[…] – number of stitches you should have at the end of the row
(…) – repeat whatever is between the brackets the given number of times
Legs and body
Stuff as you go.
With brown yarn:
Legs (make 2)
R 1: 5 sc in magic ring [5]
R 2: (inc) repeat 5 times [10]
R 3: 10 sc
Fasten off.
Crochet the second leg, do not fasten off.
Make 5 ch and join with the first leg.
Continue crocheting the body in the round.
R 4: 10 sc on the 1st leg, 5 sc in 5 ch, 10 sc on the 2nd leg, 5 sc in 5 ch (opposite side) [30]
R 5-11: 30 sc (7 rows)
R 12: (8 sc, dec) repeat 3 times [27]
R 13-14: 27 sc (2 rows)
R 15: (7 sc, dec) repeat 3 times [24]
Fasten off and leave a long tail for sewing.
Head
With brown yarn:
R 1: 6 sc in magic ring [6]
R 2: (inc) repeat 6 times [12]
R 3: (1 sc, inc) repeat 6 times [18]
R 4: (2 sc, inc) repeat 6 times [24]
R 5: (3 sc, inc) repeat 6 times [30]
R 6: (4 sc, inc) repeat 6 times [36]
R 7-10: 36 sc (4 rows)
R 11: (5 sc, inc) repeat 6 times [42]
R 12-13: 42 sc (2 rows)
R 14: (5 sc, dec) repeat 6 times [36]
R 15: (1 sc, dec) repeat 12 times [24]
Stuff with fiberfill.
Fasten off.
Arms (make 2)
With brown yarn:
R 1: 5 sc in magic ring [10]
R 2: (inc, 1 sc) repeat 2 times, 1 sc [7]
R 3-6: 7 sc (4 rows)
Don’t stuff the arm.
Fasten off and leave a long tail for sewing.
Ears (make 2)
With brown yarn:
R 1: 5 sc in magic ring [5]
R 2: (inc) repeat 5 times [10]
R 3: 10 sc
Don’t stuff the ear.
Fasten off and leave a long tail for sewing.
Muzzle
With white yarn:
R 1: 5 sc in magic ring [5]
R 2: (inc) repeat 5 times [10]
Fasten off and leave a long tail for sewing.
Assembly
Sew the head to the body, arms on the sides of the body.
Sew the muzzle and ears to the head and embroider the nose and eyebrows with a black thread.
Add pink blush to the cheeks using a beeswax crayon or makeup blush.
