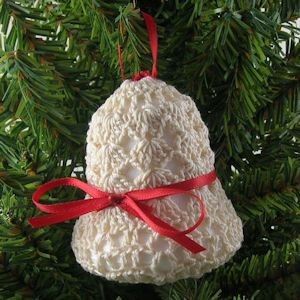
Crochet Simple Bell Ornament

Crochet Simple Bell Ornaments are a delightful addition to any holiday decor! They come in various colors and designs, making them a fun and customizable project for crafters of all skill levels. Whether you're an experienced crocheter or just starting out, creating these charming ornaments is a great way to add a personal touch to your home during the festive season. With a few simple stitches and some yarn, you can make beautiful bells that will bring joy and warmth to your space. So grab your crochet hook, pick out your favorite yarn colors, and get ready to craft some magical ornaments that will surely make your holiday season merry and bright!
Materials Needed
Size 10 crochet cotton in ecru
Size 7 steel crochet hook
1 plain foam bell ornament 2½"x2"
1/8th" satin ribbon, about 18"
2 straight pins, one with a small red ball on one end
Tapestry Needle for weaving in ends
Yarn Thickness: 10thread
Gauge: 8sc = 1"
Finished Size: 2½" x 2"
Skill Level: Beginner to intermediate
Instructions
RND 1: Ch6. Join w/slst to first ch to form ring. Ch3, 17dc in ring. Join w/slst to top of ch3.
RND 2: Ch4. *Dc in next dc, ch1. Rep from * around. Join w/slst to 3rd ch of ch4.
RND 3: Slst into the next ch1 sp. Ch3, 2dc, ch2, 3dc in same sp. Sc in next ch1 sp. *3dc, ch2, 3dc in next ch1 sp. Sc in next ch1 sp. Rep from * around. Join w/slst to top of ch3.
RND 4-6: Slst into each of the next 2 dc and into the next ch2 sp. Ch3, 2dc, ch2, 3dc in same sp. *3dc, ch2, 3dc in each ch2 sp around. Join w/slst to top of ch3.
RND 7: Ch3. Dc, ch2, dc in next ch2 sp. Sk next 2 dc. Dc in next dc. *Dc in next dc. Dc, ch2, dc in next ch2 sp. Sk 2 dc. Dc in next dc. Rep from * around. Join w/slst to top of ch3.
RND 8&9: Ch3. Dc, ch2, dc in next ch 2 sp. Sk next dc. Dc in next dc. *Dc in next dc. Dc, ch2, dc in next ch2 sp. Sk next dc. Rep from * around. Join w/slst to top of ch3.
RND 10: Slst in each of the next 2 dc. Slst into the next ch2 sp. Ch3, 2dc, ch2, 3dc in same sp. 3dc, ch2, 3dc in each ch2 sp around. Join w/slst to top of ch3. At this point, slip foam bell into work so the top of the bell is where RND 1 is.
RND 11: Slst into each of the next 2 dc and into the next ch2 sp. Ch1. Sc in each ch2 sp around to close bottom of bell. Join w/slst to ch1. Fasten off and weave ends into work.
Finishing
STEP 1: Tie one end of the ribbon into a bow and trim the long end to match the other tail end's length. Stick the red balled pin through the center and set it aside. You are going to use this to secure the other piece of the ribbon to the bell.
STEP 2: Stick the other pin through one end of the ribbon and stick it part way, into the bell at the narrowest part, wrap the ribbon around the bell to meet the pinned end, make sure the ends cross over, while holding the long end over the pinned end, stick the pin of the bow through both layers right next to the other pin, stick it all the way in. Trim the long end of the ribbon, close to the bow. Pull the other pin back out, the one that is NOT red.
STEP 3: Attach the rest of the ribbon to the top of the bell to be the hanger. Do it how ever you want to. I used my crochet hook to pass both ends through opposite stitches at the top, tied a knot, trimmed the ends then pulled up the loop to secure it.
