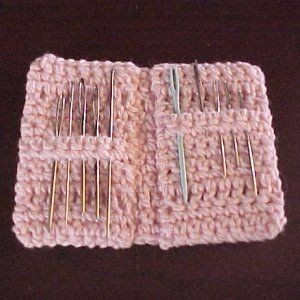
How to Make a Crochet Yarn Needle Case

Crochet Yarn Needle Cases: Organization and Charm
Crochet yarn needle cases are a crocheter's best friend! Not only do they keep all your needles organized in one place, but they also add a touch of charm to your crafting accessories. These adorable cases come in all sorts of designs and colors, making it fun to pick one that matches your style. No more hunting for needles at the bottom of your project bag or getting pricked by loose needles when you have a cute and handy needle case to keep everything in order. With a crochet yarn needle case by your side, you can focus more on creating beautiful crochet projects and less on searching for the right needle size.
Materials Needed
- Worsted weight cotton yarn - Pink or desired color (About 1 oz.)
- 2 large coffee can lids
- 1 Sharpie or permanent black marker
- 1 business card
- Sharp scissors for cutting plastic
- Size G/6 aluminum crochet hook
- Yarn needle
Specifications
Yarn Thickness: 3mm
Gauge: 9sc = 2"
Finished Size: 2.5"x3.75" closed; 4.75"x3.75" open
Skill Level: Intermediate
Instructions
ROW 1: Ch39. Sc in 2nd ch from hook and in each ch across. Ch1, turn.
ROW 2: Sc in each sc across. Ch3, turn.
ROW 3: Sk first sc. Dc in each sc across. (38 sts.) Ch1, turn.
ROW 4: Sc in each dc across. Sc in top of ch3. Ch1, turn.
ROWS 5-10: Sc in each sc across. Ch1, turn. At the end of row 10, ch3, turn.
ROW 11: Sk first sc. Dc in each sc across. Ch1, turn.
ROW 12: Sc in each dc across. Sc in top of ch3. Ch1, turn.
ROW 13: Sc in each sc across. Ch1. Fasten off. Weave ends into work.
Finishing Touches
Step 1
Use the business card as a template. Trace the business card onto the 2 plastic lids and cut them out. Set aside.
Step 2
Pick up the crochet work. Lay it down in front of you so that the starting row is on the bottom. Count in 9 stitches from both sides on the first row and last row, and mark the 10th stitch with a scrap of contrasting yarn.
Step 3
Fold the piece at the marked stitches to form a double door type thing. Do not cover the center 2 stitches. Refer to the picture for clarity. Pin the flaps in place to secure them.
Step 4
Stitch the flaps to the back along the top and bottom of the piece, with an overhand or whip stitch, to form a little book that has open side pockets inside it.
Step 5
Tuck the plastic rectangles into each pocket and stitch the pocket closed to hide the plastic. Refer to the picture to see how to store your needles in it.
Optional Enhancement
You might want to sew a ribbon to it for keeping it closed. Just sew the center of the ribbon to the spine and tie it on the open side into a bow to keep it closed.

