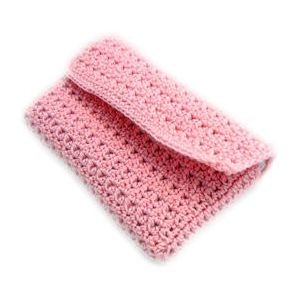
Crochet Thermal Stitch Business Card Holder

The Crochet Thermal Stitch Business Card Holder is a charming and practical accessory for any professional. This handmade piece combines functionality with style, showcasing intricate crochet work that adds a personal touch to your networking game. Perfect for storing your business cards in a neat and eye-catching manner, this holder is both durable and visually appealing.
Whether you're attending a meeting or a networking event, this unique accessory will surely make a statement and leave a memorable impression on your clients and colleagues. Add a touch of creativity to your professional arsenal with the Crochet Thermal Stitch Business Card Holder, showcasing your personality and attention to detail in a delightful and unexpected way.Materials Needed
Size 10 crochet cotton. Red Heart Classic in Orchid pink was used in the example
Size 7 steel crochet hook
Tapestry needle for weaving in ends and finishing
Yarn Thickness: 10thread
Gauge: 10sc = 1"
Finished Size: 3.5" x 2.25" x 5/8"
Skill Level: Intermediate
Special Stitch Scfbb Single Crochet Front Back Bobble: Insert hook in back lp only of next st. yo, draw up a loop. You will now have 2 lps on hook. Yo, draw through one lp on hook. Now, insert hook in front lp of same stitch from the inside toward you, yo draw up a lp. You should now have 3 lps on hook. Yo and pull through all 3 lps on hook
Instructions
ROW 1: Ch35. Sc in 2nd ch from hook and in each ch across. Ch1, turn. (34sc)
ROW 2-45: Scfbb in first st. Hdc in next st. *Scfbb in next st. Hdc in next st. Rep from * across. Ch1, turn.
ROW 46: Sc in each st across. Do not turn and do not fasten off. Now you will work a round of sc around the perimeter.
RND 1: Ch1 to turn the corner. Sc in first row and in each row down left side. You should have 46 sc on the left side. Ch1 to turn the corner. Sc in each st across the bottom, a total of 34 sc. Ch1 to turn corner. Sc in each row up the right side a total of 46 sc. Ch1, join w/slst to first sc of ROW 46. Do not fasten off. Ch3, turn to go back toward opposite corner.
Gusseted Sides
First Side: (Dc in each of the next 13 sc. Sk 2 sc. Slst in next sc. Sk 2 sc. Dc in each of the next 14 dc. Fasten off leaving a tail about 18" long for finishing.)
Opposite Side: Join pink to same row as the last row you worked the last dc in of the opposite side. Make sure the side that was facing you is the side that is facing you. You are going to be stitching from this point back down to the edge that you started the other gusset side.
Ch3. Rep between () of first side.
Finishing: Using a lacing stitch, stitch both sides closed by making sure only to stitch on the tops of the dc stitches. This will form a squared bottom on both sides.
Fasten off and weave all ends into back of work. Turn work inside out and slip your business cards inside.
