Crochet Adorable Socks: A Fun and Rewarding Experience

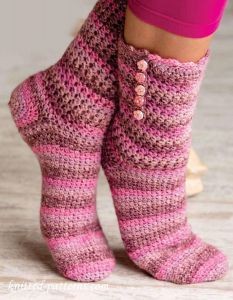
Crocheting adorable socks can be a delightful and rewarding experience for craft enthusiasts of all levels! Whether you're a seasoned crocheter or just starting out, creating your own cozy and charming socks can bring so much joy. The best part is that you have full creative control over the colors, patterns, and styles, allowing you to tailor each pair to your unique taste. With a little patience and creativity, you can craft one-of-a-kind socks that are not only stylish but also warm and comfortable. So grab your yarn, hook, and let's crochet some adorable socks that will keep your feet happy and cozy!
Finished Sizes
Instructions given fit size small; changes for medium, large, and X-large are in [ ].
Finished Measurements
Cuff: 7 inches tall
Leg Circumference: 7 inches (small) [8 inches (medium), 9 1/8 inches (large), 10 1/8 inches (X-large)]
Foot Circumference: 6 7/8 inches (small) [8 inches (medium), 9 inches (large), 10 1/8 inches (X-large)]
Materials
- Premier Yarns Deborah Norville Serenity Sock super fine (fingering) SUPER FINE weight wool/nylon/rayon yarn (1 3/4oz/230 yds/50g per skein); (1): 2 [2, 3, 3] skeins #2301 pink sugar
- Sizes D/3/3.25mm and E/4/3.5mm crochet hooks or size needed to obtain gauge
- Tapestry needle
- 10mm flat buttons with shank: 10
- Optional: 12mm flat-backed decorative novelty buttons: 10
- Washable craft glue
- Stitch markers: 3
Gauge
Star stitch with size E hook: 9 star stitches = 2 1/2 inches; 9 star stitch rounds = 2 1/2 inches
Foot pattern with size E hook: 6 stitches = 1 inch; 7 rounds = 1 inch
Pattern Notes
Work with size E hook unless otherwise stated.
Join with slip stitch as indicated unless otherwise stated.
Work in continuous rounds; do not turn or join unless otherwise stated.
Mark first stitch of round.
When working Heel Opening, the chain must be loose to keep the opening wide enough. Change hook size if necessary to keep chain stitches loose.
Place a marker in each side stitch of Toe and Heel to mark decreases. Move the marker up as work progresses.
Pattern Stitch
Star Stitch (multiple of 6 stitches)
Rnd 1: Yo, insert hook in first stitch, yo and pull up lp, yo, insert hook in next stitch, yo and pull up lp, sk next stitch, yo, insert hook in next stitch, yo and pull up lp, yo, pull through all 7 loops on hook, ch 1 (first star stitch made), *yo, insert hook in ch-1 eye of previous star stitch, yo and pull up lp, yo, insert hook in ch at base of same star stitch, yo and pull up lp, sk next stitch, yo, insert hook in next stitch, yo and pull up lp, yo, pull through all 7 loops on hook, ch 1 (next star stitch made), rep from * around, do not join (see Pattern Notes), place a marker (see Pattern Notes) in last stitch to mark beginning of round.
Rnd 2: [Yo, insert hook in ch-1 eye of previous star stitch, yo and pull up lp, yo, insert hook in stitch at base of same star stitch, yo and pull up lp, sk next stitch, yo, insert hook in next stitch, yo and pull up lp, yo, pull through all 7 loops on hook, ch 1] around.
Rep rnd 2 for Pattern Stitch.
Special Stitches
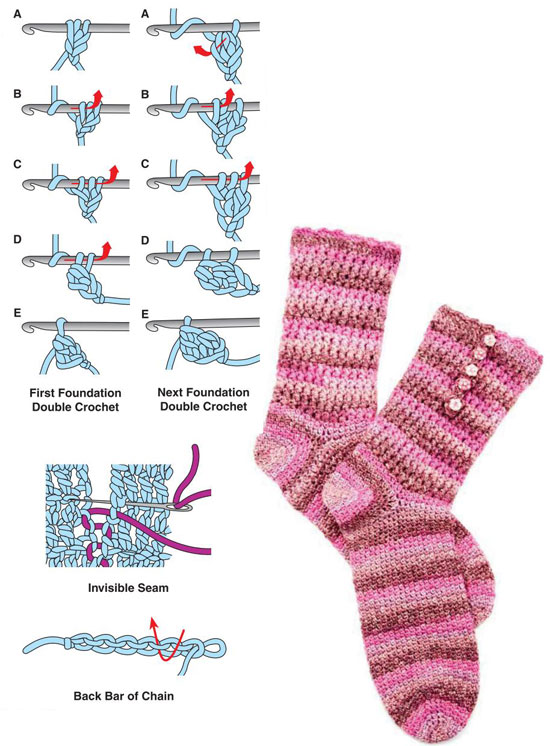
First foundation double crochet (first foundation dc): Ch 2, yo, insert hook into the 2nd chain from hook, yo, pull up lp, yo, pull through 1 lp on hook (ch-1 completed), [yo, pull through 2 loops on hook] twice (double crochet completed).
Next foundation double crochet (next foundation dc): *Yo, insert hook in last ch-1 made, yo, pull up lp, yo, pull through 1 lp on hook (ch-1 completed), [yo, pull through 2 loops on hook] twice (double crochet completed), rep from * as indicated.
Extended single crochet (ext sc): Insert hook in indicated stitch, yo, pull up lp, yo, pull through first loop on hook, yo, pull through 2 loops on hook.
Shell: (Sc, ch 2, 3 dc) as indicated in instructions.
Sock Instructions
Make 2.
Leg
Foundation rnd: First foundation dc, 47 [53, 59, 64] next foundation dc, join in top of beg ch-3 to form a ring. (48 [54, 60, 66] foundation dc stitches)
Rnd 1: Work rnd 1 of Star Stitch. (23 [26, 29, 32] star stitches)
Rnd 2: Work rnd 2 of Star Stitch.
Next rnds: Rep rnd 2 until the piece measures 7 inches from beginning, slip stitch in eye at the base of the stitch just made, do not fasten off.
Ankle
Rnd 1: [Sc in next stitch, ext sc in next stitch] 19 [22, 25, 28] times evenly spaced around the Leg, do not join, place a marker in last ext sc to mark the beginning of the next round. (38 [44, 50, 56] stitches)
Rnd 2: *Ext sc in next sc, sc in next ext sc, rep from * around.
Heel Opening
Rnd 1: Loosely chain 19 [22, 25, 28], skip next 19 [22, 25, 28] stitches, *sc in next ext sc, ext sc in next sc, rep from * around to beg chain. (38 [44, 50, 56] stitches)
Rnd 2: Ext sc in first chain, *sc in next chain, ext sc in next chain, rep from * around in remaining chains then continue in established pattern around in remaining stitches.
Foot
Rnd 1: *Sc in next ext sc, ext sc in next sc, rep from * around.
Rnd 2: *Ext sc in next sc, sc in next ext sc, rep from * around.
Rep last 2 rounds until Foot measures 2½ inches shorter than the total length of the actual foot measured from the back of heel to longest toe while standing.
Toe Shaping
Getting started: Fold Sock flat with Heel Opening centered at back. Work in established pattern to center back; do not join. Place marker to mark beginning of Toe. Place marker in each side stitch.
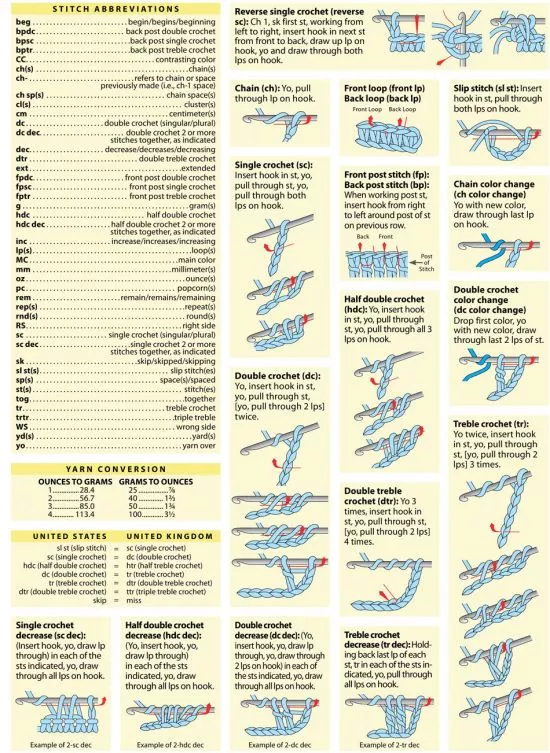
Rnd 1: *Work in established pattern around to 2 stitches before the first side marker, sc decrease in next 2 stitches, ext sc in marked stitch, sc decrease in next 2 stitches, rep from * once, continue in established pattern around. (34 [40, 46, 52] stitches)
Next rnds: Rep rnd 1 until 14 [16, 18, 20] stitches remaining.
Last rnd: Work in established pattern around.
Leaving a long end for sewing, fasten off.
Heel
Getting started: Fold Sock flat with Heel Opening centered at back and Leg down. With size D hook, join in first stitch on the right side of Heel Opening, work [sc in next stitch, ext sc in next stitch] 20 [23, 26, 29] times evenly spaced around. Work in established pattern to center back; do not join. Place marker to mark beginning of Heel. Place marker in each side stitch.
Rnd 1: *Work in established pattern around to 2 stitches before the first side marker, sc decrease in next 2 stitches, ext sc in marked stitch, sc decrease in next 2 stitches, rep from * once, continue in established pattern around. (36 [42, 48, 54] stitches)
Rnd 2: Work in established pattern around.
Rnds 4-7: [Rep rnds 1 and 2 alternately] twice. (28 [34, 40, 46] stitches)
Next rnds: Rep rnd 1 until 16 [18, 20, 22] stitches remaining.
Last rnd: Work in established pattern across to the next side, leaving remaining stitches unworked. Leaving a long end for sewing, fasten off.
Finishing
Using an invisible seam, sew Toe and Heel seams. Sew opening at the top of Cuff closed.
Cuff Edging
Getting started: Fold Sock flat with Heel facing and centered at the back of Foot and Leg up and Toe down. Place marker on outer left edge of 1 Sock and on outer right edge of the other Sock to determine left and right Socks.
Rnd 1: With size E hook, chain 15, working in the back bar of the chain, sc in the 2nd chain from hook, 3 dc in the same chain, [skip next 2 chains, shell in next chain] 4 times, working along the top edge of Leg with the right side facing, shell in marked stitch on Leg, [skip next 3 dc, shell in next dc] 12 [13, 15, 16] times, skip next 2 [4, 2, 4] stitches, shell in last stitch.
Fasten off.
Position beginning chain along the side of Leg with shells pointing toward back of Leg and pin in place. Sew 1 shank button in the center of each of the first 5 shells. Glue 1 novelty button on each shank button if desired. Wash Socks by hand to keep buttons from cracking.
Weave in all ends. Using a light setting, lightly steam-block Socks keeping the iron at least 5 inches above the surface.


