Charming Crochet Turkey Hat Napkin Rings for Thanksgiving

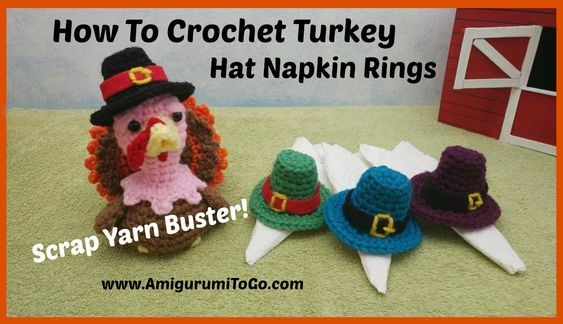
The crochet turkey hat napkin ring is a delightful and charming addition to any Thanksgiving table setting. This whimsical piece combines festive holiday spirit with practicality, adding a touch of fun to your dining experience. Handcrafted with care and attention to detail, the intricate design of the turkey hat napkin ring is sure to impress your guests and spark conversations. Whether you're hosting a formal dinner or a casual gathering, these adorable napkin rings will bring joy and warmth to the occasion. Embrace the holiday season with a sprinkle of creativity and humor by showcasing these cute and unique crochet turkey hat napkin rings on your table setting.
Supplies
To create your crochet turkey hat napkin rings, you will need the following materials:
- worsted weight yarn in any color - 12.5 yards will make 1 hat
- 12 inch strand of yellow or gold yarn for the buckle
- 4mm hook
- blunt end yarn needle for sewing
- scissors
- felt, ribbon or colored construction paper for the belt
- glue or needle and thread for attaching the belt
Abbreviations
- st = stitch
- sc = single crochet
- BLO = back loops only
- FLO = front loops only
- sl st = slip stitch
- f/o = finish off
Understanding the Rows
When working in the round, follow these steps:
Add a marker at the end of row 2 and move that marker each time you finish a row. Each row has a sequence. For example, "1sc then 2sc in next st" means to repeat that sequence throughout the row. The number inside the parentheses (~) represents the total stitches you should have at the end of that particular row.
Important Notes About This Pattern
I made a couple of the hats with one less row of sc, resulting in a slightly shorter hat. I couldn't decide which height I preferred, so I'll leave the choice up to you.
Hat Instructions
Follow these steps to create the turkey hat:
- Magic circle with 7sc (7)
- 2sc in each st (14)
- In the BLO 1sc in each loop (14)
- 1sc in each st for 1 row
- 1sc in the next 6st then 2sc in the next st (16)
- 1sc in each st for 1 row. *Skip row 7 for a shorter hat.
- 1sc in the next 7st then 2sc in the next st (18)
- 1sc in each st for 1 row
- In the FLO 2sc in each loop (36)
- 1sc in each st for 1 row
sl st next st and f/o weave in yarn tail by pulling the yarn tail through a loop on the inside of the rim, being cautious not to alter the shape of the rim. Then carry it out through the top of the hat, wrap over a row on top then bring it out through the side of the hat, pulling slightly until the top of the hat is flat. Knot off and bring the yarn tail inside the hat and cut short.
Making the Napkin Ring
If you are making this hat for the turkey only, do not add the chain (napkin ring).
For the napkin ring, make 1 using the same color as the hat:
- Ch14. Ensure that the starting yarn tail is long enough for sewing.
- f/o, leaving a tail for sewing.
Sewing the Chain to the Hat
Before adding the felt belt or ribbon:
Bring the one yarn tail inside the hat and come out between the 3rd and 4th row from the start of the rim. Sew the chain in place, securing it down to the rim with three holding stitches. Bring the yarn needle through the chain itself each time you go in and out of the hat. Once complete, knot off and weave the yarn tail under the chain inside the hat to prevent dangling, then cut short. Repeat this process with the other yarn tail directly across, ensuring the chain is not twisted.
Creating the Belt and Buckle
Wrap your chosen material for the belt around the hat with the ends overlapping slightly. The belt should be slightly less than half an inch wide.
Sew a yellow or gold yarn around the belt’s center at the front of the hat, starting from inside. Once finished, knot the yarn tails inside and cut them short. After sewing on the buckle, glue the two ends together using tacky glue, fabric glue, or hot glue. Alternatively, sew the ends using sewing thread and needle.