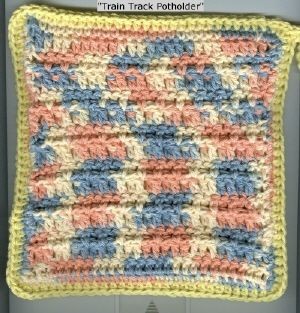
Crochet Train Track Potholder

If you're looking to add a touch of charm and whimsy to your kitchen, why not consider crafting a crochet train track potholder? This delightful project not only serves a practical purpose by protecting your hands from hot pots and pans but also brings a playful element to your cooking space. With its intricate design resembling a miniature train track, this potholder is sure to spark joy and conversation among your guests.
Whether you're a seasoned crocheter or new to the craft, creating a crochet train track potholder can be a fun and rewarding experience. So grab your yarn and crochet hook, and let your creativity chug along as you craft a unique and cheerful addition to your kitchen decor.Materials: Worsted Weight Cotton Yarn: Peaches & Crème for Main Color (MC), #166 Lullaby Ombre, 1 oz for Front; Yellow (CC) for Back and Border; Size G crochet hook
FRONT
Row 1: With MC chain 29, turn, dc in the 4th ch from hook and in each ch across. Ch 3, turn. (27)
Row 2: Dc in each dc across to the last dc, dc in the 3rd ch of the last dc. Ch 3, turn.
(FPDC = Front Post Dc)
Row 3: (FPDC around the post of the next dc in the row below, dc in the next dc) across, ending with a dc in the 3rd ch of the last dc. Ch 3, turn.
(FLO = Front Loop Only)
Row 4: Dc in the FLO of each dc across, ending with a dc in the 3rd ch of the last ch. Ch 2, turn.
Rows 5-13: Repeat Rows 3 & 4 alternately, ending with Row 3.
Row 14: (Dc in both loops across, ending with a dc in the 3rd ch of the last dc. At the end do NOT ch 3, do NOT turn.
BORDER: Work in rounds
Rnd 1: At the end of Row 14 ch 1, 3 sc in the same sp [first corner made]. (Sc evenly spaced across to the next corner, making 3 sc in next corner) around. Join with a sl st in the first sc. Finish off and weave in the ends.
BACK: With CC make the same as FRONT, Rows 1-14.
BORDER: Work in rounds.
Rnd 1: At The end of Row 14, ch 1, 3 sc in same sp [corner made], (Sc evenly spaced across to the next corner, making 3 sc in the next corner) around. Join with a sl st in the first sc. Finish off.
JOINING: Holding wrong sides together, with front (MC) facing you, working through both thicknesses, join CC with a sl st in the center st of any corner. Ch 2, hdc in the same st [corner made]. (hdc in each sc across to the next corner, making 3 hdc in next corner) around. Join with a sl st in the first hdc. Finish off and weave in ends.
To Add A HANGING LOOP: In any hdc corner, ch 14, sl st in the same hdc.
