CrochetMenScarvesHatsGlovesSweatersCardigansSocksOther clothingWomenScarvesHatsGlovesShawls and cover upSweatersCardigansSocksSlippersBagsOther clothingChildrenScarvesHatsGlovesSweatersCardigansSocksSlippersOther clothingHomeBlankets and plaidsRugsHome decorationsPetsSchemesKnittingOther hand-madeChat
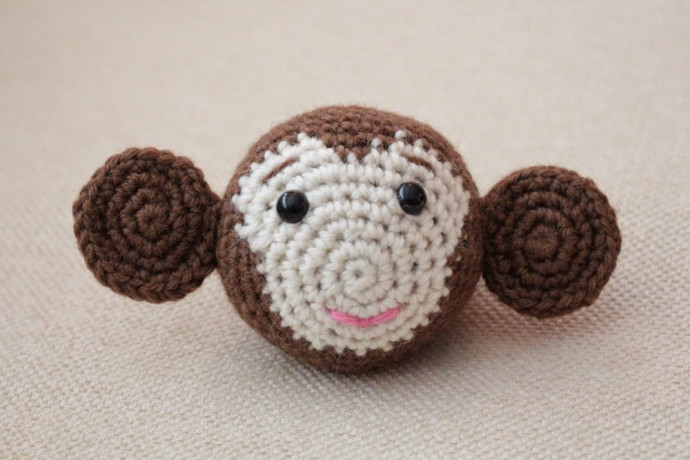
Crochet Beautiful Monkey

Crocheting a beautiful monkey can be a delightful and charming project for those looking to add a touch of whimsy to their creations. With its playful demeanor and adorable features, the crochet monkey can bring joy and laughter to anyone who beholds it. The intricacies of the crochet work allow for immense creativity and personalization, making each monkey truly unique. Whether you're a seasoned crocheter or a beginner, crafting this lovable monkey can be a rewarding experience filled with cuddly satisfaction. So grab your yarn, hook, and imagination, and let's create a little crochet friend that will surely bring a smile to your face.
You will need:
white and brown yarn (and a little bit of pink) in worsted weight
stuffing (polyfill or wool)
safety eyes
crochet hook (size A recommended but any hook up to size G will work)
stuffing (polyfill or wool)
safety eyes
crochet hook (size A recommended but any hook up to size G will work)
tapestry needle
Key:
Key:
Ch = chain
INC = 2 sc into one stitch
#INC = do # increases in a row
DEC = invisible decrease turns the next 2 sts into one st
# or sc# = separate sc stitches (no increasing or decreasing)
Begin here:
Start with brown yarn if you are doing the all brown face.
Start with white yarn if you are doing the white face.
R1 Magic circle with 6 stitches into the loop.
R2 INC around. (12)
R3 (1, INC) around (18)
R4 1, INC, 2, INC, 3, INC, 2, INC, 3, INC, 2 (23)
R3 (1, INC) around (18)
R4 1, INC, 2, INC, 3, INC, 2, INC, 3, INC, 2 (23)
R5 INC, 4, INC, 3, INC, 4, INC, 3, INC, 4 (28)
Skip to R6 below if you are doing the brown face.
Continue here if you are doing the white face.
When I say CHANGE on the next stitch, this means: insert hook, draw up a loop so there are 2 loops on your hook, yarn over WITH NEW COLOUR and pull the new colour through. This equals one stitch.
*R6 sc 3 (changing to BR on 1st st), INC, sc 5, CHANGE to WHITE on nx st (allow plenty of slack in the yarn you are carrying across the work), INC, sc 6, INC, sc 4, CHANGE to BR on nx st, sc, INC, 3 sc (32)
*R7 sc 5, INC, sc 5, CHANGE TO WHITE on nx st, sc 3, INC, sc 1, CHANGE TO BR on nx st, sc 1, CHANGE TO WH on nx st, sc 4, INC, CH to BR on nx st, sc 6 (35)
*R8 sc 3, INC, sc 9, CH to WH on nx st, INC, sc 3, CH to BR on nx st, sc 3, CH to WH on nx st, sc 3, INC, CH to BR on nx st, sc 7 (38) Go to R9 below.
Brown face only.
R6 3, INC, 6, INC, 6, INC, 6, INC, 3 (32)
R7 5, INC, 9, INC, 9, INC, 6 (35)
R8 3, INC, 10, INC, 11, INC, 8 (38)
Both white and brown faces, continue here until the end.
R9 12, INC, 25 (39)
R10 INC, 38 (40) place eyes between rounds 5 and 6.
R11 sc around
R12 38, DEC (39)
R13 25, DEC, 12 (38)
R14 8, DEC, 11, DEC, 10, DEC, 3 (35)
R15 6, DEC, 9, DEC, 9, DEC, 5 (32)
R16 3, DEC, 6, DEC, 6, DEC, 6, DEC, 3 (28) (FILL WITH STUFFING)
R13 25, DEC, 12 (38)
R14 8, DEC, 11, DEC, 10, DEC, 3 (35)
R15 6, DEC, 9, DEC, 9, DEC, 5 (32)
R16 3, DEC, 6, DEC, 6, DEC, 6, DEC, 3 (28) (FILL WITH STUFFING)
R17 4, DEC, 3, DEC, 4, DEC, 3, DEC, 4, DEC (23)
R18 2, DEC, 3, DEC, 2, DEC, 3, DEC, 2, DEC, 1 (18)
R19 (DEC, 1) repeat around (12)
R20 (DEC, 1) repeat around. Fasten off. Weave loose end through each stitch in the opening. Fill completely with stuffing. Pull tightly to close. Sew in your end.
R19 (DEC, 1) repeat around (12)
R20 (DEC, 1) repeat around. Fasten off. Weave loose end through each stitch in the opening. Fill completely with stuffing. Pull tightly to close. Sew in your end.
Ears(make 4 pieces with med brown yarn):
R1 Magic circle with 6 sts into the loop.
R2 INC around (12)
R3 (1, INC) six times around (18).
R4 (2, INC) six times around (24). Finish off. Make a second one this time leaving a tail about 14” long. Put both pieces against each other with the wrong sides facing in. Whipstitch the front and backs together. You should still have a tail remaining to sew onto the head. Repeat so you have two ears. Place on the head where you would like and sew the ears on.
Embroider mouth in pink between R3/4. To do this, poke pink yarn back and forth inside the head a few times to secure yarn. Then come out at one corner of the mouth and back in thru the other corner. Then come out in the centre of the mouth at the lowest point where you want your smile, catch the yarn of the mouth and go right back into the head at the same point but a few plies of yarn over to hold the stitch. Weave in the end. You can add eyebrows if you wish!!
No comments
Write a comment
